Introduction
The quality of the produced key is highly dependent on:
-
the green screen
-
the lighting
-
the camera
-
the position and clothing of the talent
Learn more about how to create a good keying setup
If you are using an external keyer, go to Configure using an external keyer
Academy Tutorial - Using the Pixotope Keyer
This tutorial showcases an older version of Pixotope.
Updates introduced in 23.3 improve the results shown in this video.
-
Looking at the different Keyer models
Workflow
Prepare
The video keyer is an easy-to-set-up real-time chroma keyer that you can use to key your video input.
-
Double-check that:
-
the camera system setup matches the physical camera
-
the camera system is routed to the correct machine
-
-
Go to PRODUCTION > Adjust > Video Keyer
-
Select the camera system
-
Click "Enable Video Keyer"
-
Position a talent or a stand-in person on the stage, or else use a dummy model with hair, as well as a water bottle to set the transparency
-
Zoom in tight on the head of the model, and adjust the focus so that the hair is clearly shown. Then zoom back out again without adjusting focus
Initialize key
-
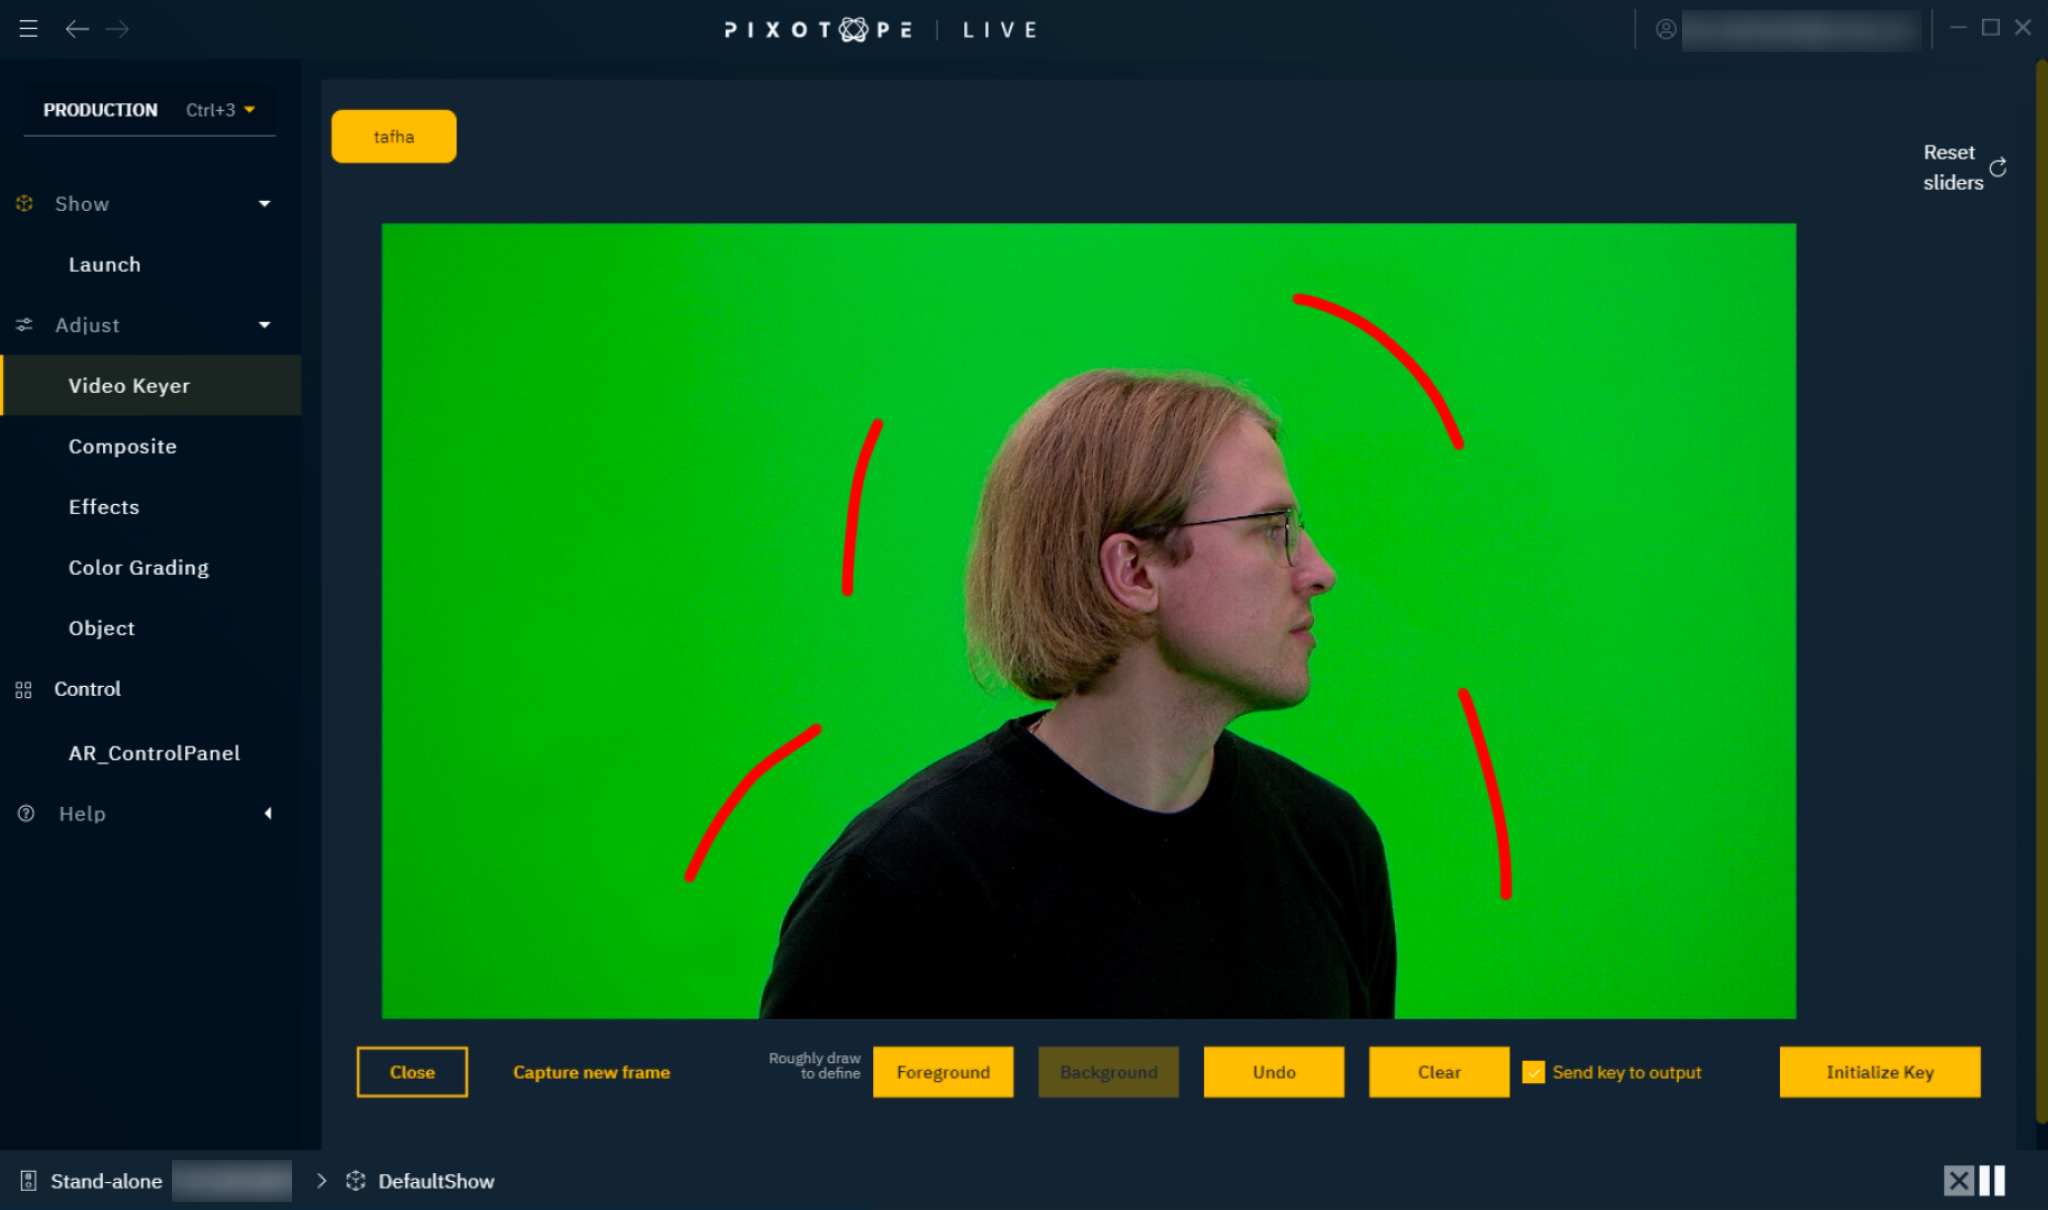
Click "Initialize key" to open the annotation view
-
Director grabs one image of the video feed
-
Tip: "Initialize in a new window" allows you to annotate and refine at the same time
Annotate
-
Draw on the image to select which colors are background and should be keyed out
-
These are typically the flat green values - do not select the dark greens on the floor if you wish to get contact shadows
-
It usually only needs a couple of strokes
-
If you want to recapture the image, just click "Capture new frame"
-
To delete all strokes use the "Clear" button
-
To undo your previous selection, press "Undo"
-
-
-
Click "Foreground" and then select any problematic colors i.e. those that are more difficult to key because they contain a significant amount of the main background color
-
Click "Initialize Key" once you are done
-
Select "Send key to video output" to examine the result to view the generated alpha on the video monitor
-
Select "Visualize alpha extremes" for a closer look at the alpha extremes
-
The fully opaque areas are displayed in light pink

-
-
-
Refine the initial key by selecting more colors. Keep monitoring the results and repeat several times as needed
-
Click "Close" when you are happy with the initial key
-
The image and its annotations are saved, so you can always come back to add more.
Don't forget to turn off "Send key to video output" when you are happy with your key.
The alpha channel can also be seen in the Editor if needed:
How to show the alpha channel in the Editor
In the Editor
-
Click the "Utilities" tab
-
Click Input video > Raw
-
Click "View"
-
Turn on Alpha
-
Turn off the Red, Green and Blue channels
-
-

Refine
Adjust Foreground
Increases the range of the foreground colors making it more opaque.
Adjust Background
Increases the range of the selected key colors cleaning up the background.

Ut: Adjust Foreground
Maintaining a good distance between the Background and Foreground sliders will ensure a good soft edge on the key. The best results are often found with theses sliders at 0 and 1 respectively.
Add Luma Key
Adds to the key based on the pixel luma value. The luminance reference is automatically generated from the locally closest backing color. Reducing it removes high contrast details (including noise).
This can help to fill in areas of a soft foreground region.
With a good initial pick of the background and foreground colors using the Labelling tool, there should be little need to adjust background and foreground controls. It is often preferable to fill holes in the foreground with a little Add Luma Key, rather than by hardening up the foreground.
Mask adjustments
Mask adjustments affect the Luma key, Adjust foreground/background does not.
Gamma
Controls the gamma of the alpha mask. Can be used to either bring back more details or clean up the background.
Gain
Controls the gain of the key increasing the value of the alpha. Can be used to make the foreground more opaque.
Detail Enhancement
Controls the strength of the effect. Increasing the level will help to include more details in the soft edges.
Fill adjustments
Edge correction
Edge correction removes edge artifacts, typically introduced by chroma subsampling and sharpening. It will replace unwanted dark/light edges with a color from the foreground, without affecting the silhouette of the foreground (unlike a mask erode, which will “shrink” the foreground and remove details).
The Edge correction filter is subpixel, to allow for fine control of the effect.
We always recommend turning off detail/sharpening filters on the camera when doing chroma keying (and adding it back after chroma keying using Pixotope’s built in detail filter), but sometimes that is not possible and halo/ringing artifacts are introduced in the source material.
Despill
The Despill controls allow you to vary the removal of the background color that has spilled into the foreground.
Despill intensity
Controls the strength of the spill removal. Reduce the value to see if any colors other than the background are being despilled as well. If you see other colors are being despilled, you can use the Cutoff control to correct that.
Low saturation despill
Enable more spill removal for low saturated areas. If you see remaing background color on skin tones or white props, you can enable this feature.
Despill Cutoff
Controls the range of colors that are despilled from the original background picked color. For example, yellow/light blue may also be despilled by default due to having a close color distance from green/blue screens. Adjusting the Cutoff can reduce the despill effect for those colors and so preserve the original foreground colors.
Despill Hue
Changes the hue of the despilled area.
Hue changes the hue angle of the range of the despilled colors. Use with care to preserve skin tones - it is generally better to use the Cutoff control rather than the Hue to preserve the original foreground colors.
Respill
Respill can improve the visual integration of the keyed object into the scene.
Respill color
Pick a custom color for the respill.
Only hue and saturation matters. The default is white.
Respill Edges
Blends parts of non-opaque areas, such as edges, with the background.
-
0 - no part of the background blended in
-
1 - graphics background is blended in to edge/fringe to match the level of the background in the source material
Respill Core
Replaces spill in the opaque foreground with the chosen respill color. It affects both luma and chroma.
To increase or decrease the luminosity, saturation, etc of the foreground, use the color grading panel. Learn more about how to Adjust color grading
Shadows
Removes respill from shadow areas to give darker shadows, while retaining fine details.
-
0 - respill everywhere
-
1 - exclude respill from most areas
More details about the Pixotope Keyer
Multiply fill with key
Go to Adjust Composite
Create presets
Use quick presets to try out and save different settings, and quickly switch between them while still editing.
Use named presets to save settings using custom names and recall them later through the control panel or the API.
Learn more about how to Use presets
Want to blend between 2 presets based on another value (e.g. FOV)? Check out Driving keyer parameters with camera (or other) values