Suggested setups
1 machine
-
Control + Render machine all in one
-
Erizos Server, Client and Agent
-
Pixotope with Erizos Plugin
-
No Local Preview possible.
2 machines
-
Control + Preview machine
-
Erizos Server, Client and Agent
-
Pixotope with Erizos Plugin - for local preview
-
-
Render machine
-
Pixotope with Erizos Plugin
-
3 machines
-
Control machine - less demanding HW, no need for powerful GPU
-
Erizos Server, Client and Agent
-
-
Preview machine
-
Pixotope with Erizos Plugin - for local preview/Client preview
-
-
Render machine
-
Pixotope with Erizos Plugin
-
For the 2 + 3 machines setup, we recommend to use Pixotope Synced Storage to keep projects sync between the different machines.
Install Erizos Agent and Plugins
The Erizos Agent and Erizos Plugins are now part of the Pixotope installer.
-
Select "Erizos Agent and Plugin" in the Pixotope installation
-
This installs the Erizos plugin and auto-starts the Erizos Agent service
-
Learn more about how to Install Pixotope
Create Motion Design assets
-
To get up to speed follow → Unreal’s Motion Design Quick Start Guide
-
Create Motion Design assets
-
Each "layer" will be a Motion Design level
-
The different levels will be related by the Transition Logic which is part of the Motion Design tools
-
There is no need to expose parameters through Remote Control Presets since this will be handled by the Erizos plugin.
Enable plugins
-
In Pixotope Editor go to Settings > Plugins
-
Enable both the "Erizos Tools" and "Erizos Tools for Motion Design" plugins
Create Motion Design level
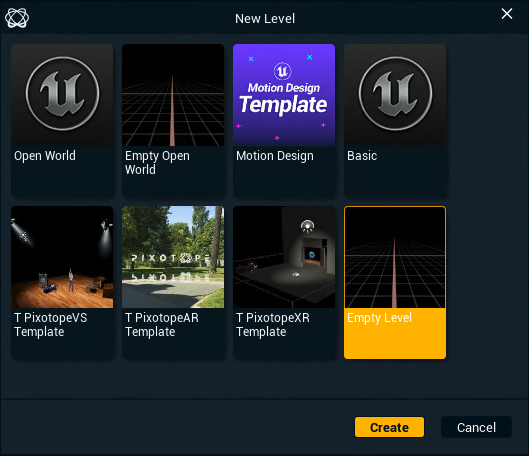
-
Create a new Empty Level
-
Add a "Control Motion Design" actor to the scene
-
Select the new actor in the Outliner and go to the Details panel
-
Go to Levels and add all the Motion Design levels (layers) that you have created for your CG graphic assets
-
Go to Pixotope World Settings
-
Change Compositing Type to "AR"
-
Change Video Outputs > Video Output to "Motion Design"
-
-
Save the level
-
we named it MainErizosExample, which will be the main level connecting with Erizos Studio to create templates
-
-
Start the level in PIE (Play In Editor)
Erizos Studio Client - Basic setup
-
Open the Erizos Studio Client
-
Go to Settings and enable the following
-
In General
-
Enter the IP Address of the Erizos Studio Server and enable Auto Login
-
-
-
Click on "Unlock Advanced Settings" and use the default admin/admin credentials
-
In Renderers
-
Enable Pixotope
-
If using Synced Storage to keep projects in sync
-
Select the Synced Storage folder (by default: C:\Pixotope\Synced Storage\Projects)
-
-
Otherwise
-
Select a network share all machines have access to
-
-
-
In Remote Preview
-
Add the machine where you have Pixotope Editor running with the newly created level using the Erizos plugin (Control Motion Design)
-
-
-
Go to the Template Manager
-
Click "Show Templates Browser" and navigate to your project
-
Find the level (MainErizosExample in our case) and click "Import"
-