Pixotope natively supports the DMX (Digital Multiplex) protocol, enabling real-time control of stage lighting within the engine. This documentation outlines the process of setting up and controlling a series of DMX lights using a basic Moving Head example. It details the necessary steps to configure DMX communication, create a Moving Head light, and program its behavior within Pixotope.
Check out our DMX example in the example projects
Prerequisites
-
DMX plugins enabled
-
DMX Engine
-
DMX Fixtures
-
DMX Protocol
-
DMX Control Console
-
-
Open Pixotope and create a new project (either "Blank" or "Virtual Studio")
-
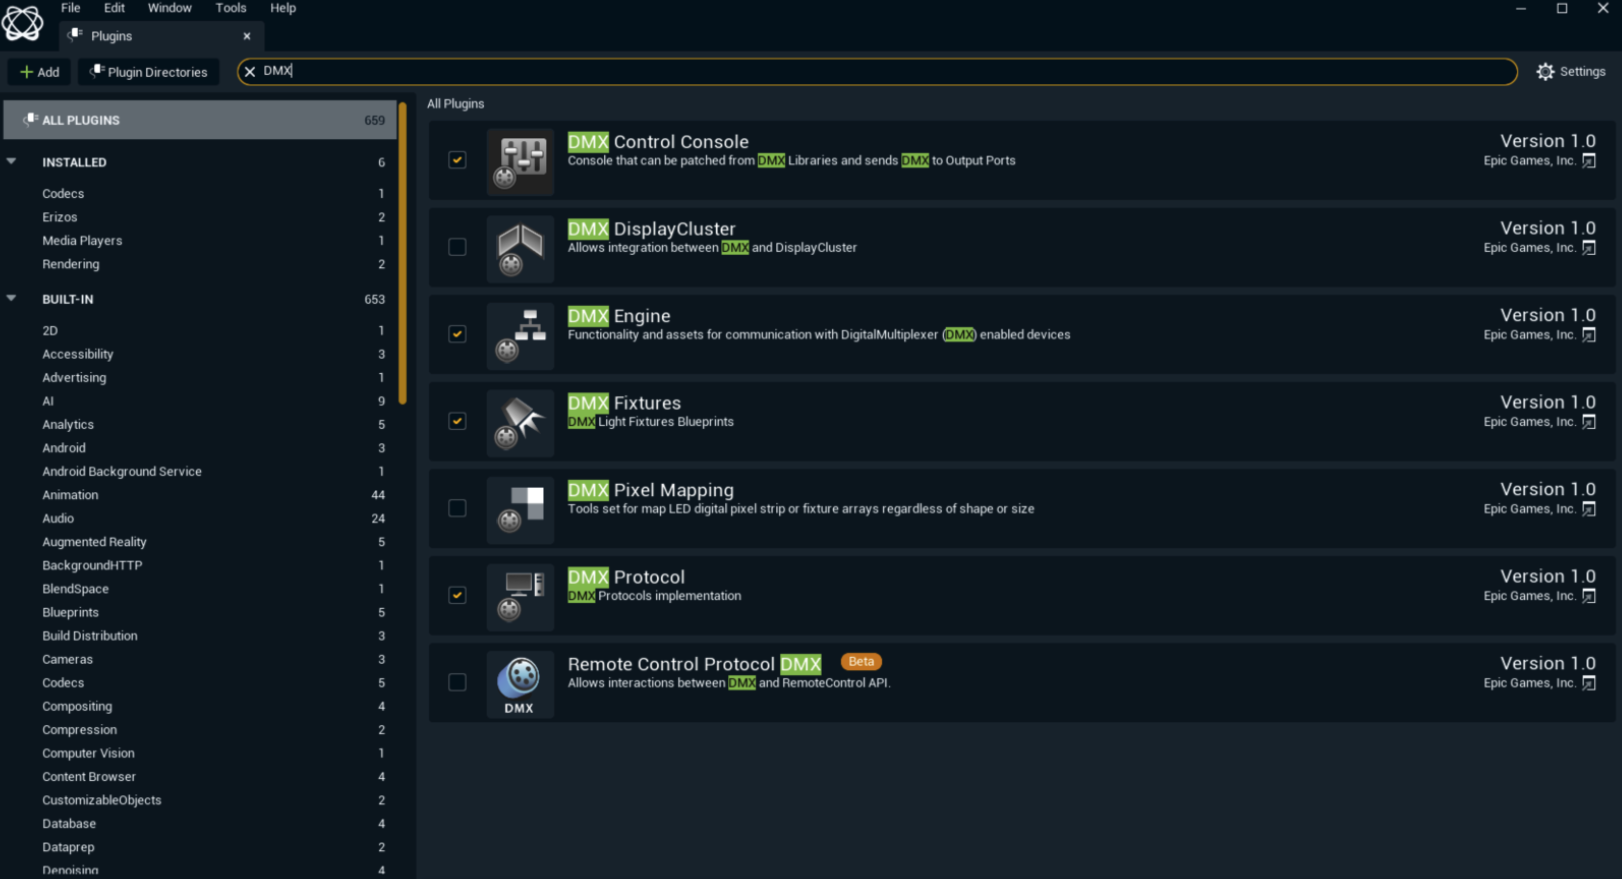
Go to Edit > Plugins
-
In the search bar, type "DMX" and enable the mentioned DMX plugins
-
Restart Pixotope to apply the changes
Step 1: Configure DMX communication
-
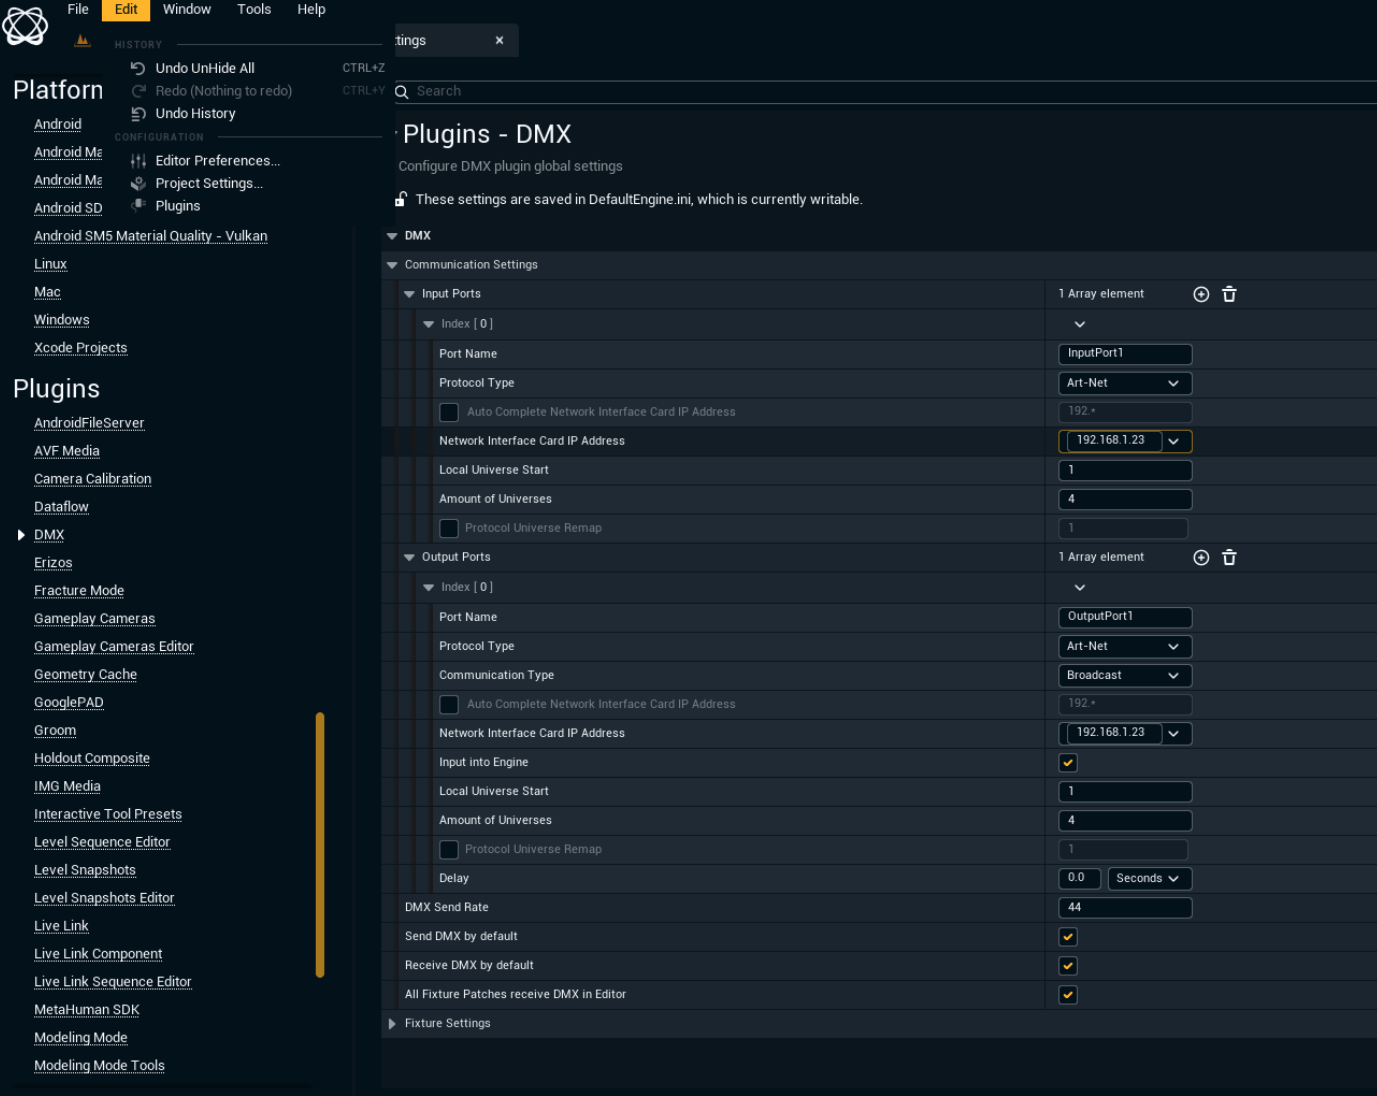
Open the Project Settings window under Edit > Project Settings
-
Search for the DMX section in the left sidebar
-
Under DMX Protocol, select the protocol you wish to use (Art-Net or sACN)
-
Configure the Network Interface to match your DMX network’s IP address
-
Save the changes
Step 2: Add a moving head light from plugin content
Pixotope includes pre-made DMX lighting assets as part of the DMX Fixtures plugin. Follow these steps to access and add it to the scene:
-
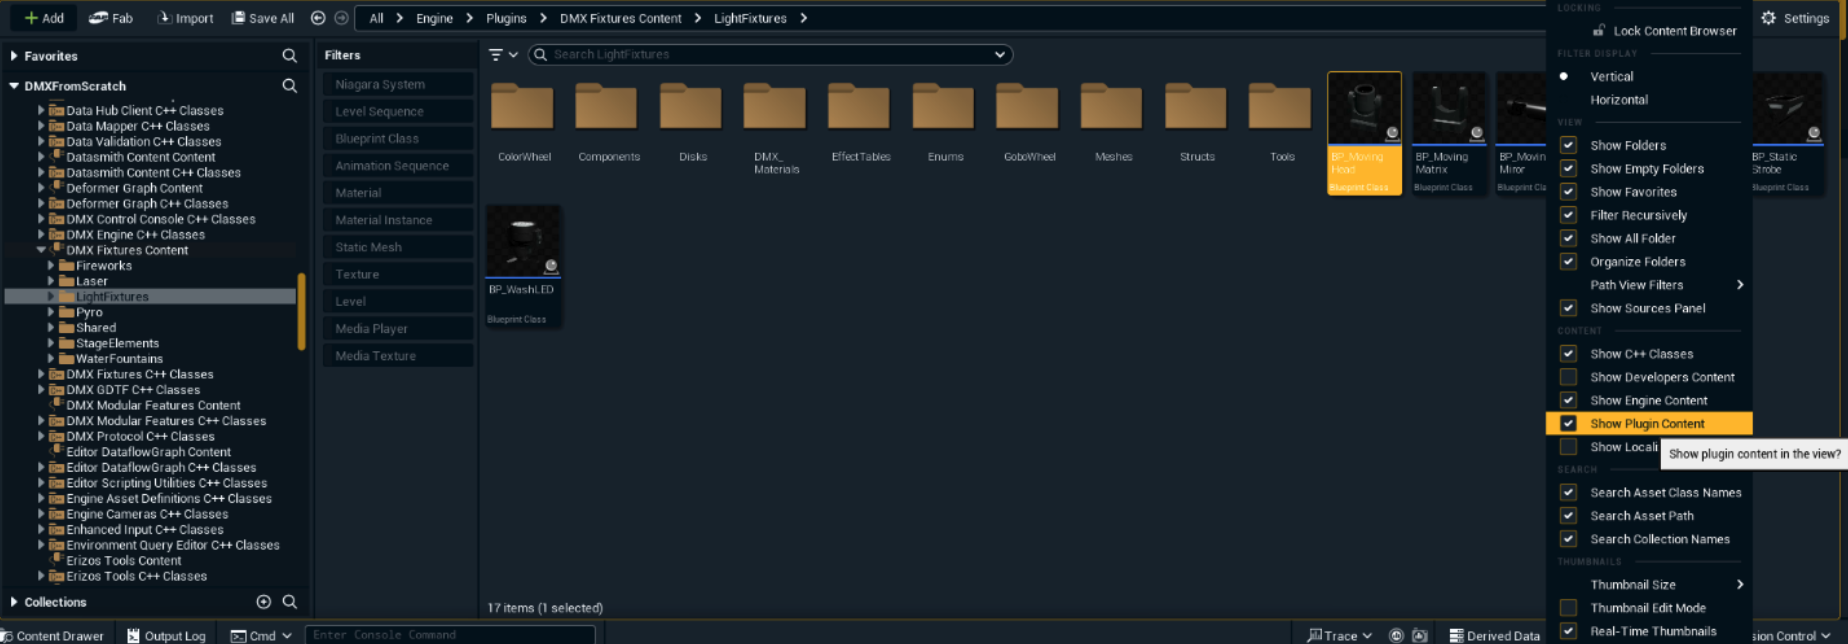
Enable Plugin Content Visibility:
-
Open the Content Browser
-
Click on the Settings (gear icon at the upper right corner)
-
Enable Show Plugin Content to display assets from installed plugins
-
-
Locate the Moving Head Fixture:
-
In the Content Browser, navigate to:
Plugins > DMX Fixtures Content > LightFixtures -
Locate BP_Moving Head fixture
-
-
Add the Moving Head to the Scene:
-
Drag the selected BP_Moving Head fixture into the Viewport
-
Adjust its position and rotation as needed
-
Step 3: Configure DMX functions/patches
The DMX Library allows for defining fixture types, assigning control modes, and mapping DMX functions to parameters such as Pan, Tilt, Dimmer, Color, and Zoom. Follow these steps to set up DMX control for the Moving Head fixture:
Create a DMX Library
-
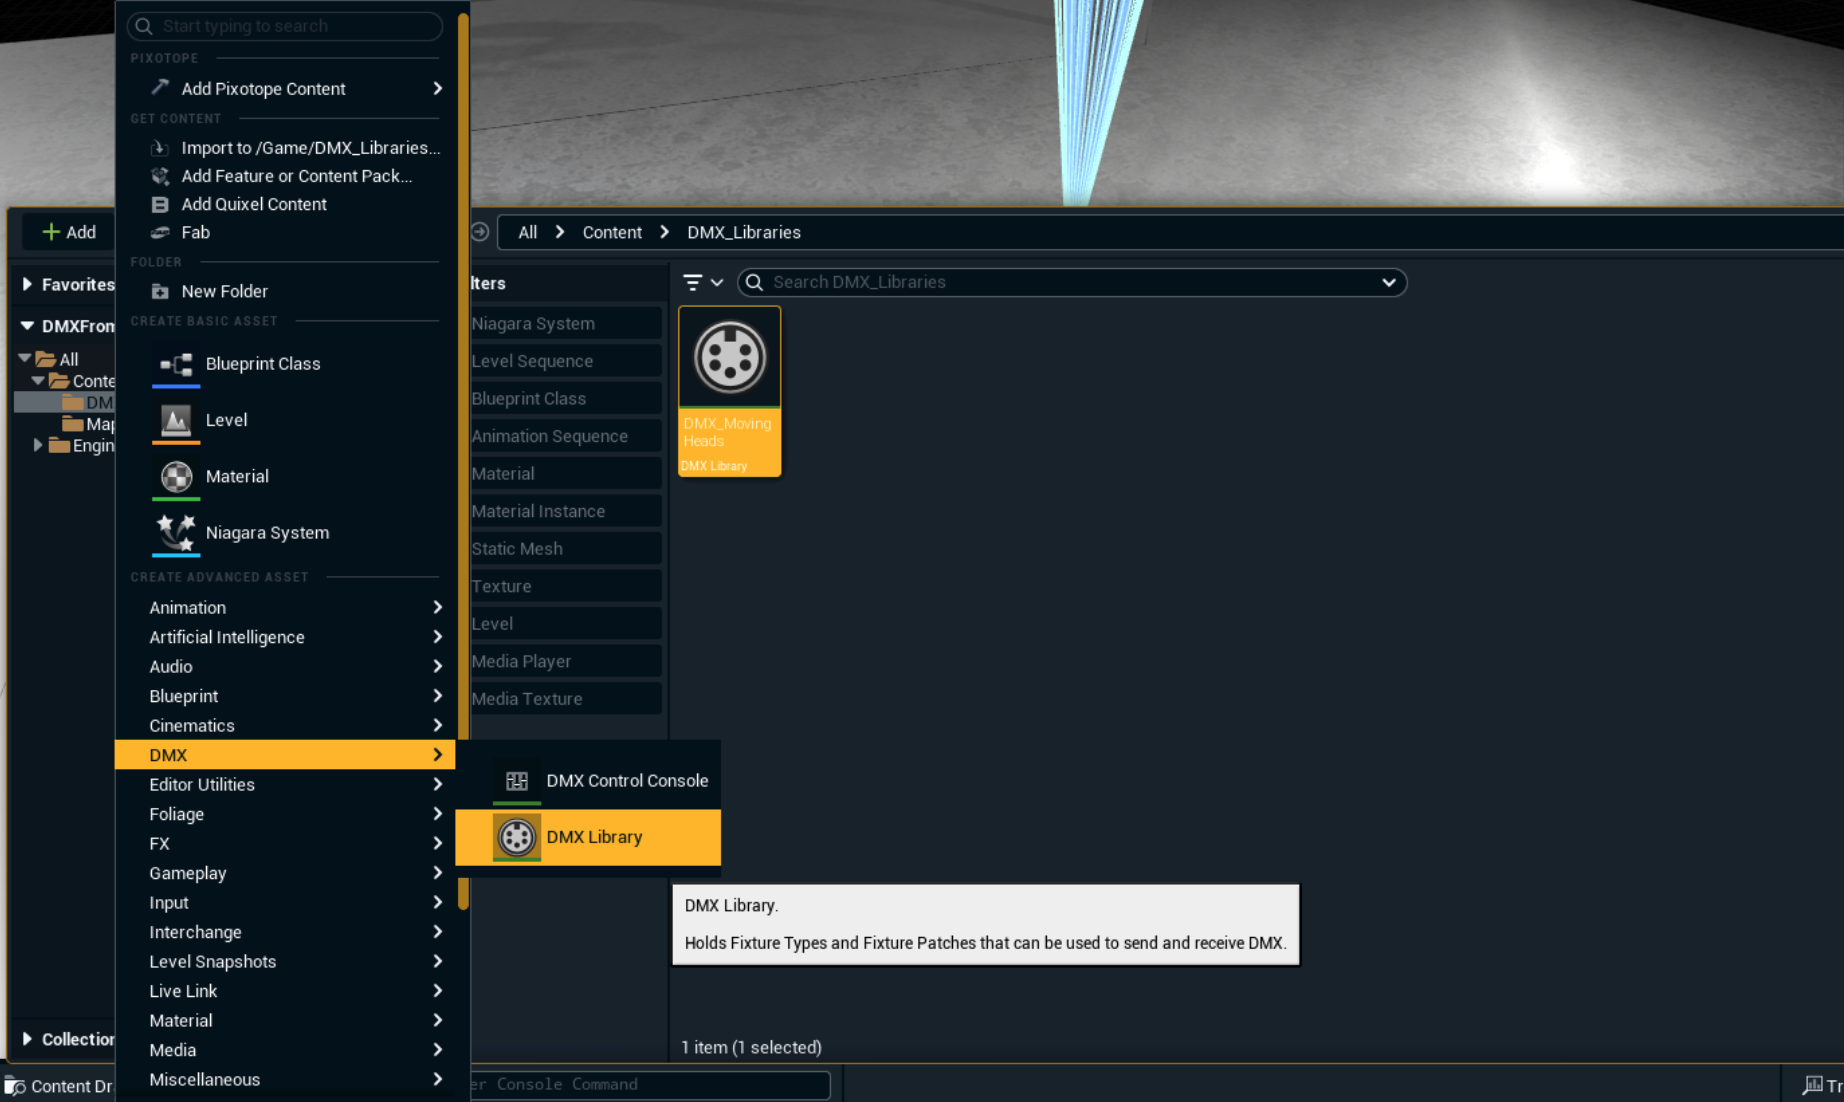
Open the Content Browser
-
Click Add (+) > DMX > DMX Library and name it (e.g.,
DMX_MovingHeads) -
Open the newly created DMX Library
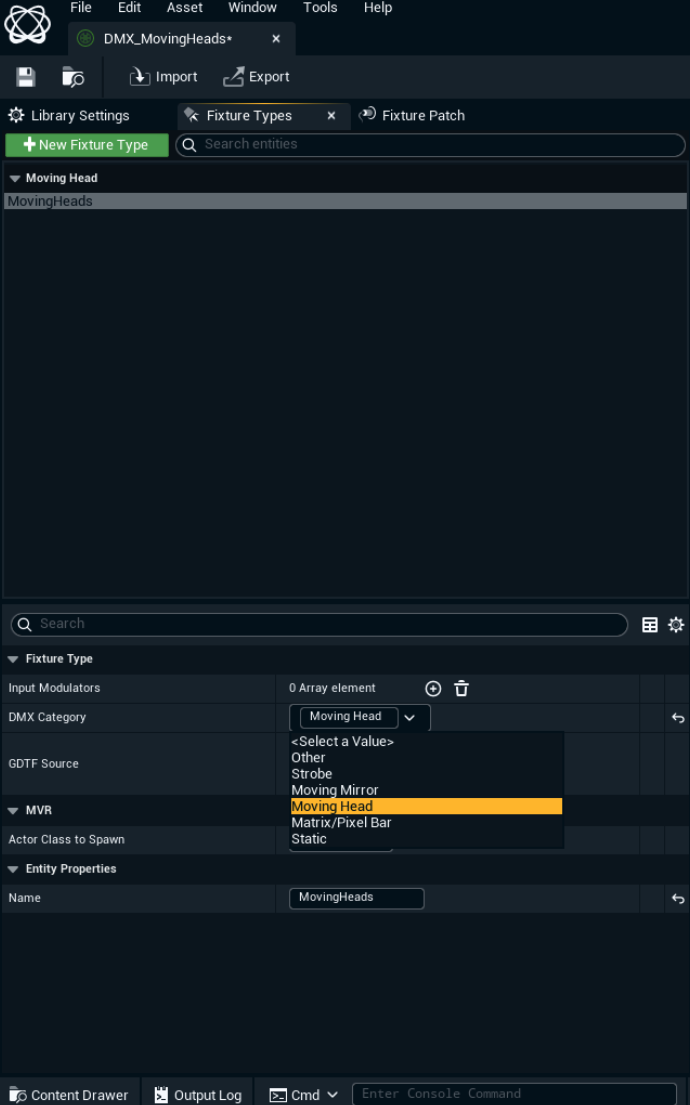
Add a Fixture Type
-
Inside the DMX Library editor, go to Fixture Types tab and click New Fixture Type
-
Name the fixture
-
Set the DMX Category to Moving Head
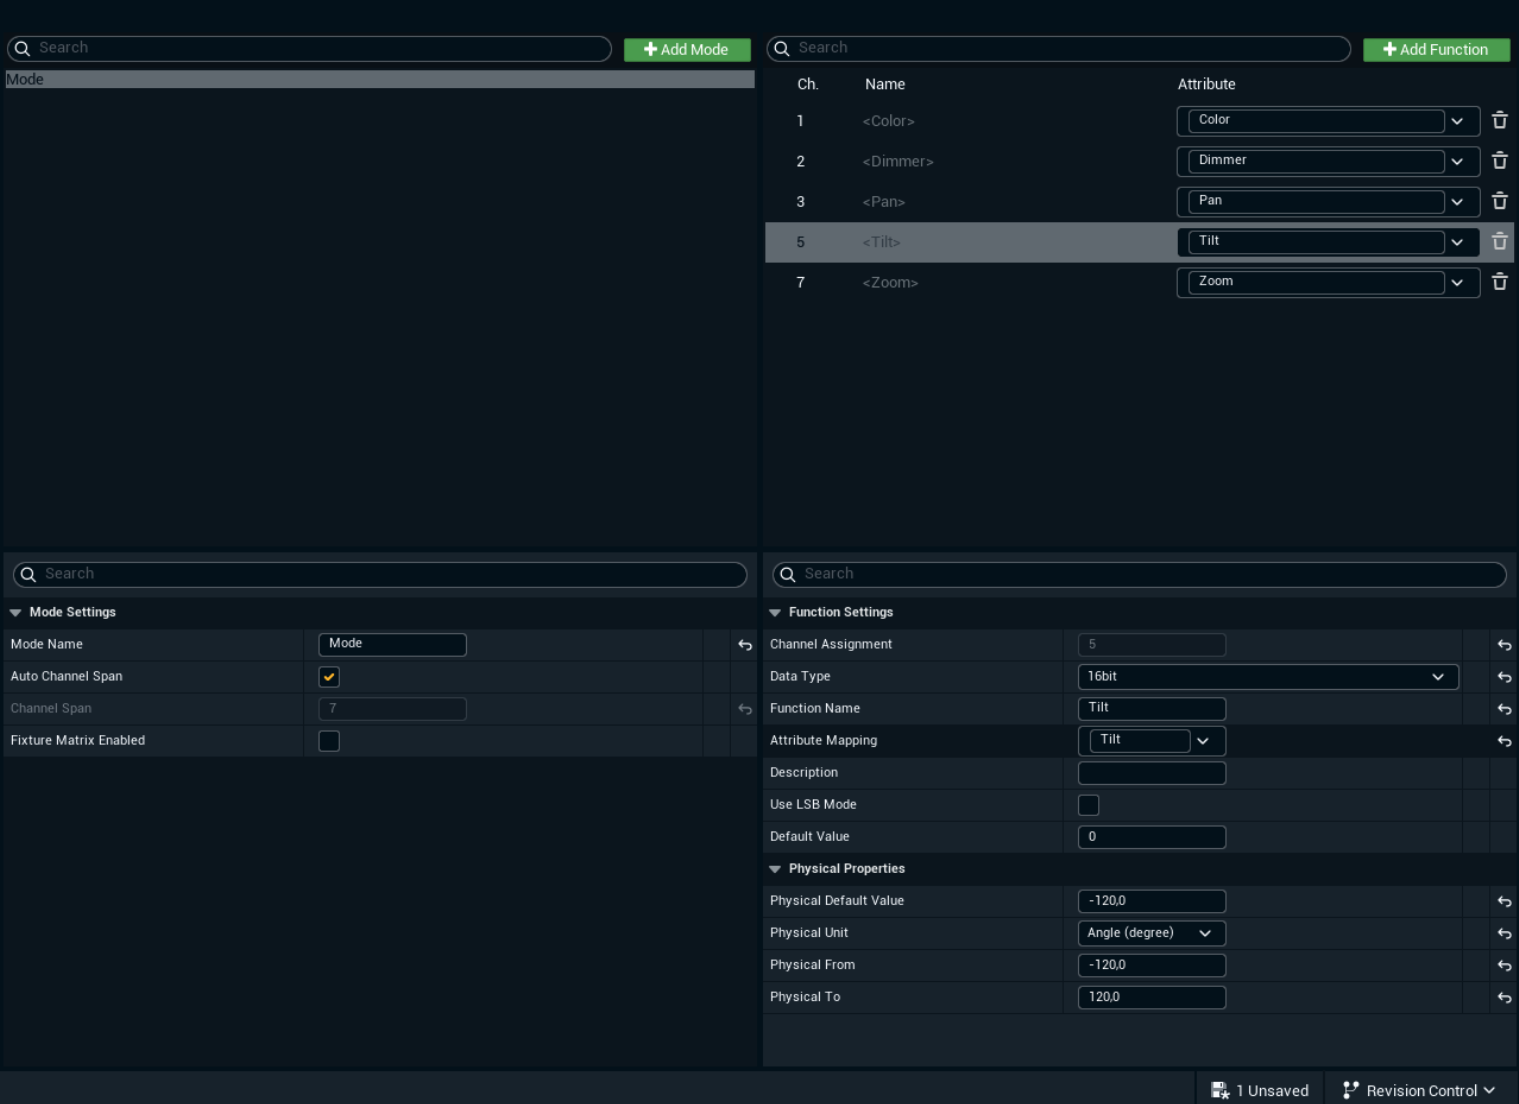
Define DMX modes and functions
-
Inside the Fixture Type tab, click Add Mode
-
In the Functions section, add DMX functions and name them with their corresponding Attribute Mapping:
-
Color – Assigns RGB or CMY values (8bit)
-
Dimmer – Adjusts light intensity (8bit)
-
Pan – Controls horizontal movement (16bit)
-
Tilt – Controls vertical movement (16bit)
-
Zoom (if applicable) – Controls beam width (8bit)
-
-
Assign corresponding Data Type (8bit, 16bit, 24bit) to each Function
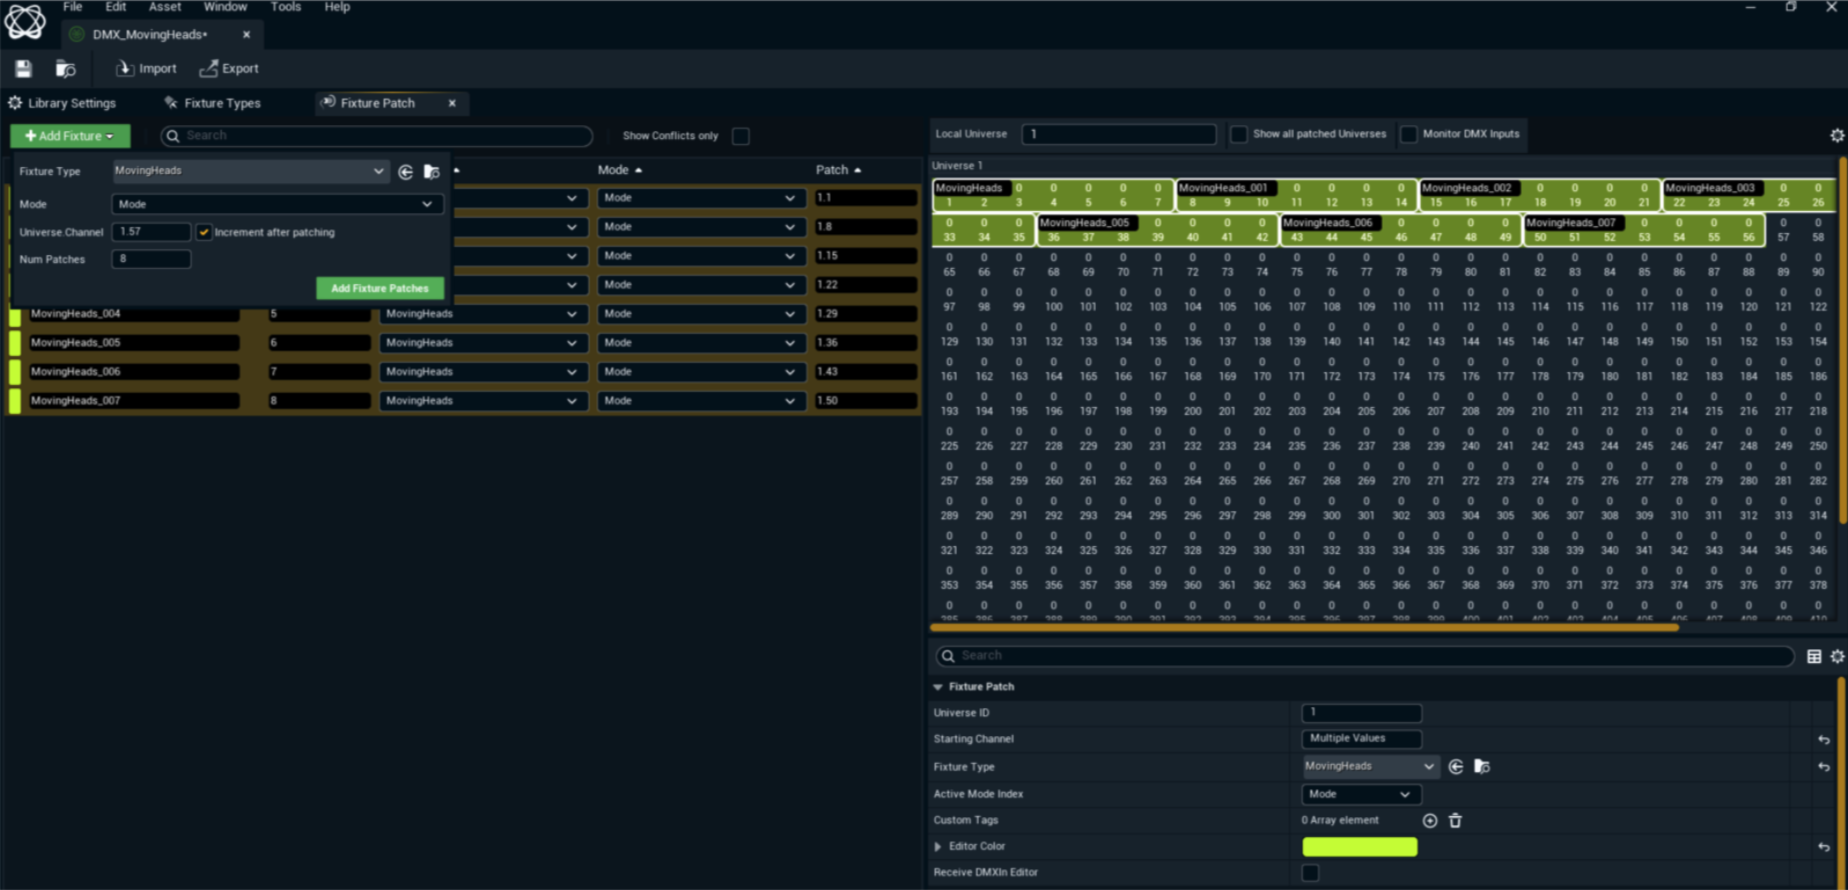
Add patches for the Moving Head fixtures
-
Go to the Fixture Patch tab
-
Click Add Fixture and select the Fixture Type created in the DMX Library
-
Choose the appropriate Mode
-
Set the Universe Channel (e.g., 1)
-
Select the Num Patches to create (we will use x8 MovingHeads)
-
Press Add Fixture Patches
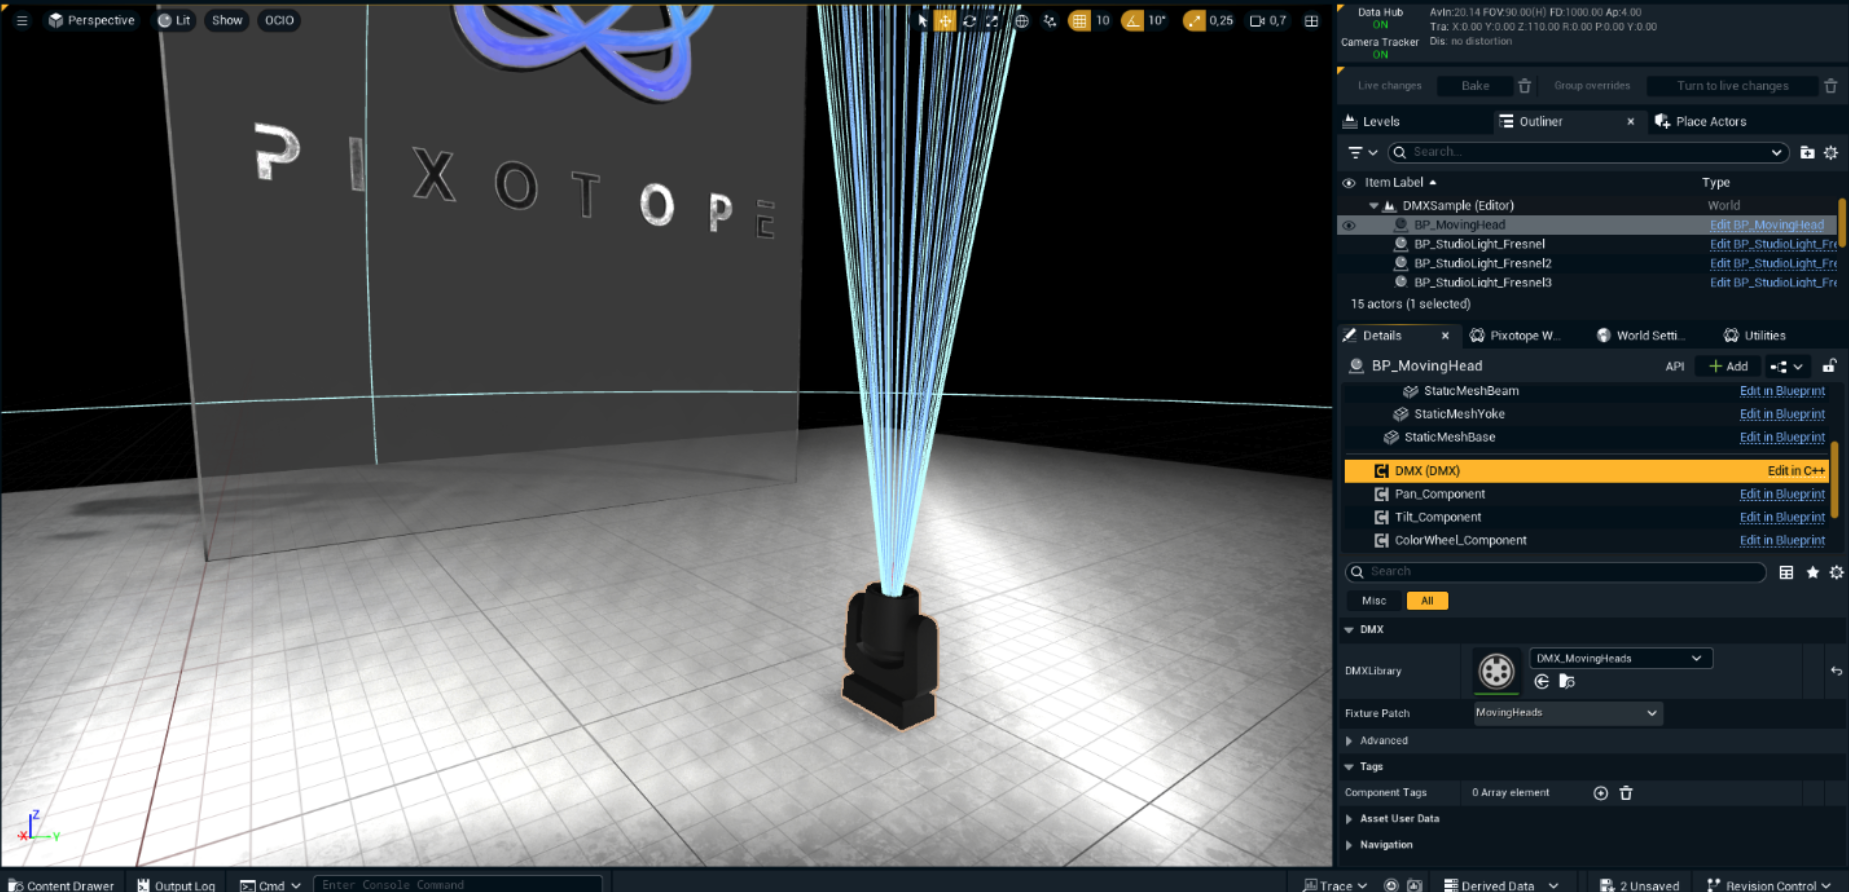
Assign the DMX Library to the Moving Head fixture
-
Select the BP_Moving Head fixture in the Outliner
-
In the Details Panel, locate the DMX Component section
-
Assign the DMX Library and select the appropriate Fixture Patch
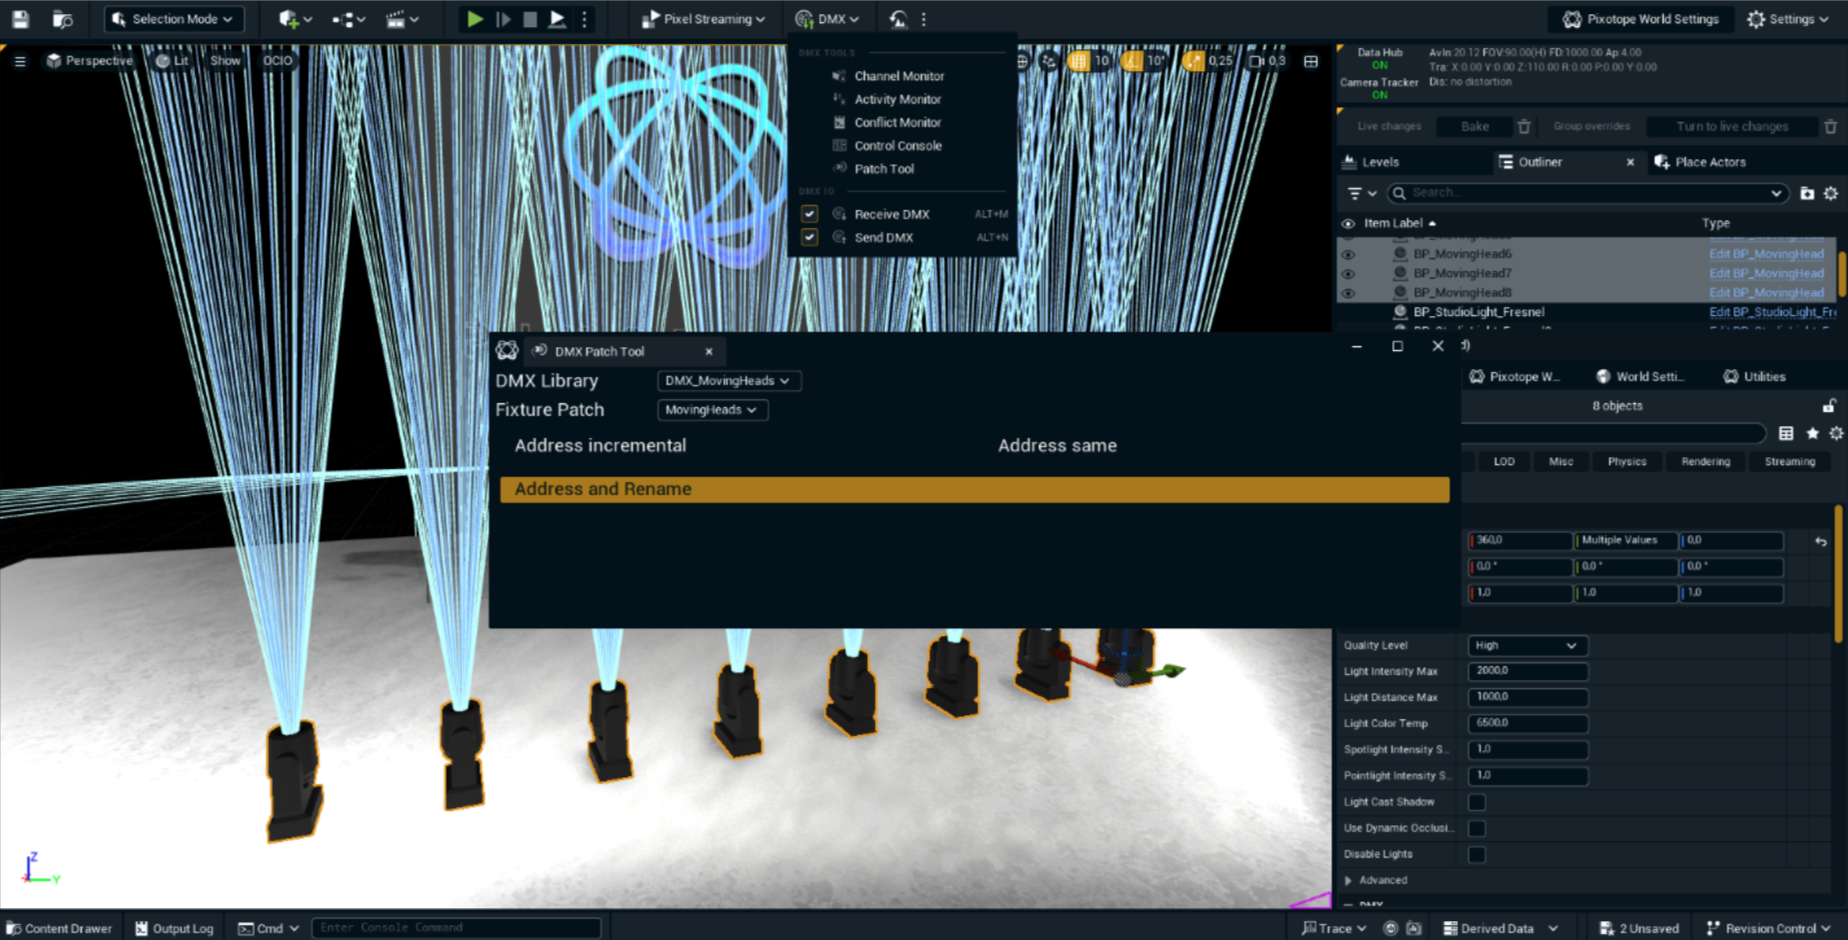
Step 4: Assign addresses and names using the patch tool
-
Duplicate Fixtures as many as you need (In this example we will use x8)
-
Open the DMX Patch Tool window from the DMX menu
-
Select your DMX Library and the Fixture Patch you created
-
Assign unique DMX addresses to each Moving Head in the scene by pressing Address and Rename button
-
Save level and close the Patch Tool
Step 5: Control moving heads with the DMX control console
-
Open the DMX Control Console window from the DMX menu
-
Choose your target DMX Library (DMX_MovingHeads)
-
Select all the Fixtures you want to control from the List
-
Define a Layout for Fixture Controls (Horizontal, Vertical and Grid)
-
Press the green Play button to Send to DMX
-
Adjust the channel values to test the real-time control of the Moving Heads
-
Observe how the lights respond to changes and adjust the setup as needed

Conclusion
By following these steps, you will have set up a basic Moving Head in Pixotope that responds to real-time DMX signals. Using the Patch Tool to organize and assign addresses to fixtures and the DMX Control Console for real-time testing, you can efficiently manage multiple lights within Pixotope.
This system can be scaled to control multiple lights and advanced effects, allowing you to create interactive virtual productions with professional lighting setups.
Continue to
Learn more about how to Control DMX lights from Control panel