SDI Audio Embedder
1 Preface
With the Audio Embedder feature the tracking data stream can be embedded into an audio channel of the incoming SDI video signal. The tracking engine outputs the SDI video with embedded tracking data which can then be fed into a graphics engine. The Pixotope Graphics engine can de-embed the tracking data in the Director. For other graphics engine vendors a Standalone SDI Tracking Data De-Embedder software product, running in Windows, is available.
This feature makes the recording and playback of tracking data very easy. Any device that can record an SDI video feed with uncompressed audio can record the tracking engine output, meaning recording the video together with the matching camera tracking data.
The following requirements are needed:
A Blackmagic video card in the tracking engine with SDI input and output
Audio compression must never be applied to the tracking data embedded in the audio channel at any point in the signal path. It turns the tracking data unusable and can not be reversed
Only for Pixotope Fly: A Blackmagic video card in the tracking engine with two SDI inputs and one output
2 Setup
2.1 License
For using this feature a license addon is needed. Open the License Manager and log in to your user account. Either check out a camera tracking license which includes the SDI Embedder addon or select the SDI Embedder from the Available Addons field. If you need to select a camera tracking package and an addon, use the Ctrl key to select both and then click Checkout.
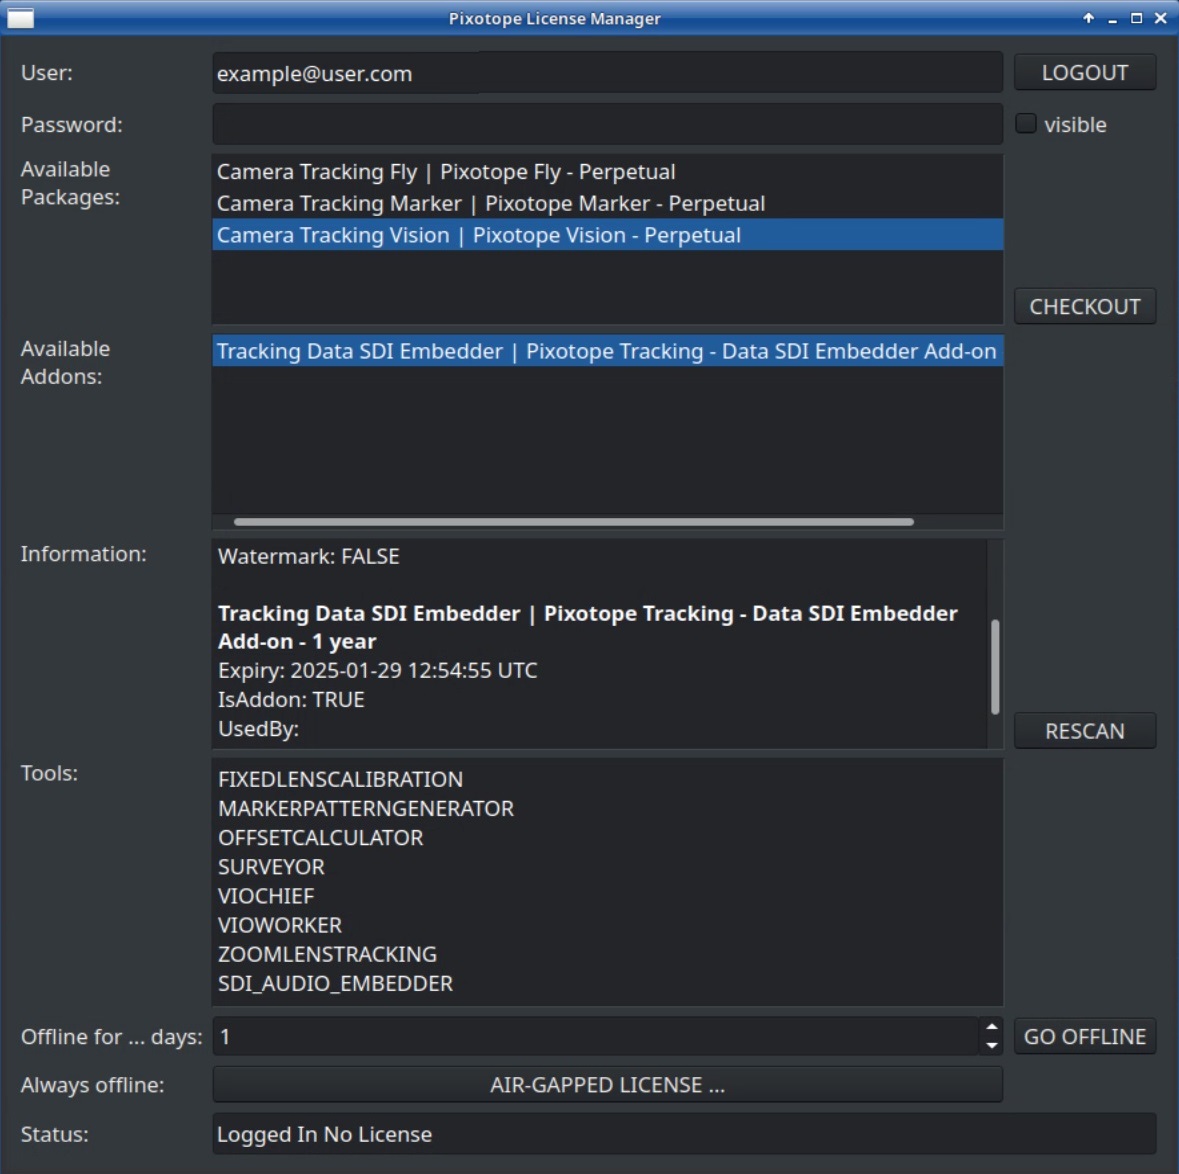
Illustration 1: Checkout an SDI Embedder license
2.2 Chief
Start the Chief and click on the Setup button
If there is no Audio embedder option in the Setup menu, update the Chief package to the newest version
Activate the Audio embedder option and click Save + Quit/Restart
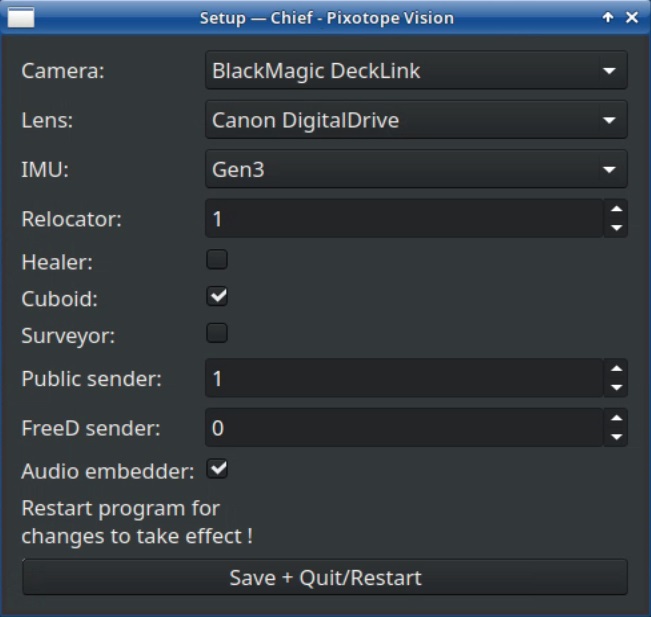
Illustration 2: Chief Setup menu
2.3 Video In and Out
Connect the SDI cables for video In and Out to the desired spigots and route the video of the tracked camera to the input spigot.
For Pixotope Fly both Worker and Chief need to receive the SDI video. For this reason the video needs to be fed into two separate spigots of the video card.
Click on the Linux Menu on the left side of the task bar
Type in “blackmagic” and open the Blackmagic Desktop Video Setup
Configure all Connector settings to In or Out
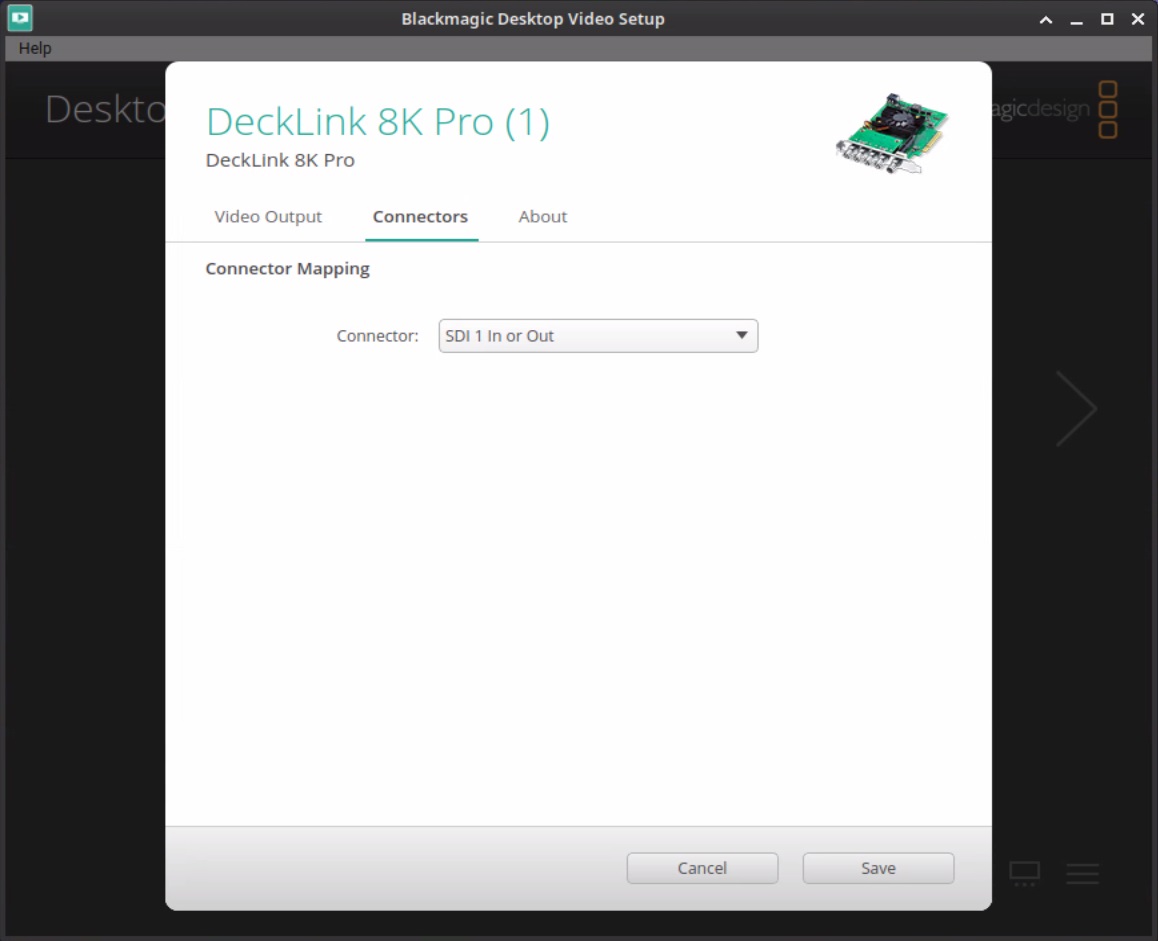
Illustration 3: Connector settings for using a Blackmagic Decklink 8K Pro
3 Operation
3.1 Camera tab
Device, Connector and Video Mode refer to the incoming video. If these settings are not matching the video routed to the tracking engines input, no video will be shown in the Chief Video window.
Pixel Format defines the depth of color of the Chief video that the tracking engine works with and outputs. When not using the audio embedding this can be set to 8 Bit to save processing time. when using the audio embedder, in most cases the video coming from from the tracking engine needs to be in the highest possible quality, meaning 10 Bit. However, if no device which receives the SDI video from the tracking engine needs more than 8 Bit depth of color, this setting can be set to 8 Bit.
Audio Channels defines the number of audio channels in the SDI signal that the tracking engine will pass through. The tracking data will be embedded into one audio channel meaning that one more audio channel will be used compared to when not using audio embedding. The SDI standard gives only the options of selecting 2, 8, 16 or 32, so this value has to be set to a number high enough for the amount of channels used for audio data plus one more channel for the tracking data. For example in case two audio channels are occupied with audio data, that means a third audio channel will be needed for the embedded tracking data. In such a case it would need to be set to 8. The channel to contain the tracking data will be defined in the Audio Embedder tab.
Bits per Sample is similar to Pixel Format. Set it to 32 for the tracking engine to output the video with the highest possible quality.
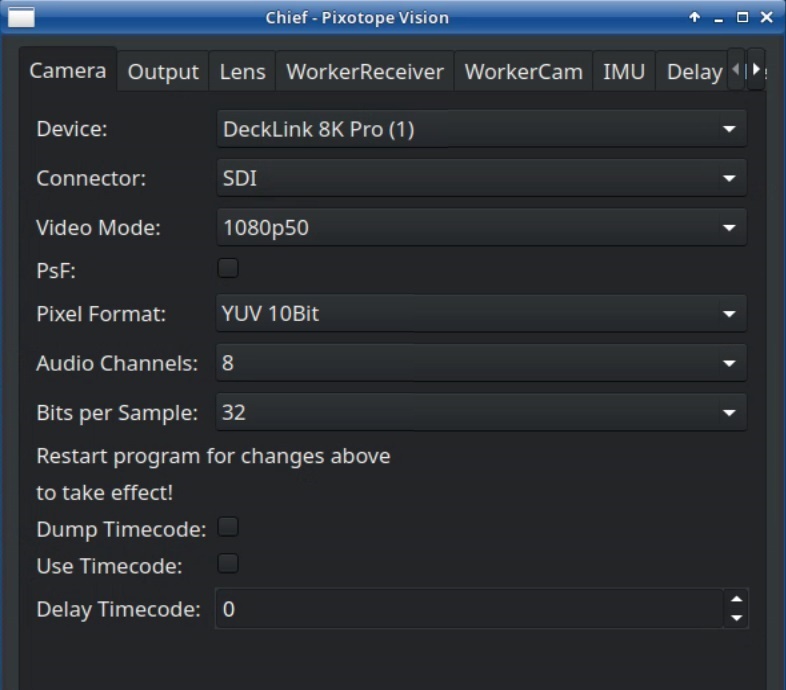
Illustration 4: Chief Camera tab
3.2 Output tab
Device, Connector and Level in this tab refer to the outgoing video.
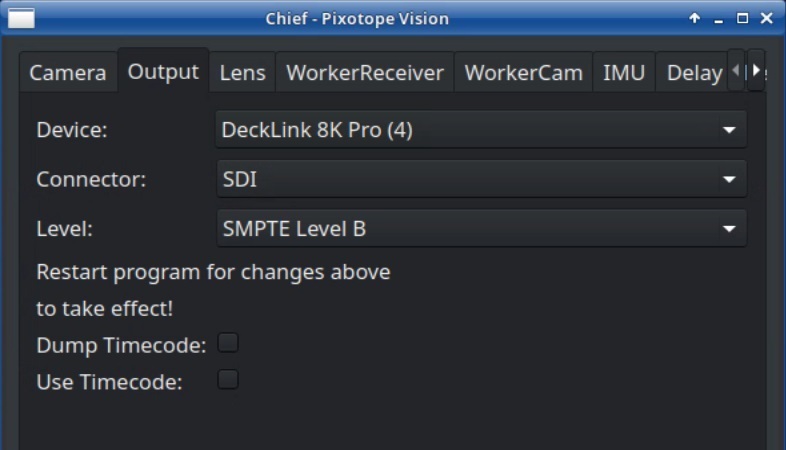
Illustration 5: Chief Output tab
3.3 Audio Embedder tab
With the drop down button at the top of this tab the format of the tracking data is defined in order to match the graphics engine being used.
Channel defines in which of the audio channels the tracking data will be embedded. The number of audio channels must be defined first in the Camera tab and the Chief restarted. A channel must be chosen that is not used for any audio data.
Offset offsets the position of the tracking data inside the audio channel by bits. This can be needed in case any of the devices used in the signal pipeline corrupt the first bits of the signal. In case no tracking data are recognized by the de-embedder even though embedded, try an offset value between 20 and 800. This setting does not change anything for the de-embedder.
Dump prints information about the embedding in the system log (see also next chapter). It prints the amount of audio packet samples and bytes for the tracking data. Every five seconds it additionally prints one line containing 42 bytes for the meta data (Illustration 7).
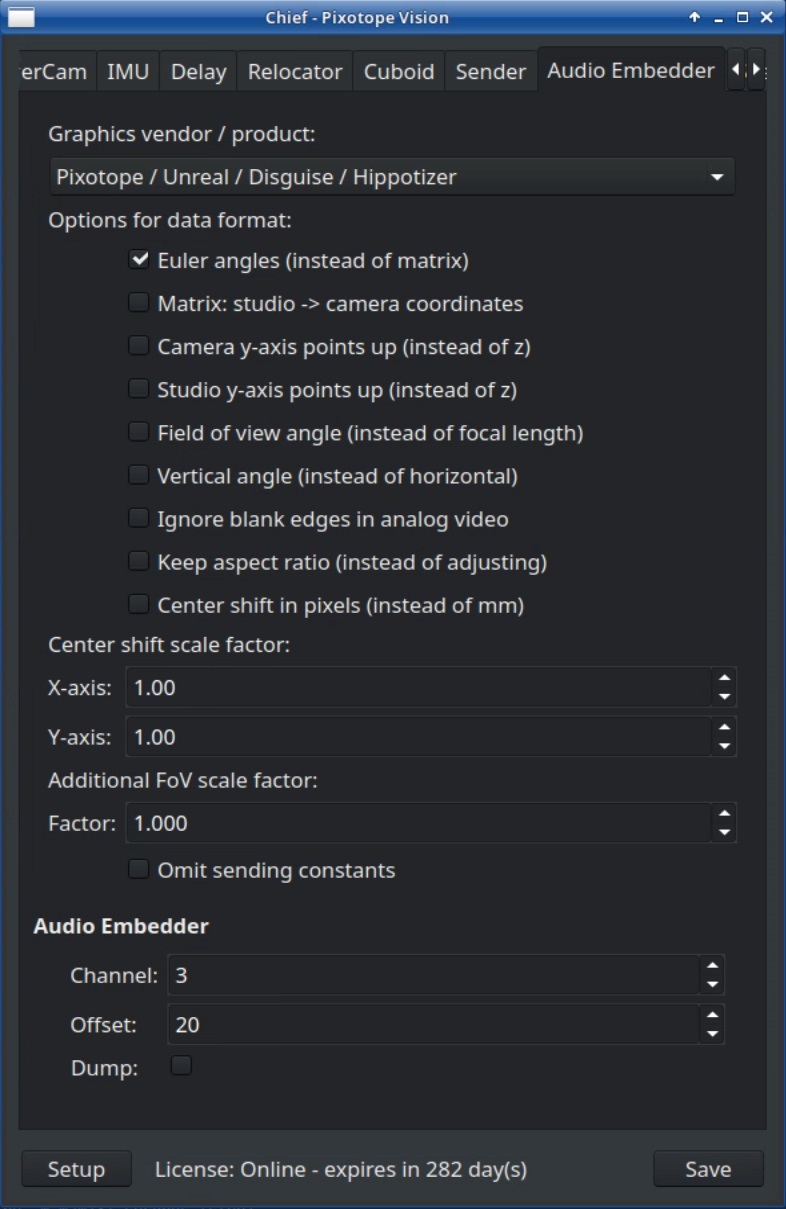
Illustration 6: Chief Audio Embedder tab
3.4 Send Delay
The Send Delay needs to be controlled after the Audio Embedding has been set up.
Activate the Dump in the Audio Embedder tab
Go to the Delay tab
Set the Send Delay to a value between 1 and 19 where the Audio embedder Dump appears completely regular as shown in Illustration 7. Keep in mind that every five seconds one line for the 42 bytes of metadata will be printed too
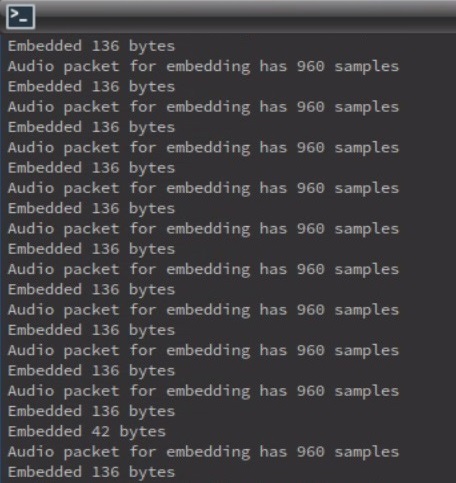
Illustration 7: A correct Send Delay causes the Dump to appear regular in the System Log
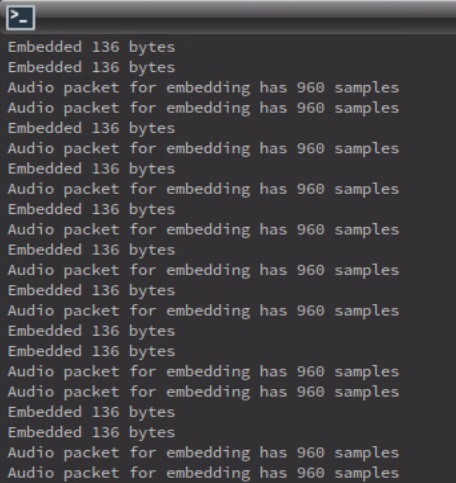
Illustration 8: A false Send Delay causes the Dump to appear irregular in the System Log
4 De-Embedder
For de-embedding the SDI signal, a Pixotope Director version 24.1 or newer needs to be installed. When using the standalone De-Embedder software, the Pixotope Director still needs to be installed in order to activate the license.
4.1 Pixotope Director
Select the correct video mode in the Show settings
Select the TrackMen protocol in Camera tracking
Go to Routing
Activate Tracking from audio in the video input and select the Audio channel where the tracking data are embedded in
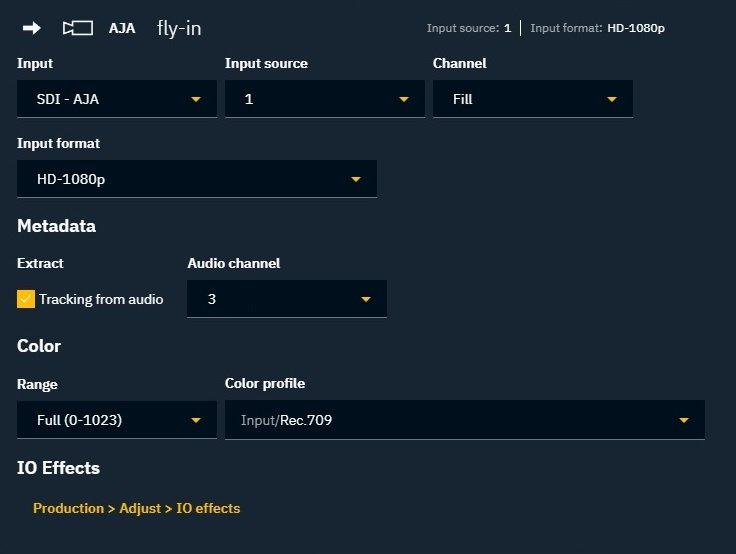
Illustration 9: Video input in the Director Routing window
Activate From local video in the tracking input. The Status now shows the frequency of the tracking data
The Port does not need to be defined. If an error occurs stating that the port is already in use, try incrementing the value
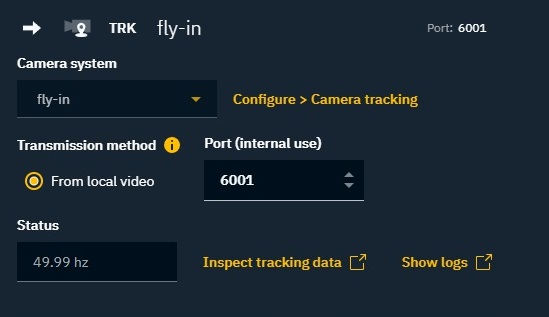
Illustration 10: Tracking data input in the Director Routing window
If no tracking data are being received, make sure that no device is compressing the audio data of the SDI signal, for example by connecting tracking engine output and graphics engine input with one direct SDI cable.
4.2 Standalone De-Embedder
The standalone De-Embedder software runs on a windows computer and receives the SDI signal with the embedded tracking data through a Blackmagic video card. It can then send the tracking data alone through the local network to a graphics engine. The graphics engine can also be on the same windows computer but for performance reasons it is recommended to have it on a separate one.
Install Pixotope version 24.1 or newer on a windows machine. The De-Embedder software will be installed with it automatically
Start the Director, log into your account and activate the Tracking Data SDI De-Embedder license
Go to C:\Pixotope\24.1.xxxx\Services\DeEmbedder and start the PX_DeEmbedder.exe
Choose the SDI input of the Blackmagic card at Device
Fill out all settings under SDI In according to the settings chosen in the Chief menu
Select the Audio Channel that has the tracking data embedded under Data In
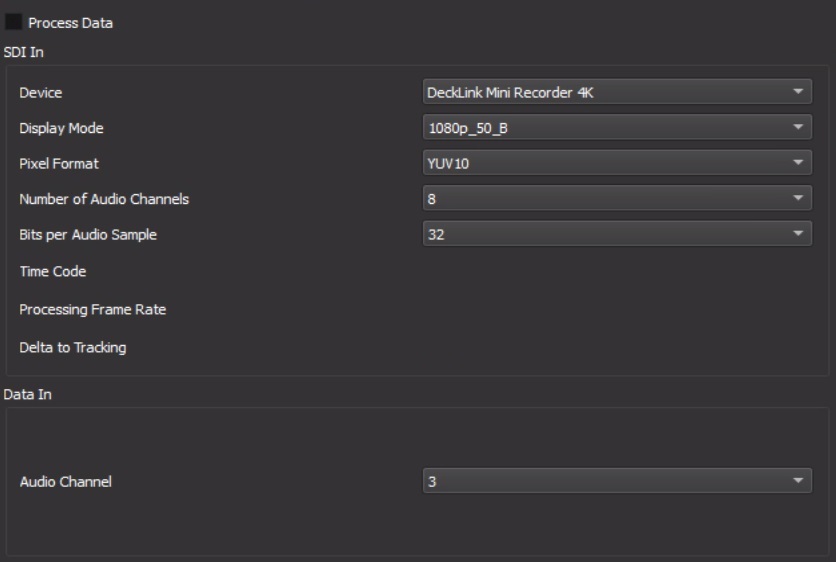
Illustration 11: Input settings
Define to which IP and Port the tracking data shall be sent to under Data Out
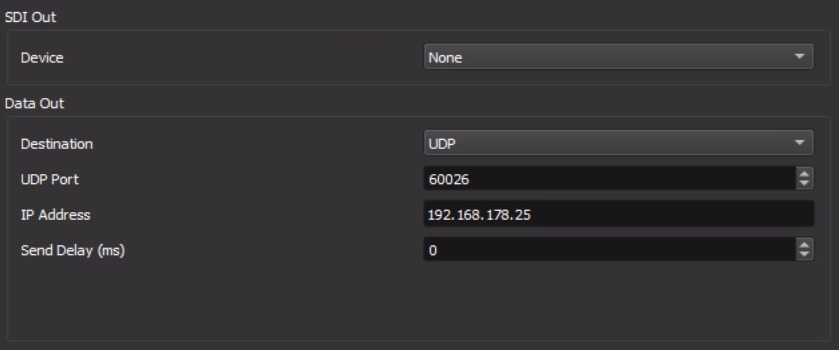
Illustration 12: Output settings
Activate Process Data at the upper left to start the de-embedding and sending. The incoming tracking data and the video will be displayed at the lower half of the window
