1 Preface
The TrackMen operating system (OS) is a dedicated, customized Linux client meant to run the Pixotope Tracking software. Pixotope Tracking programs are not meant to run in other environments and alongside other applications, unless stated otherwise. These real-time tracking programs will therefore require a dedicated workstation. Real-time tracking solutions require a lot of calculations and are not meant run on outdated or underpowered machines.
It is recommended to use hardware specified in the System Requirements page.
The easiest way to install software is to have the tracking engine connected to the internet to access Pixotope’s online repositories.
If internet access is not possible, due to network restrictions or remote locations, installing software can be done using a USB flash drive with the repositories on it.
More information about remote access with or without internet connection on the tracking engine can be found in the Remote Connection page.
For already installed systems:
User: tracking
Password: tmg51105k
2 OS Installation
2.1 Creating an Installation Medium
The OS is installed by booting the workstation from a bootable USB flash drive. Proceed as shown below:
-
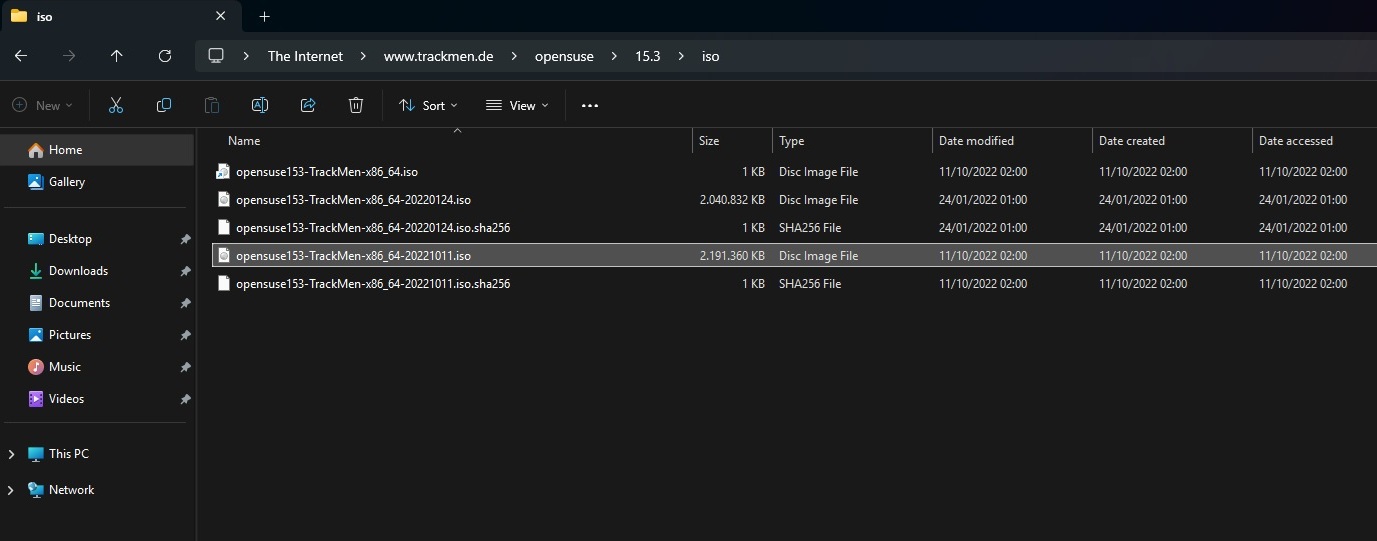
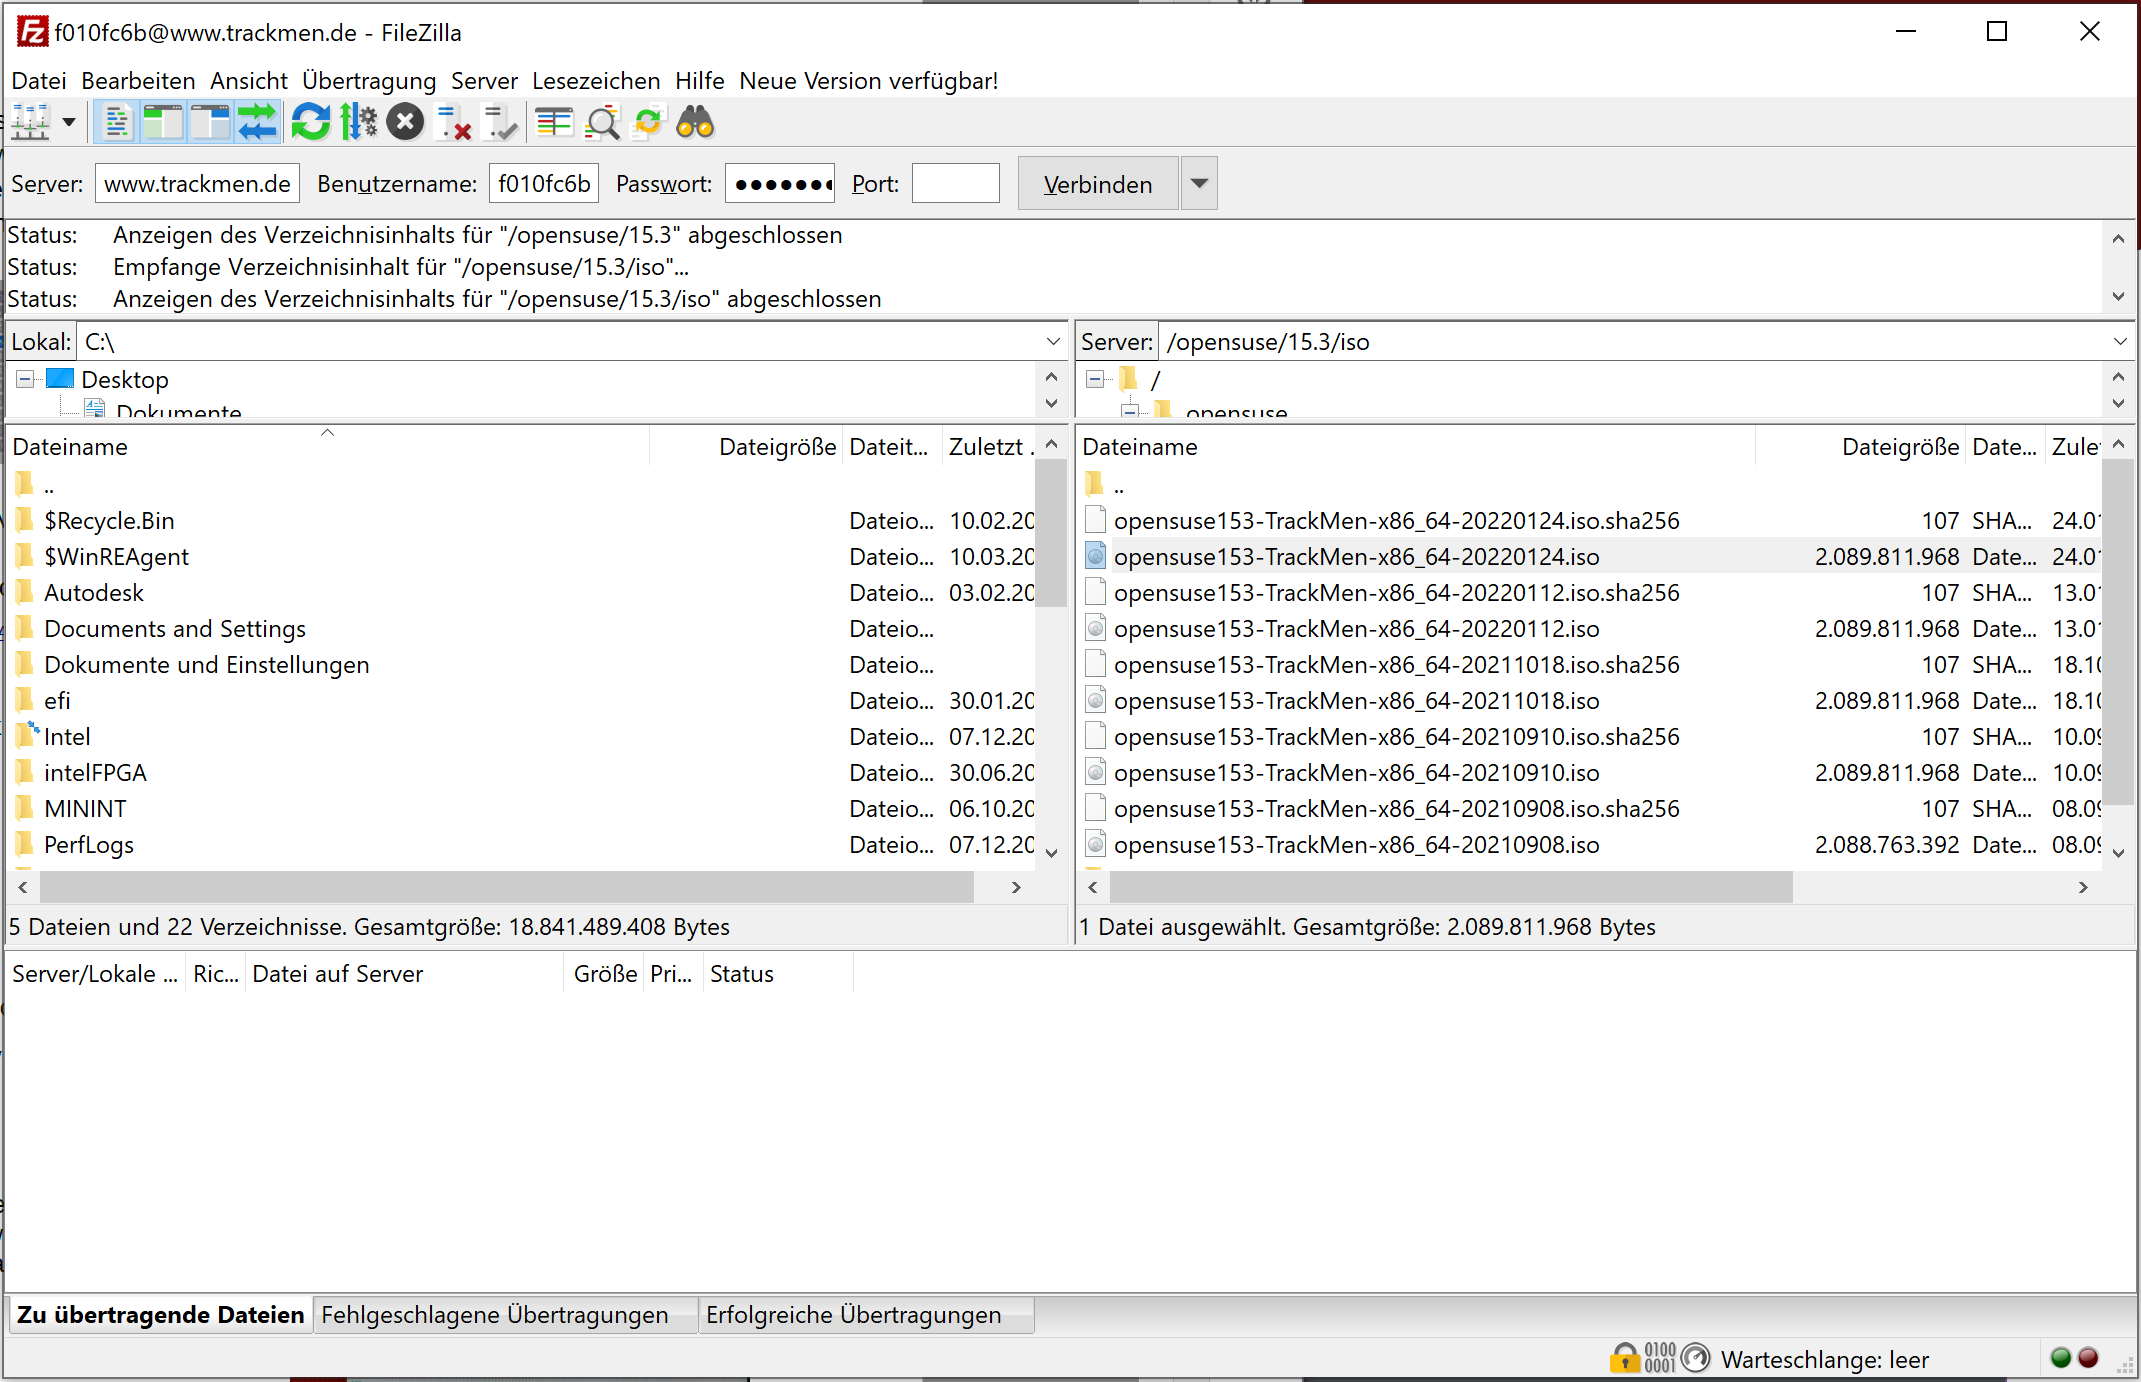
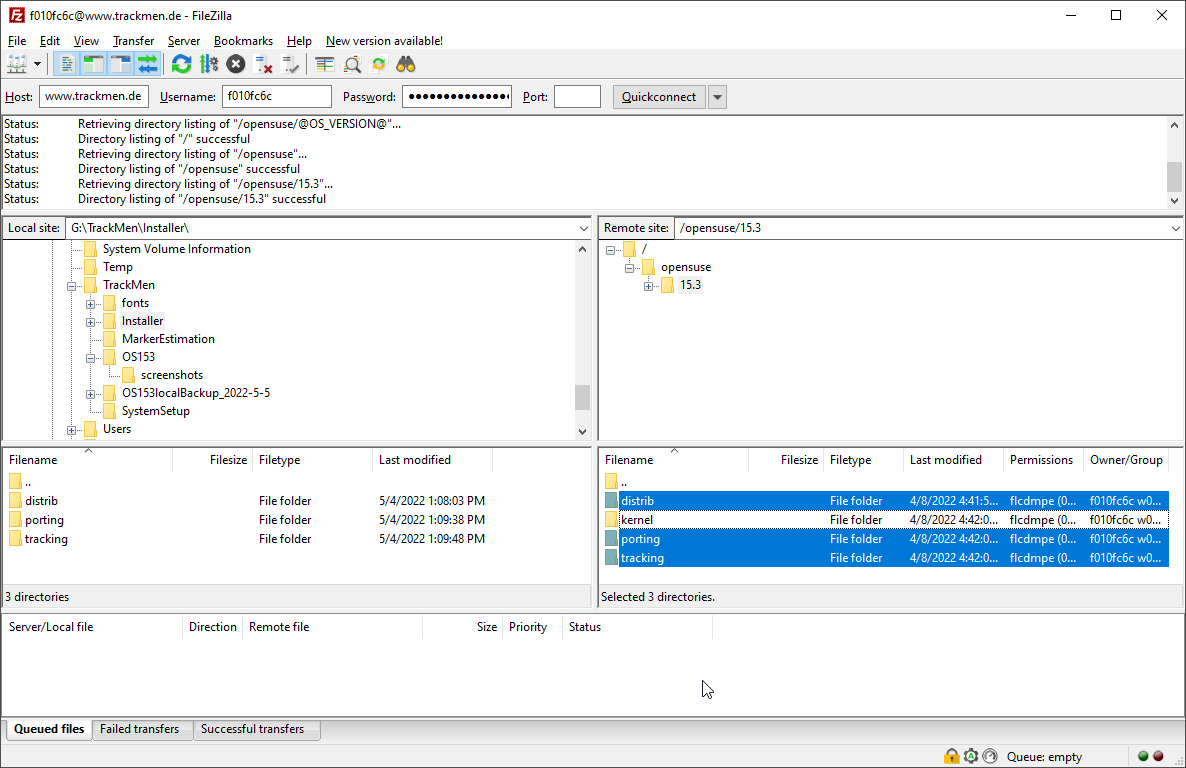
Download the .iso image file from the TrackMen server, using the below FTP link. If redirected to a folder with multiple .iso files, go by the date in the name and select the most recent one
If the Explorer or a browser struggles to open the link, it may be entered in the freeware FileZilla by simply pasting the whole link in the Server field and clicking Quickconnect. User and password will be filled out automatically this way.
If no connection to the Server in FileZilla can be established, try opening Server manager in the Files menu and change to Only use plain FTP (insecure).
-
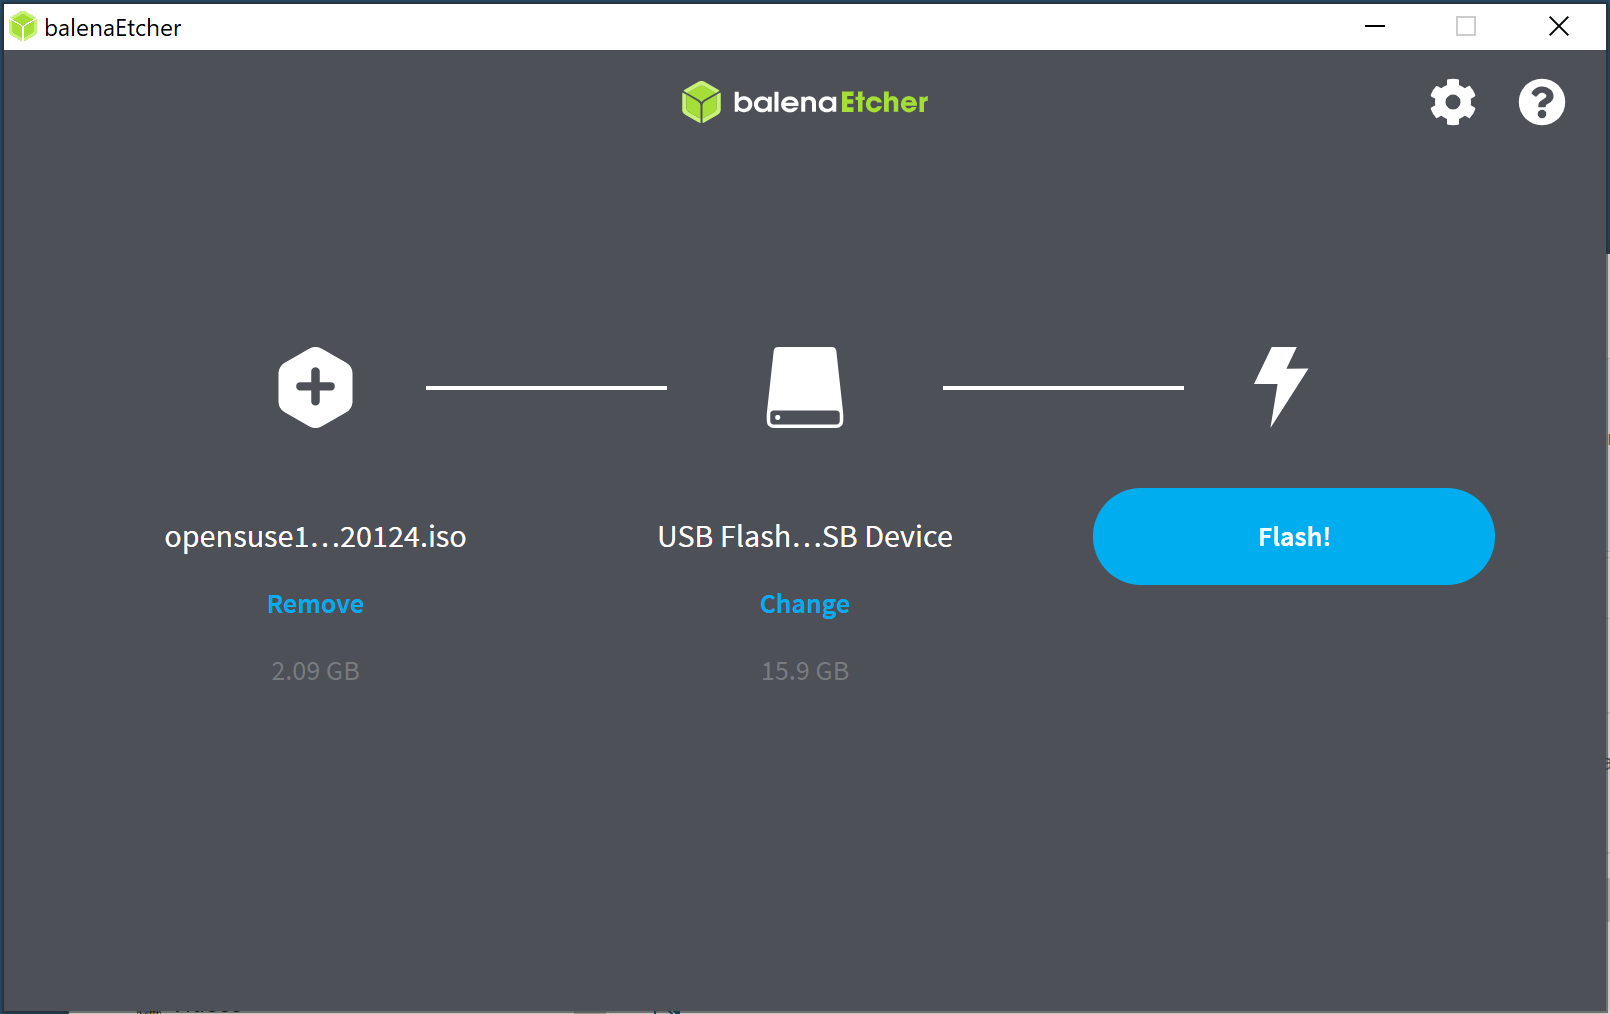
Burn the image on a USB flash drive, using a flash utility like Etcher or Rufus
-
Make sure to have one hard drive connected, that is either free or has only dispensable data on it. For safety reasons, do not keep another hard drive connected during installation!
-
If possible, connect the workstation to a network that provides DHCP service and Internet
2.2 Installation
-
Connect the installation USB flash drive to the workstation
-
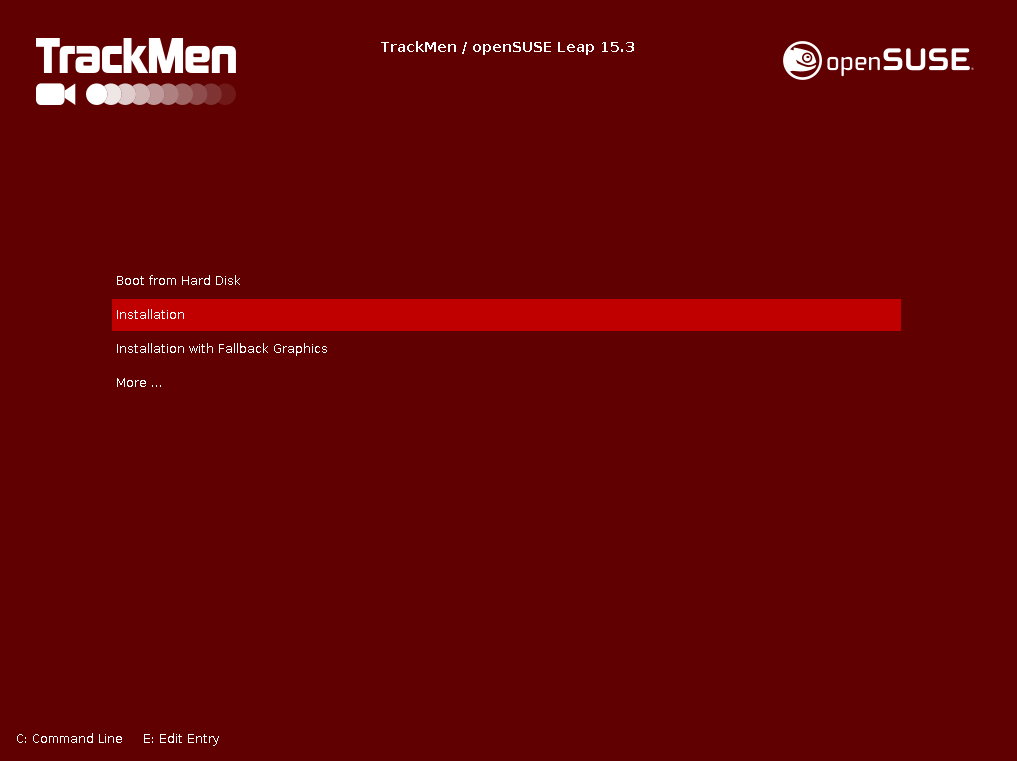
Start the workstation, making sure it will boot from USB with highest priority. If necessary, access BIOS or Boot Options during computer start
-
In the upcoming screen, select Installation, using the arrow keys to navigate, and press <Enter>
-
Wait for the Setup interface to load and prepare
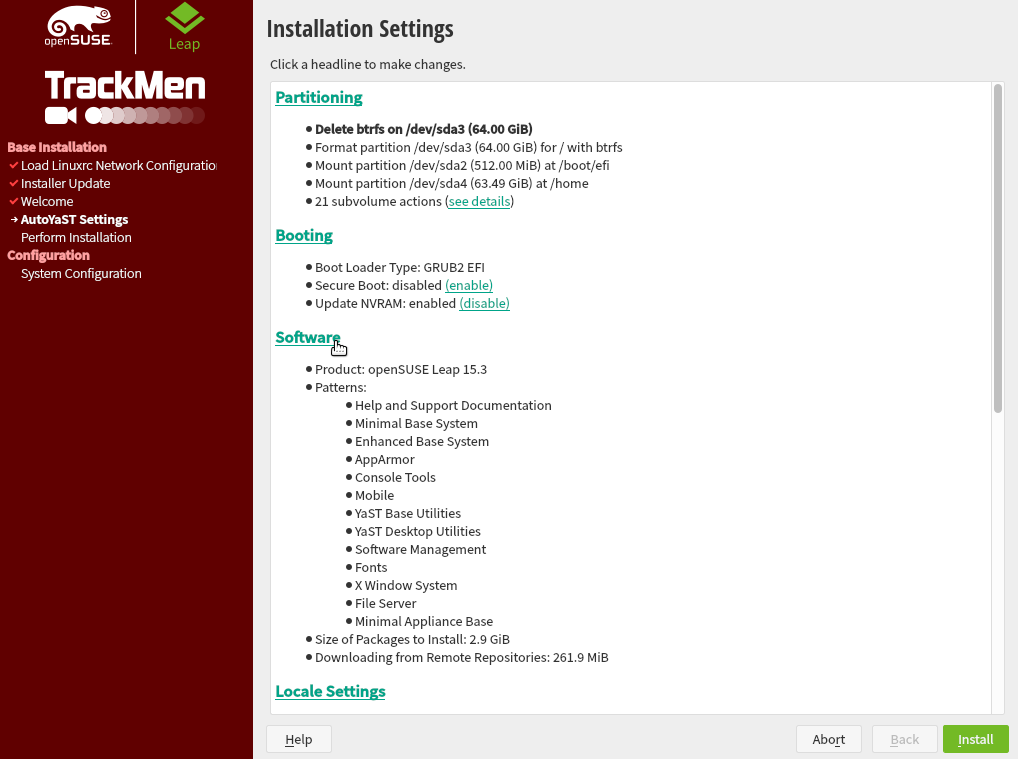
The Installer comes pre-configured to partition the first found hard drive and install the operating system with some basic programs. Usually no further modifications are necessary. Software and drivers can also be installed after the OS installation.
In some cases it makes sense to change the Software installation settings at this point. For example when using new GPUs such as NVIDIA RTX 50xx. Also, when no internet will be available after the OS installation, the software can be installed together with the OS. Follow steps in the next chapter to do so. Otherwise click Install.
2.2.1 Software Installation Settings: GPU driver
-
By default G06 / 550.x drivers are installed. These drivers work up until and including NVIDIA RTX 40xx cards
-
For NVIDIA RTX 50xx cards version 570.x must be used
-
For much older cards the G05 drivers might be suitable
a. Click on Software

b. Click on Details in the lower left
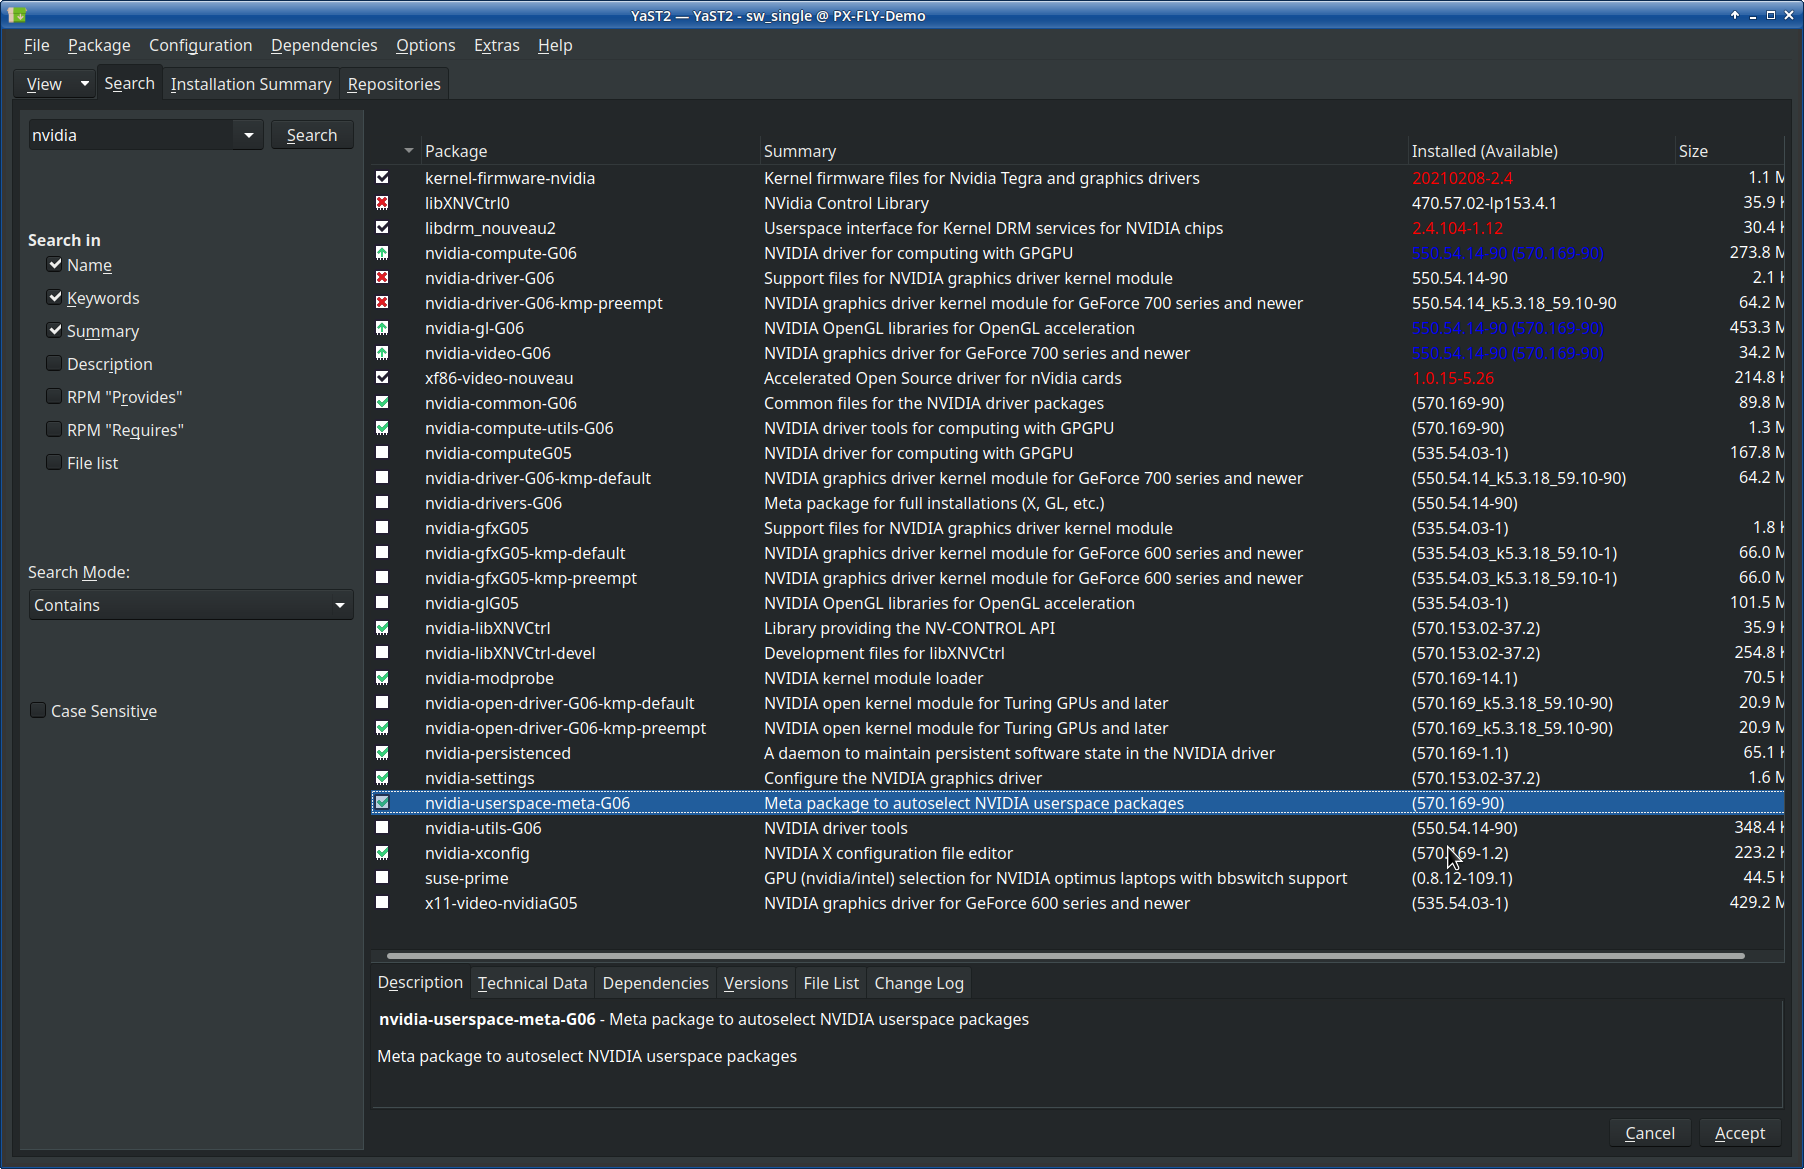
c. In the upcoming interface search for “nvidia”
d. Select the nvidia-userspace-meta-G06 package. All other necessary packages will be selected automatically. This updates to the 570.x drivers
e. Click Accept

2.2.2 Software Installation Settings: Tracking programs
a. Click on Software and then on Details in the lower left
b. Click on View and select Repositories
c. In the Tracking Repository the desired Tracking Software can be selected
d. Click Accept
-
Click Install in the lower right corner
-
If a message shows up during the installation stating that now network could be configured, click OK. The network can be configured manually later
3 Setting up the Network
By default, the network is configured to use DHCP. If this should be changed, because in real-time productions static IPs are recommended:
-
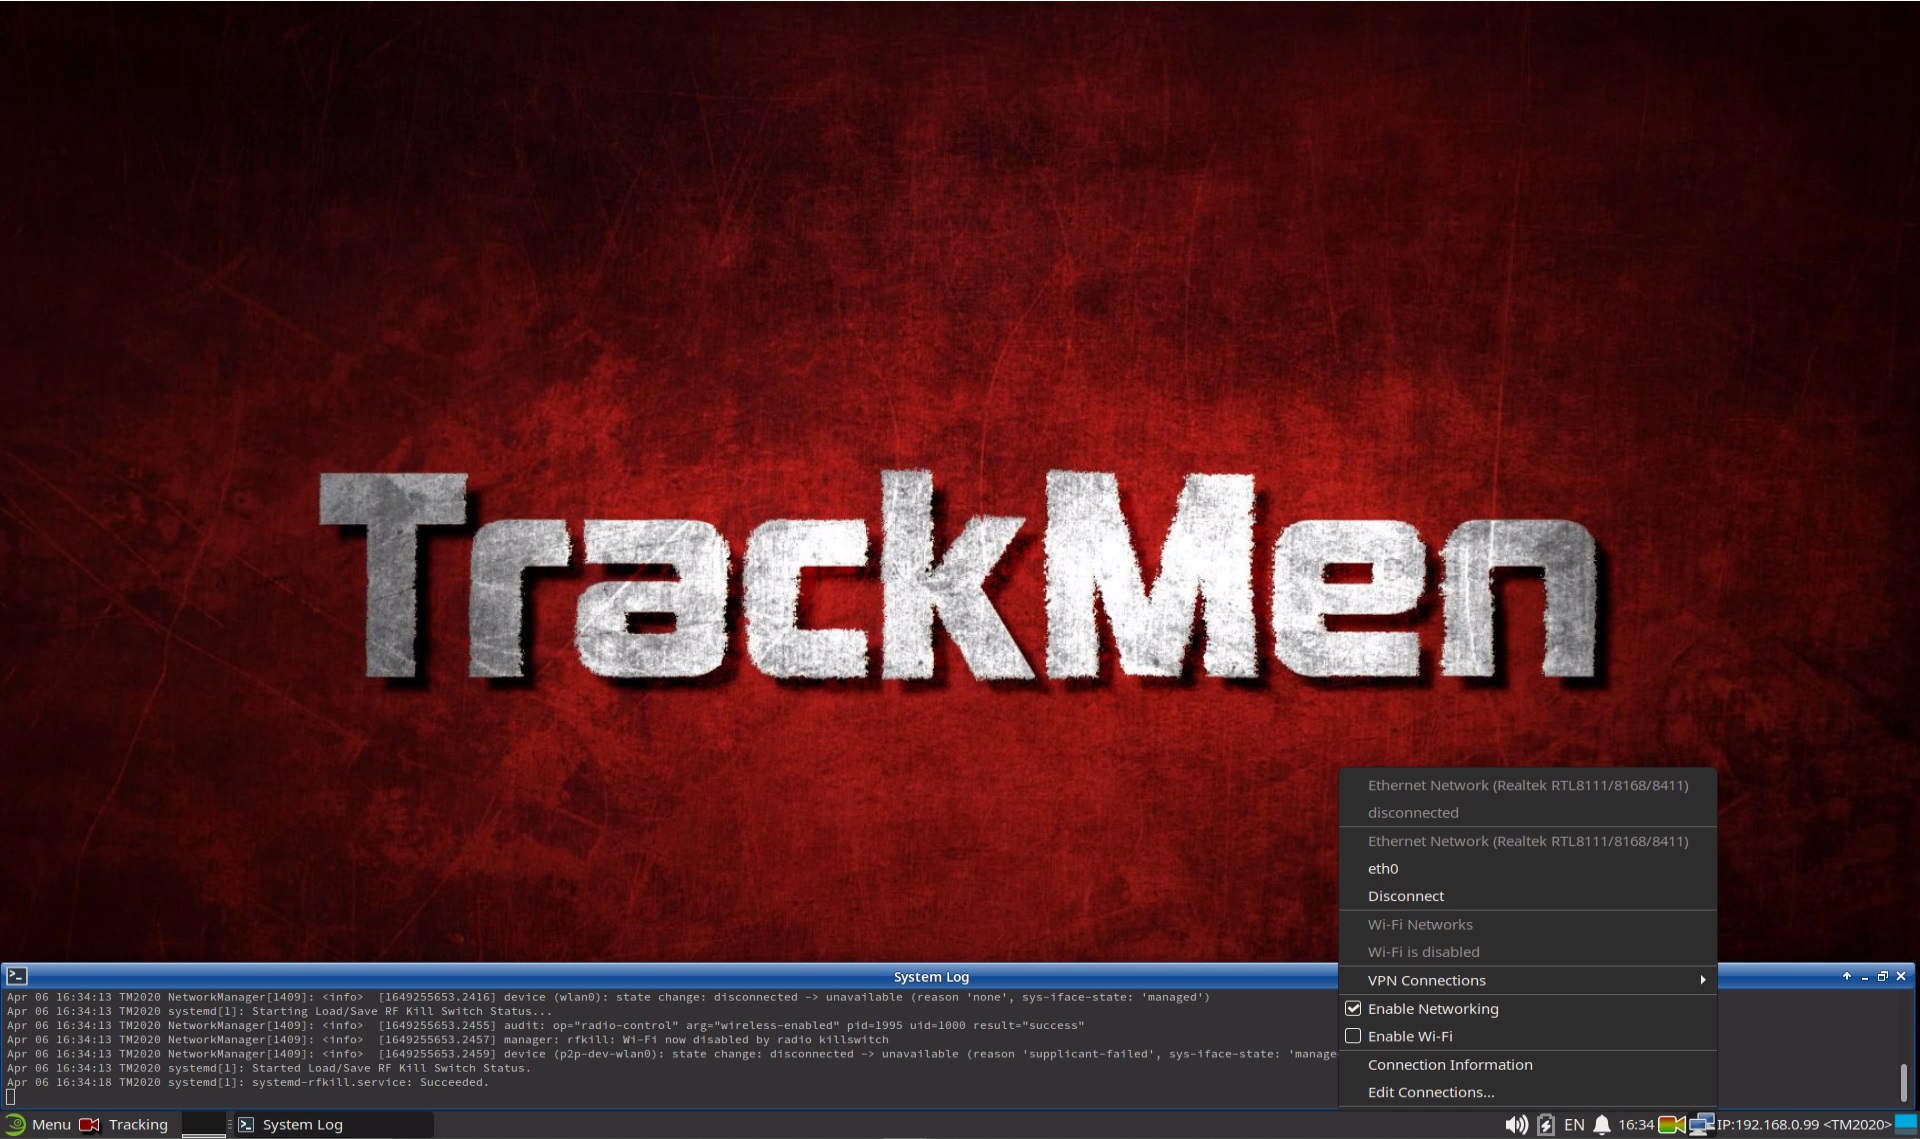
Click the Network symbol in the task bar
-
Select Edit Connections
-
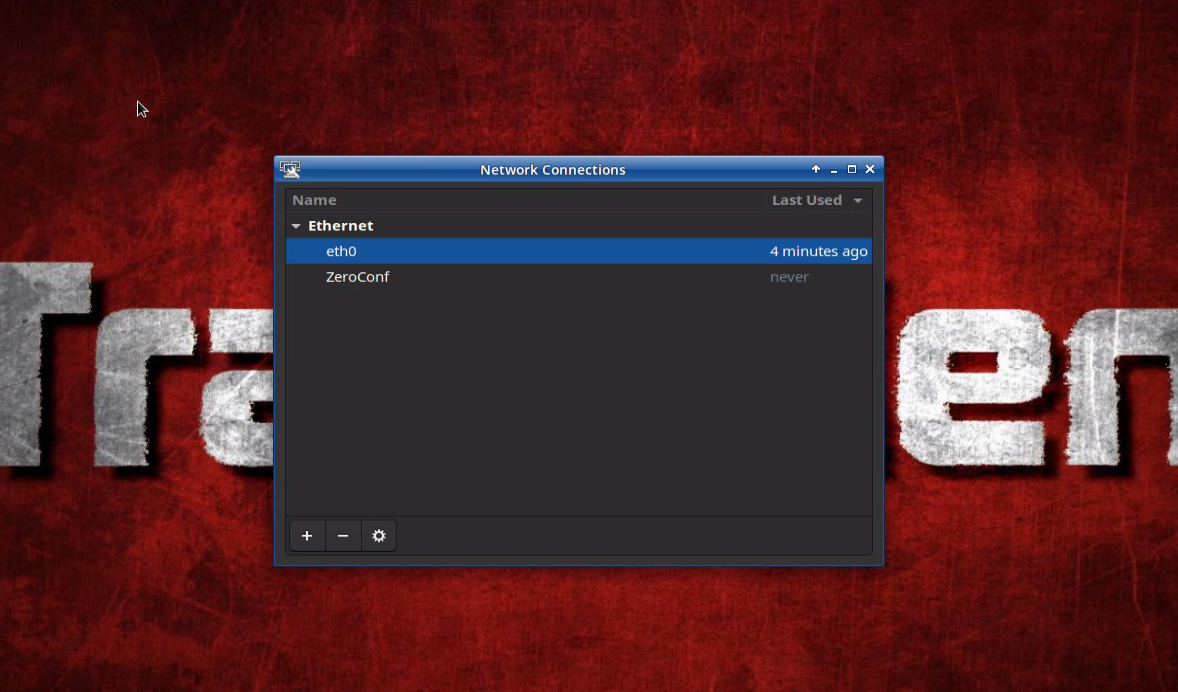
In the upcoming Network Connections window, select the Ethernet connection
eth0 -
Click the gear symbol in the bottom of the window to edit
-
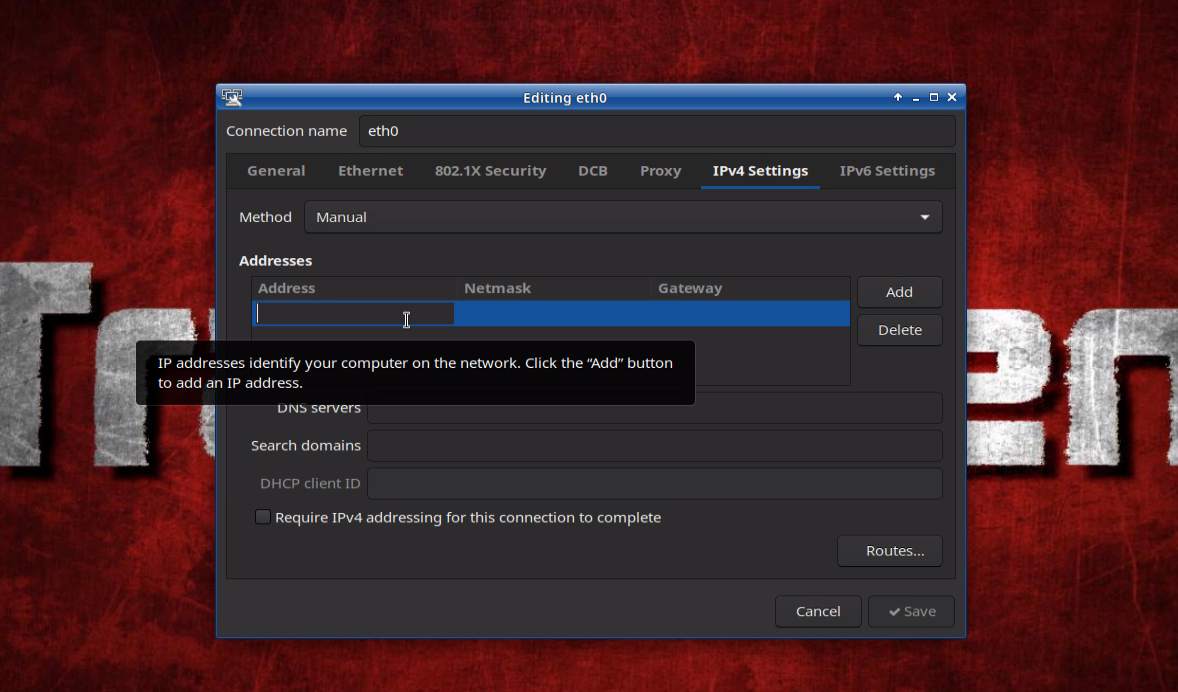
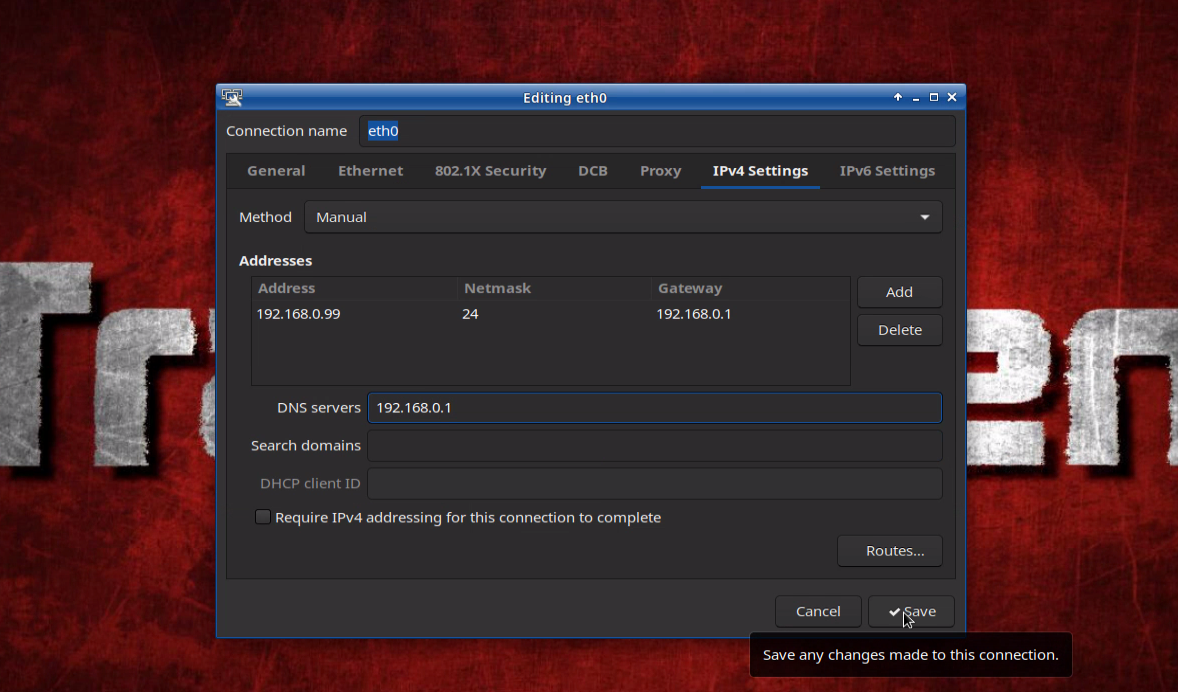
Switch to the IPv4 Settings tab
-
Select Manual in the Method dropdown menu
-
Click the first line in the Addresses section to enter an appropriate IP and Netmask. Remember that the address space must be chosen, so a tracking engine is able to communicate with a graphics engine
-
The Gateway and DNS Server should be set in order to be able to access the internet and thus enable online repositories and remote support
-
Click Save and close the connection editing windows
-
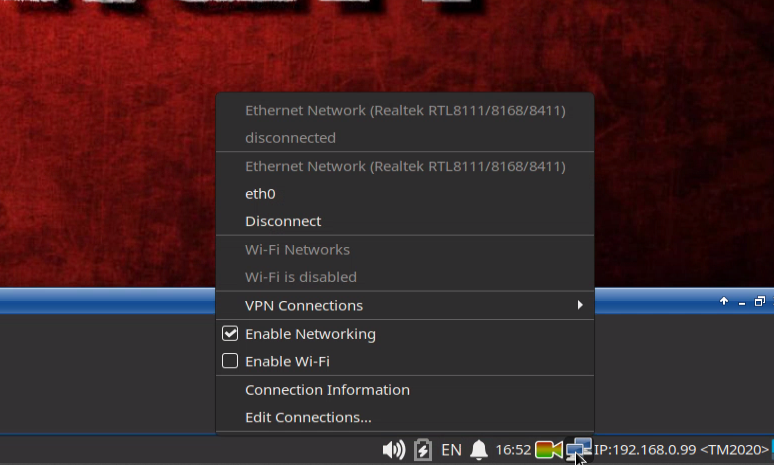
To apply the changes, click the network symbol again to bring up the context menu
-
Find the entry eth0 and click Disconnect right below that. Network connection will be interrupted, including any remote access
-
Then click the entry eth0 itself to reconnect
The IP address in the task bar, next to the network symbol will not be updated immediately but after a short time period.
4 Software Installation
Pixotope Tracking has online repositories from which software can be installed and updated. This is done using the Software Manager. To use it, please follow the steps below.
If the computer cannot be connected to the internet, follow chapter 4.3 to install the software from a USB flash drive.
-
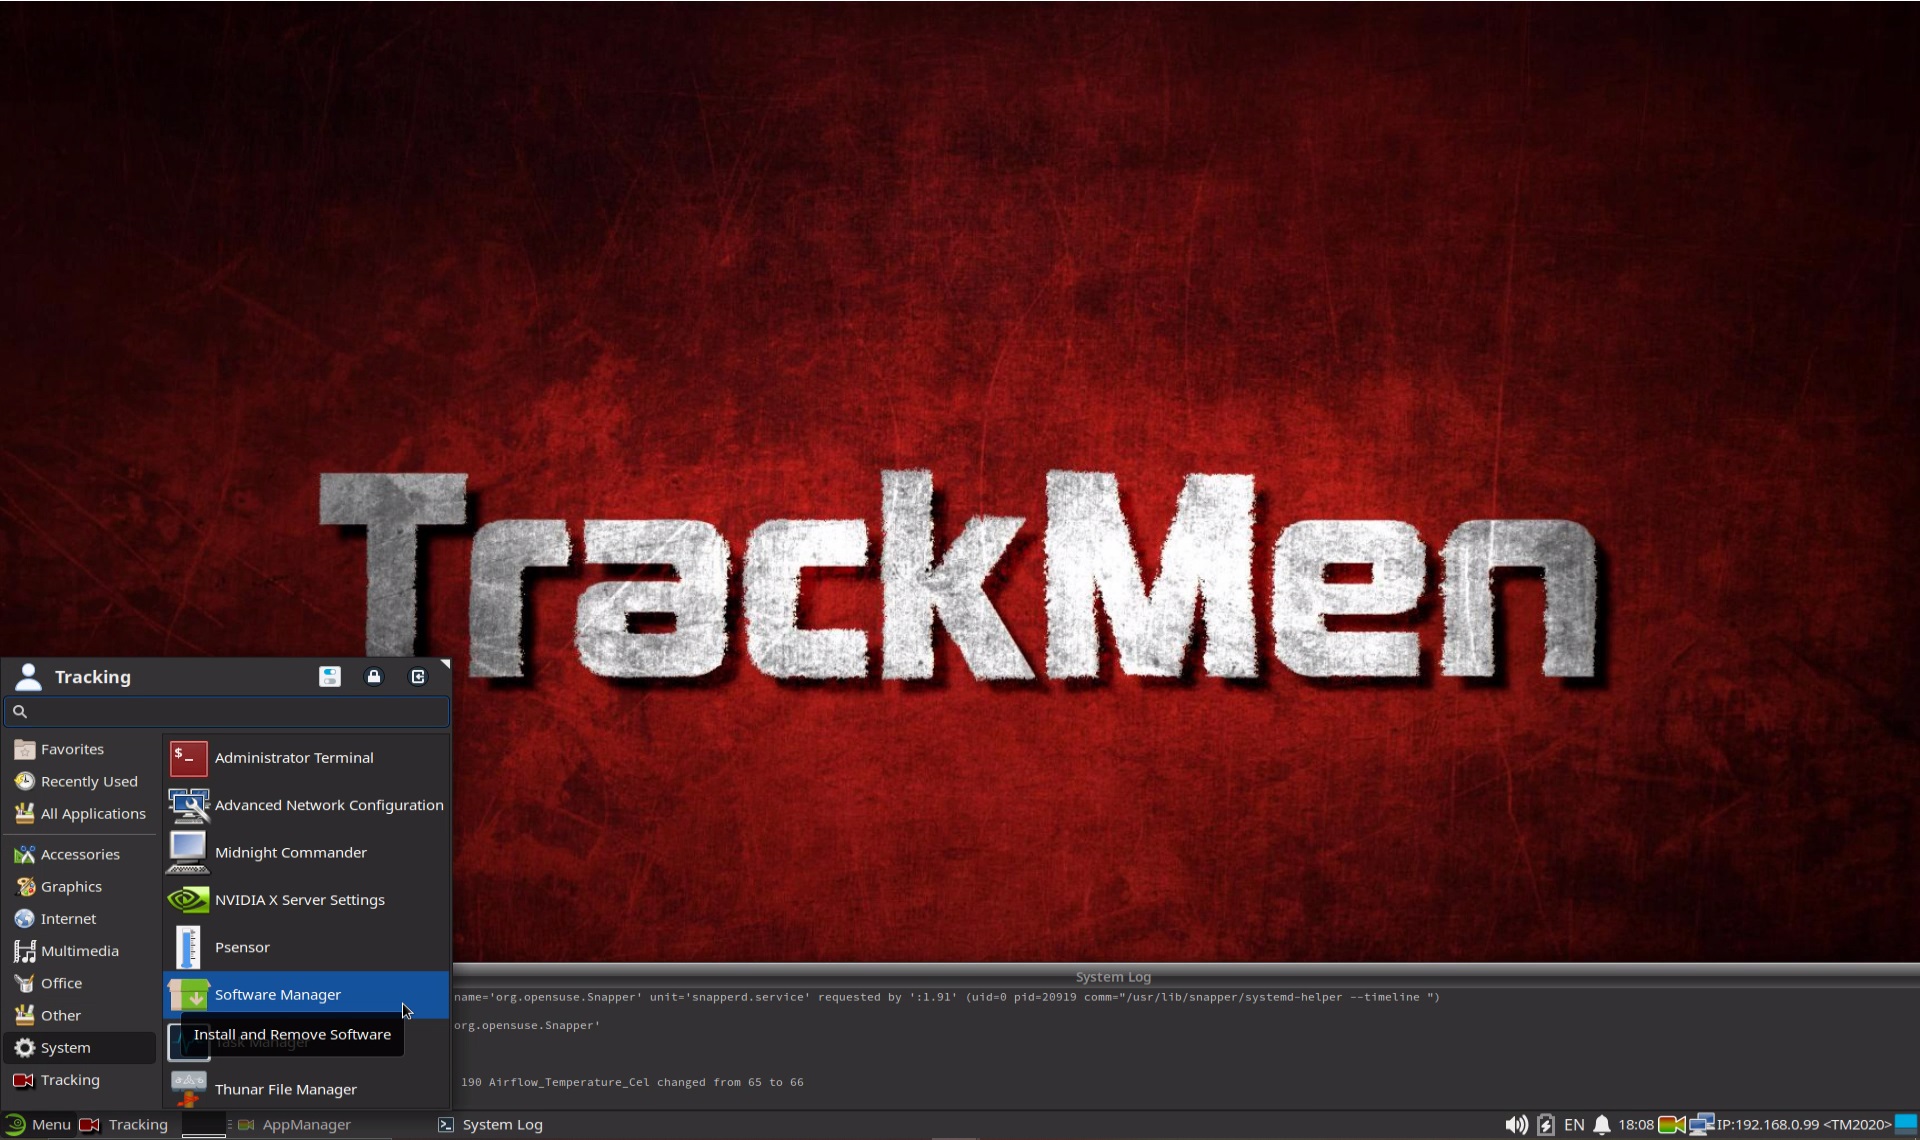
Open the Linux Menu and find the Software Manager in the System section
-
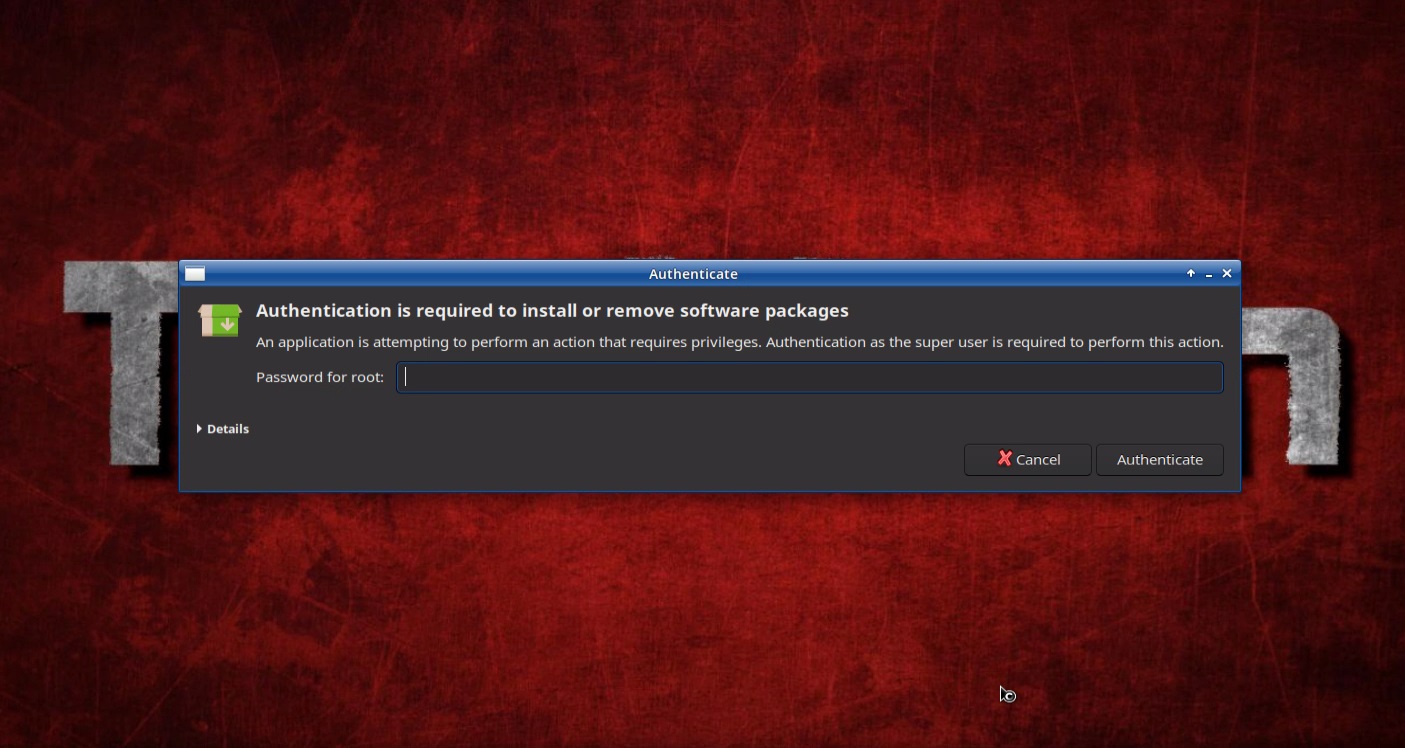
The root (“admin”) password will be requested. Enter the password: tmgmbh51105k
4.1 Checking Repositories
-
Wait for the Software Manager (“YaST2”) to load. Then open the Configuration menu and click Repositories...

-
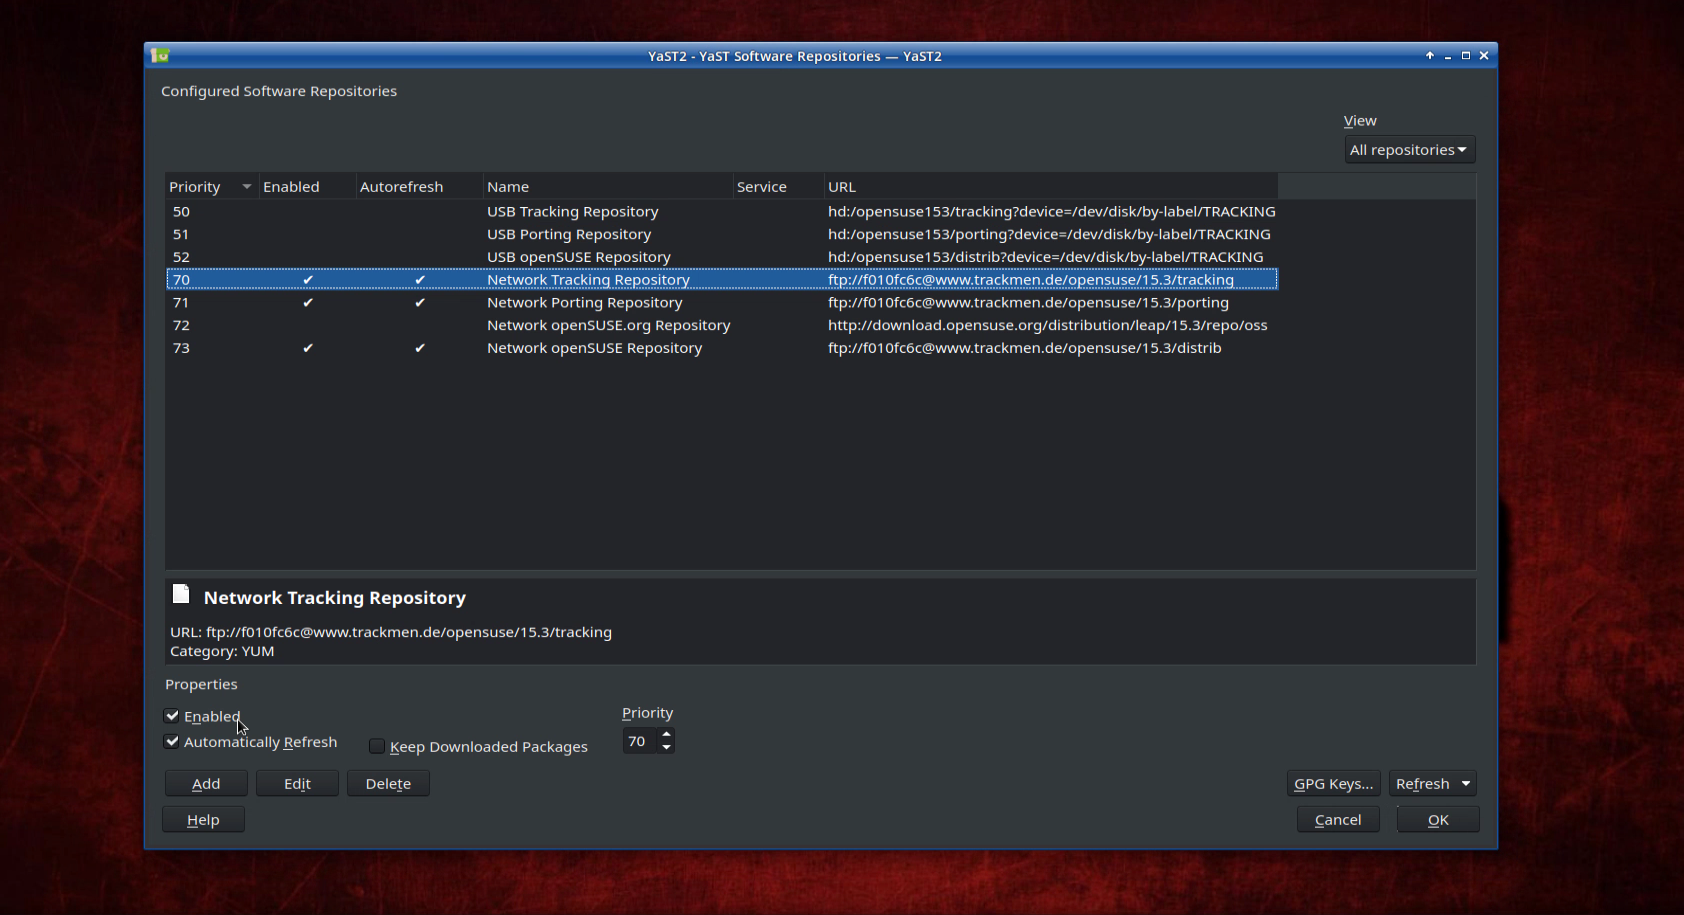
In the repository configuration window, find the three Network Repositories
-
Network Tracking Repository
-
Network Porting Repository
-
Network openSUSE Repository
-
Check both Enabled and Automatically Refresh in the Properties section below the window
-
Click OK to apply and wait for the System Manager to update.
4.2 Installing or Updating Software
-
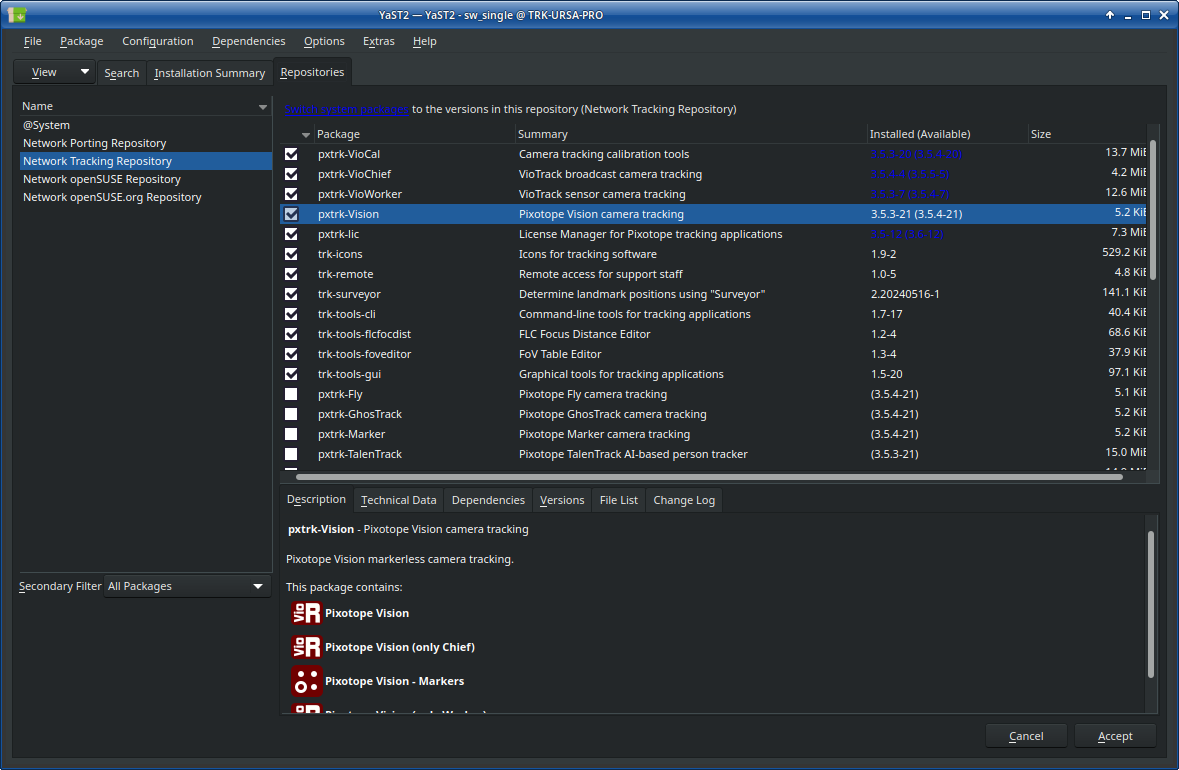
Back in the main window, click the Repositories tab below the menu bar. (If this tab is not visible, open the View dropdown menu and select it)
-
Select the Network Tracking Repository in the left List
-
In the right list, select the desired package and click the checkbox until it shows:
-
A green check mark, if it has not been previously installed
-
A green up-arrow to update the package to the latest version
-
Click on the package according to your license, for example for installing Vision click on the checkbox of pxtrk-Vision. All packages that are necessary will automatically be selected
-
In any case, also select the package trk-remote to be installed
-
Click Accept to apply and confirm the installation summary to install

After the installation of the software is finished, a reboot should be done!
4.3 Installing Software from a USB Drive
If no internet connection is available or desired, the repositories can also be provided by a USB drive. To create and use such a USB drive, please follow these steps:
-
Use the link below to access the repositories folder on the TrackMen FTP server
If a browser struggles to open the link, it can also be entered in FileZilla in the Server field.
-
Download the three folders distrib, porting and tracking
-
The USB stick is required to have a certain setup. Format it to FAT32 filesystem and rename it TRACKING (Windows: right-click in the Explorer and select Format...)


-
Create a folder on the stick called opensuse153
-
Copy the three folders distrib, porting and tracking into that folder

-
Insert the USB drive into the TrackMen workstation.
-
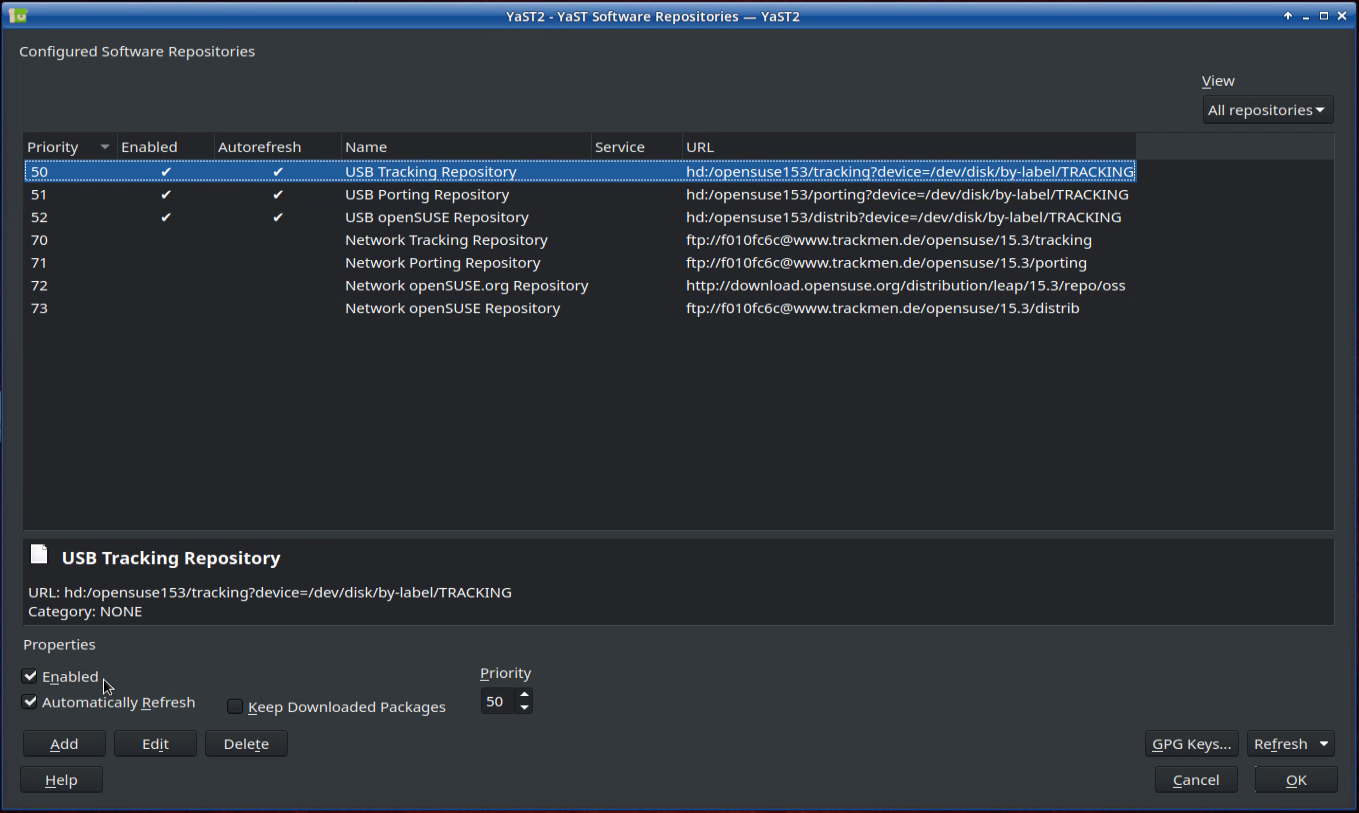
Go to chapter 4.1 and follow the instructions with the difference that in step 4 you now need to check the USB repositories instead of the network repositories:
-
USB Tracking Repository
-
USB Porting Repository
-
USB openSUSE Repository
-
Now the instructions of chapter 4.2 can be followed and the repositories on the USB drive will be used
After the installation of the software is finished, a reboot should be done!
4.4 Updating Graphics Card Drivers
The graphics card drivers are also accessible through the Software Manager and can be updated there.
-
Open the Software Manager from the start menu (password: tmgmbh51105k)
-
Click on Search and type in “nvidia” into the search field
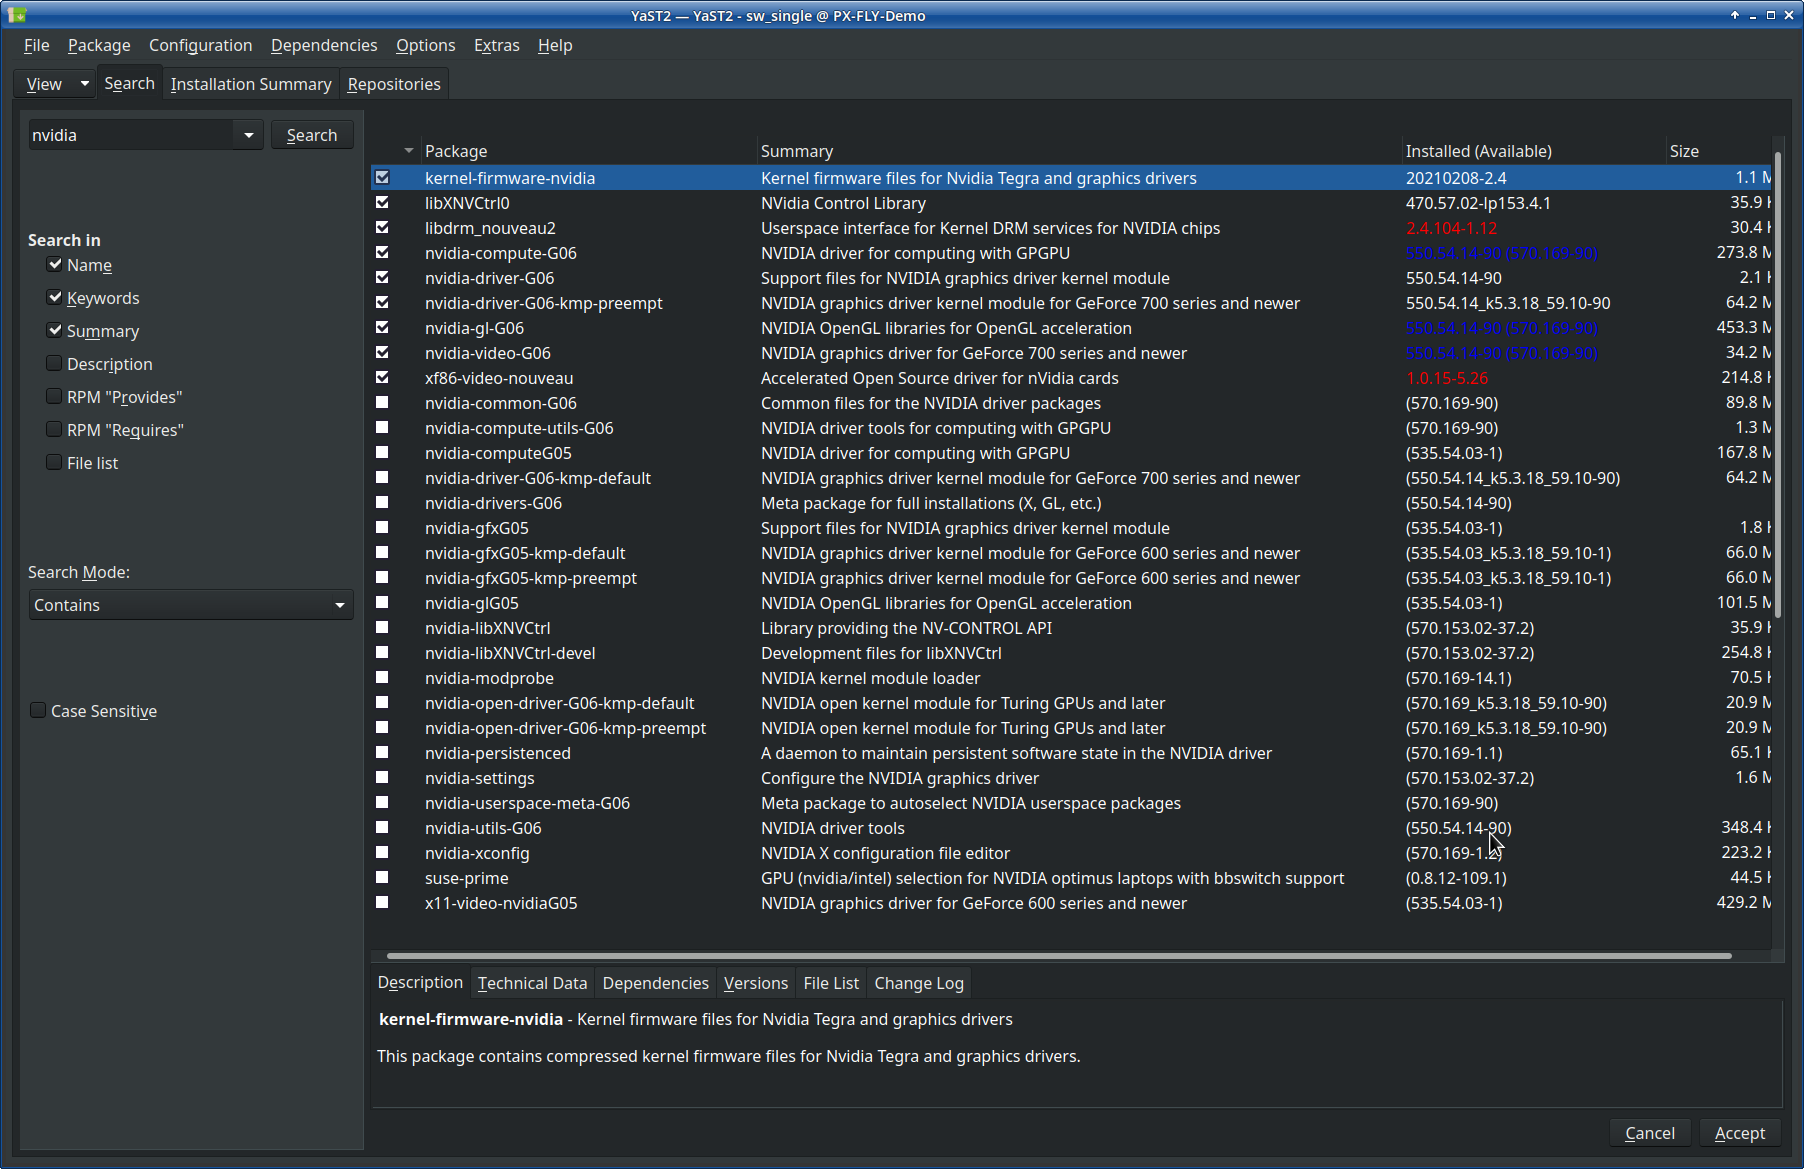
The different driver versions can be differentiated by the version number in the Installed (Available) column and the suffix G05 or G06 in the name.
-
By default G06 / 550.x drivers are installed. These drivers work up until and including NVIDIA RTX 40xx cards
-
For NVIDIA RTX 50xx cards version 570.x must be used
-
For much older cards the G05 drivers might be suitable
-
For updating to the 570.x drivers click on the left white square of a the nvidia-userspace-meta-G06 package. Other related packages that are necessary will be selected automatically
-
If a message like the following appears, select the option that leads to the deinstallation of the unwanted version
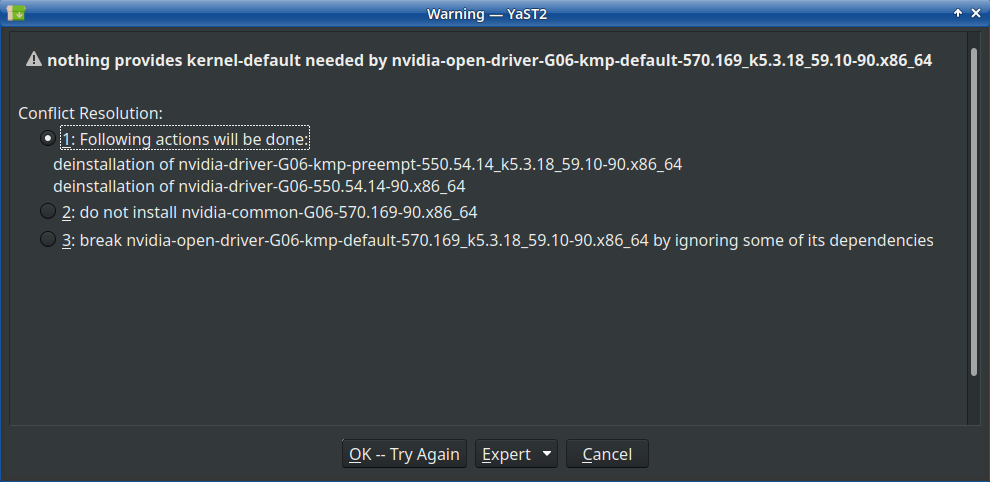
Please note that downgrading may require additional steps of removing individual packages that depend on the respective versions.
5 Activating Remote Access
For using the dedicated Pixotope remote connection the trk-remote package from the Network Tracking Repository needs to be installed. If it has not yet been installed or needs to be upgraded, please refer to chapter 4 Software Installation. The computer also needs access to the internet.
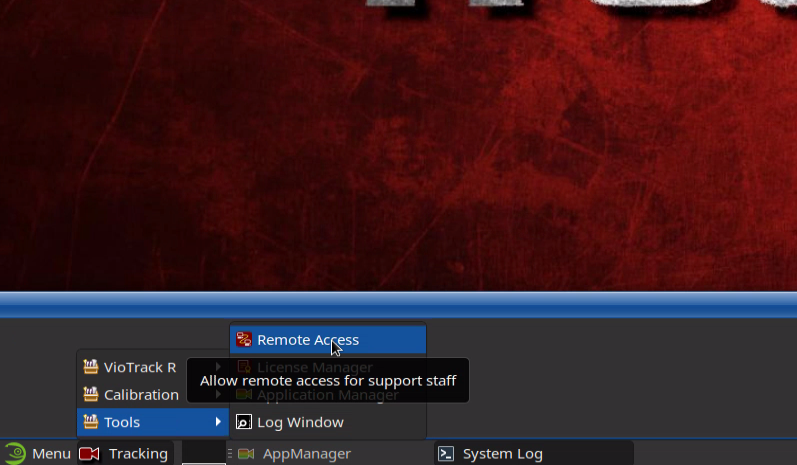
To grant remote access for Pixotope support, open the Tracking menu in the task bar and navigate to Tools and then Remote Access. The system will register on a server in the TrackMen office in germany and open a channel for remote access via NoMachine.
More information about remote access with or without internet connection on the tracking engine can be found in the Remote Connection page.
6 Using the Operating System
Chapters 1 to 4 enables beginning the calibration of the tracking system. Furthermore chapter 5 enables the Pixotope staff to log in and do support or a system check.
This chapter gives more information about using the operating system.
6.1 UI Components
Every TrackMen OS has common components that will be installed with the OS.
6.1.1 Task Bar
Tracking Menu: on the left side of the taskbar, the Tracking Menu provides quick access to to all tracking software as well as the calibration software and tools.
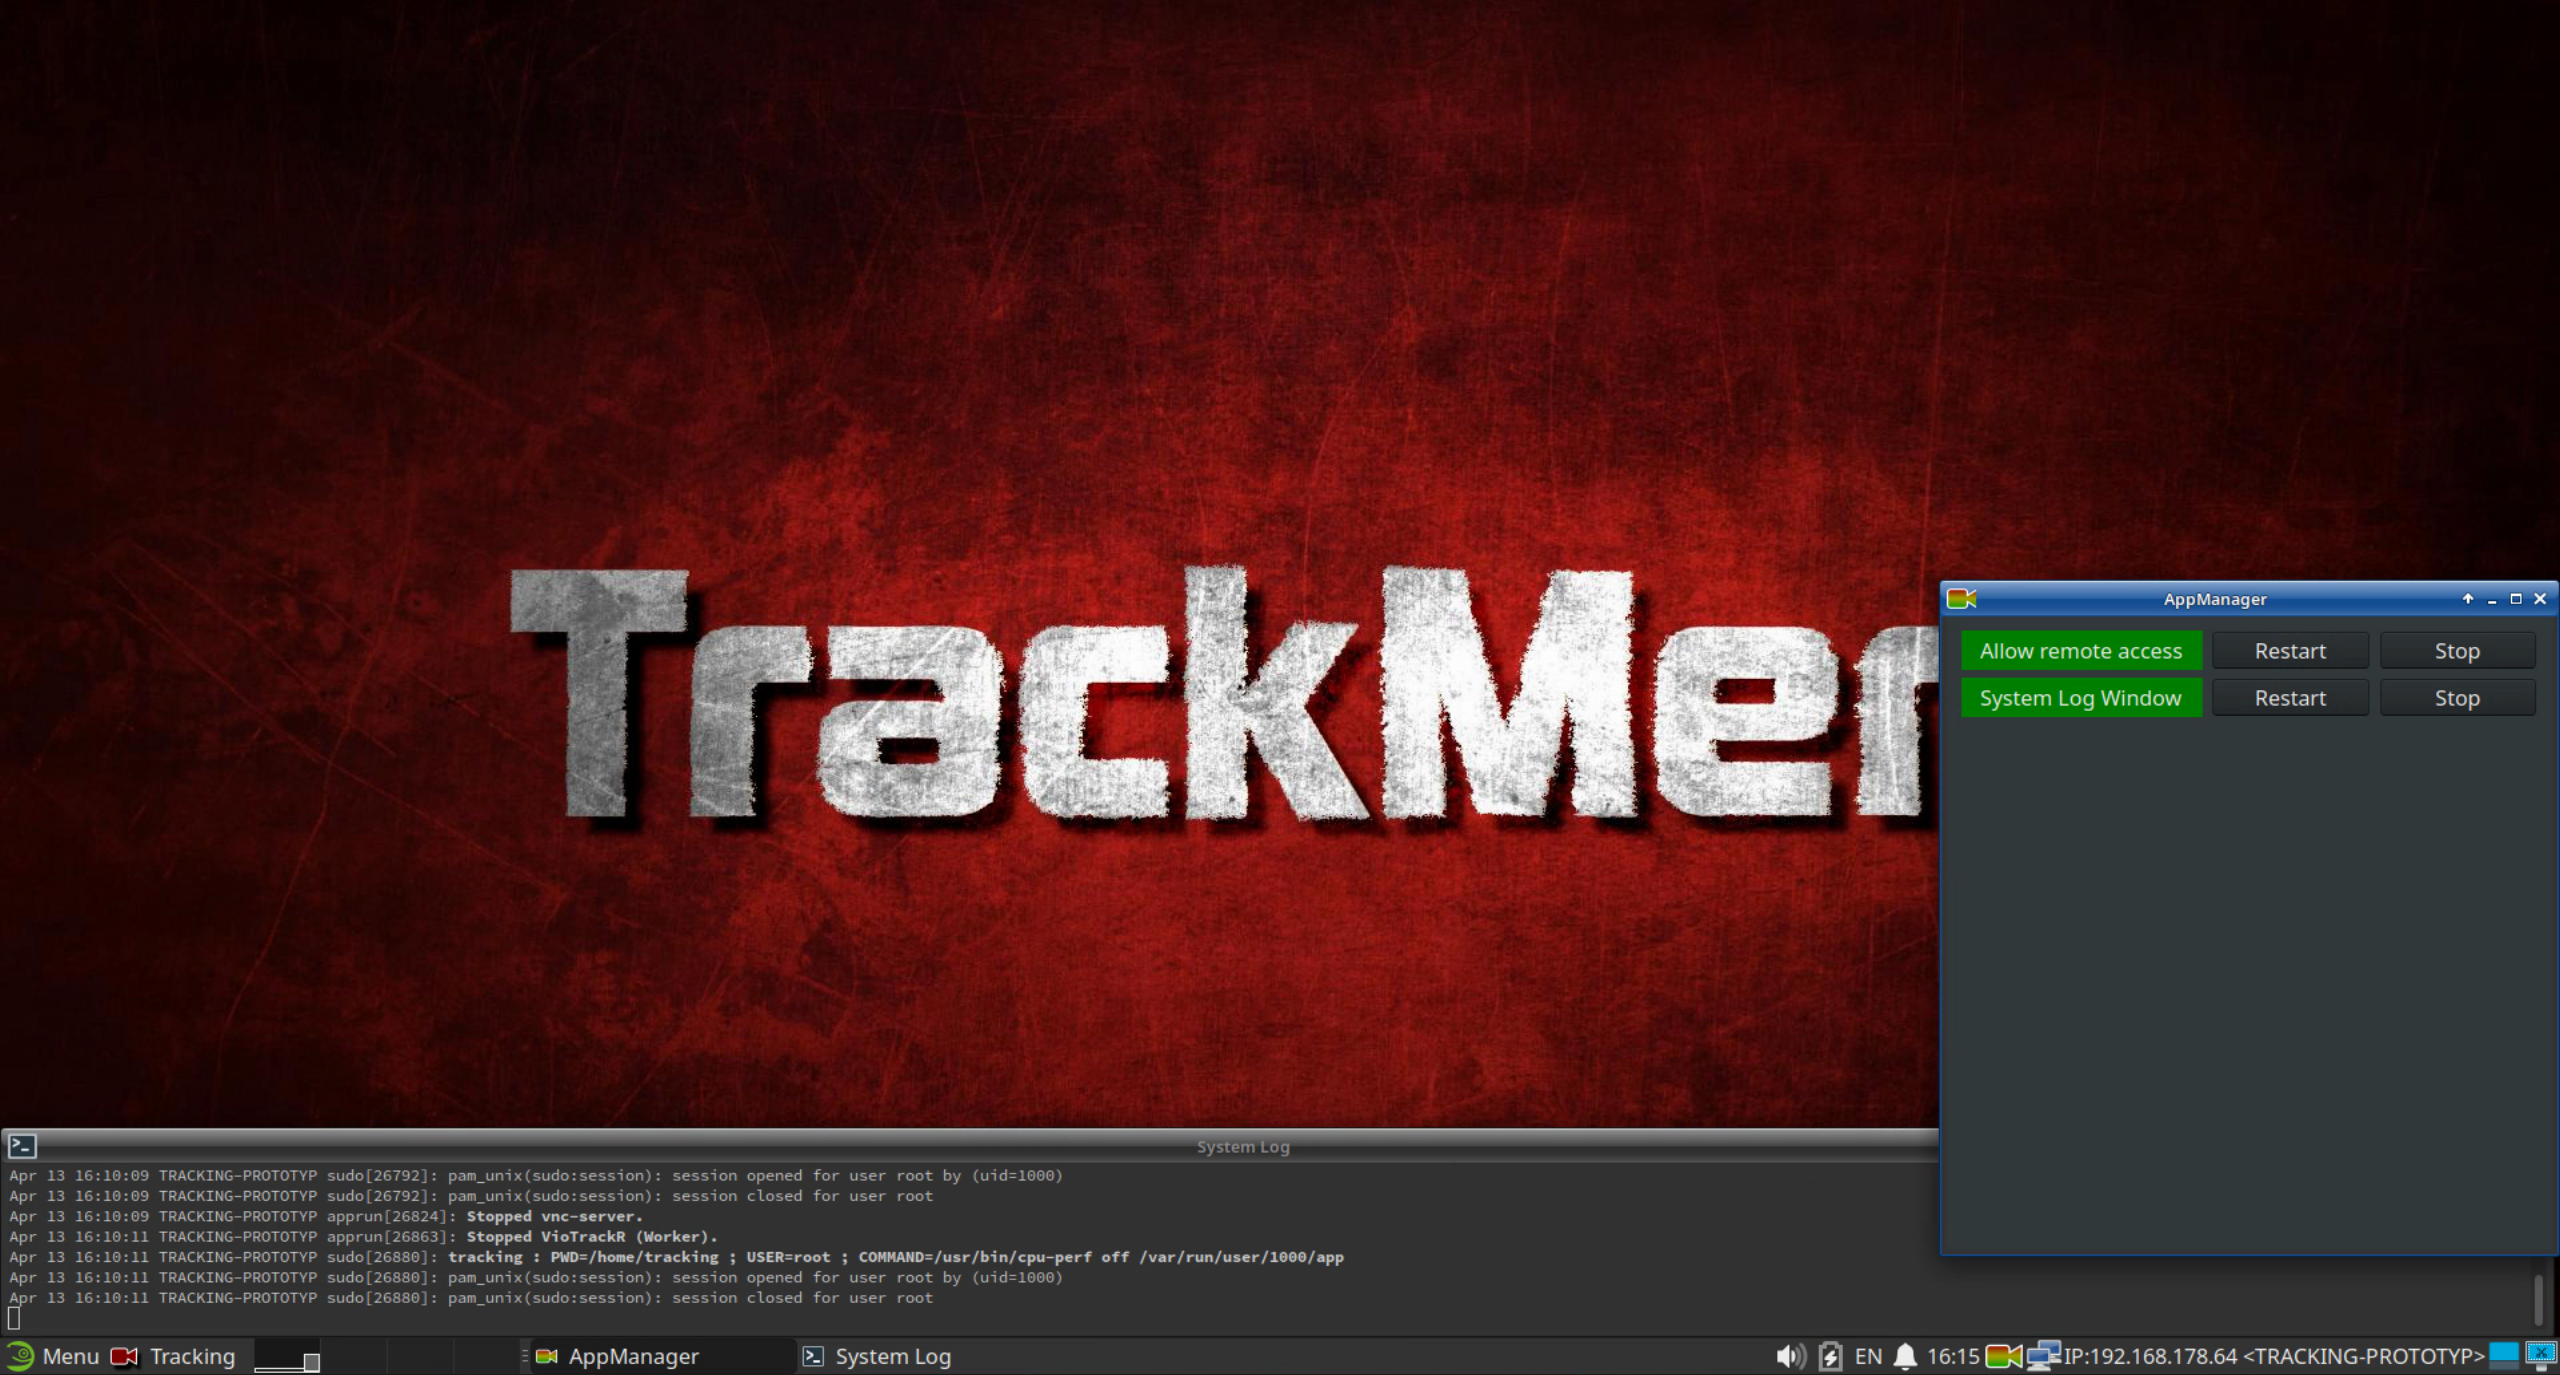
AppManager: The colorful camera symbol on the right side of the Task Bar opens the AppManager.
Network settings: The IP address of the machine is displayed on the right side of the task bar. When changing the machine’s IP address it takes a moment until the IP address in the Task Bar is updated. Check chapter 3.1 on how to change the IP.
Host Name: On the right side of the IP address the machine’s host name is displayed. It can be changed by typing “hostname” in the Menu and opening this tool. This name will be visible for remote Support from Pixotope so it makes sense to give the machine a name that makes it easy to identify. When changing it a relog is necessary.
6.1.2 System Log
The system log prints core system activities from system applications and services in a chronological order. It can be helpful in case something is not working as expected. It is also where where data will be displayed when a parameter dump is activated in the tracking system.
The system log does not need to be observed permanently. It is mostly a tool when setting up a system and for error diagnostics.
6.1.3 AppManager
The AppManager shows applications which are running by displaying them in green. The applications can be restarted and stopped with the respective buttons. When right-clicking on the AppManager symbol in the Task bar you can select “Show All Apps” to have it display running as well as non-running apps. The latter are shown in red.
The AppManager can be considered a quick access tool in situations where frequent switching between programs is necessary.
6.1.4 File Manager
The standard working directory of the tracking and calibration software is dependent of the used software:
/home/tracking/pxVision/
/home/tracking/pxMarker/
/home/tracking/pxFly/
/home/tracking/pxGhosTrack/
/home/tracking/pxTalenTrack/.
These folders contain the configuration files for the Chief, the Worker, the calibration software as well as the reconstructions.
The lens files are stored in the folder /home/tracking/lenses/ with the exception of TalenTrack where they are stored in /home/tracking/pxTalenTrack/Calibration.
6.2 Network Settings
Please check chapter 3 on how to set up the network connection.
6.2.1 ZeroConf Connection
For Pixotope Vision, Marker, GhosTrack and TalenTrack, an additional network connection with the name ZeroConf is created. This connection is for the sensor camera. It will be listed after installing the tracking software and performing a reboot.
If the sensor camera is not detected in the software, it should be checked whether the correct eth port is set in the Ethernet tab of the Network Connections settings.
When plugging or unplugging an ethernet cable to an ethernet port of the computer, the system log will display a message that includes which port was used. It is usually named eth0, eth1, eth2, …

If it’s not listed or has been deleted, the ZeroConf connection can be created manually. Click on the Network symbol in the task bar and on Edit Connections. Add a new connection by clicking on the plus-symbol. The following things must be edited in that Network Connection:
-
Select the ethernet port that connects to the sensor unit camera as Device, in the Ethernet tab. (Illustration 22)
-
Set MTU to 9000 in the Ethernet tab (Illustration 22)
-
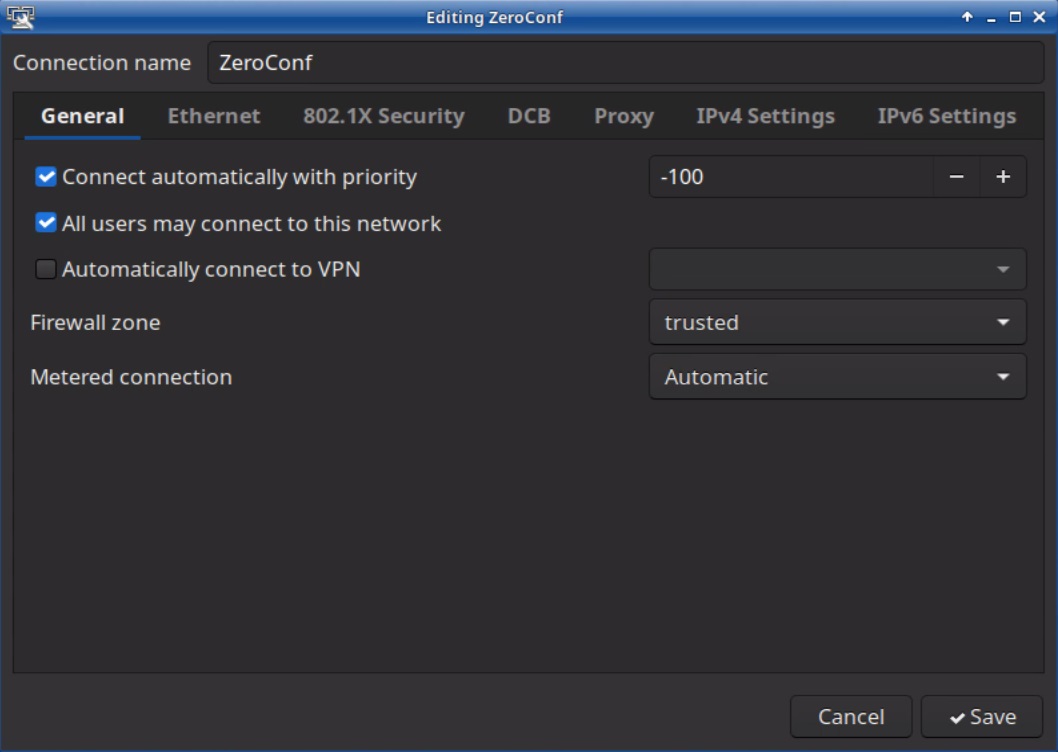
In the General tab the Firewall zone must be set to trusted (Illustration 23)
-
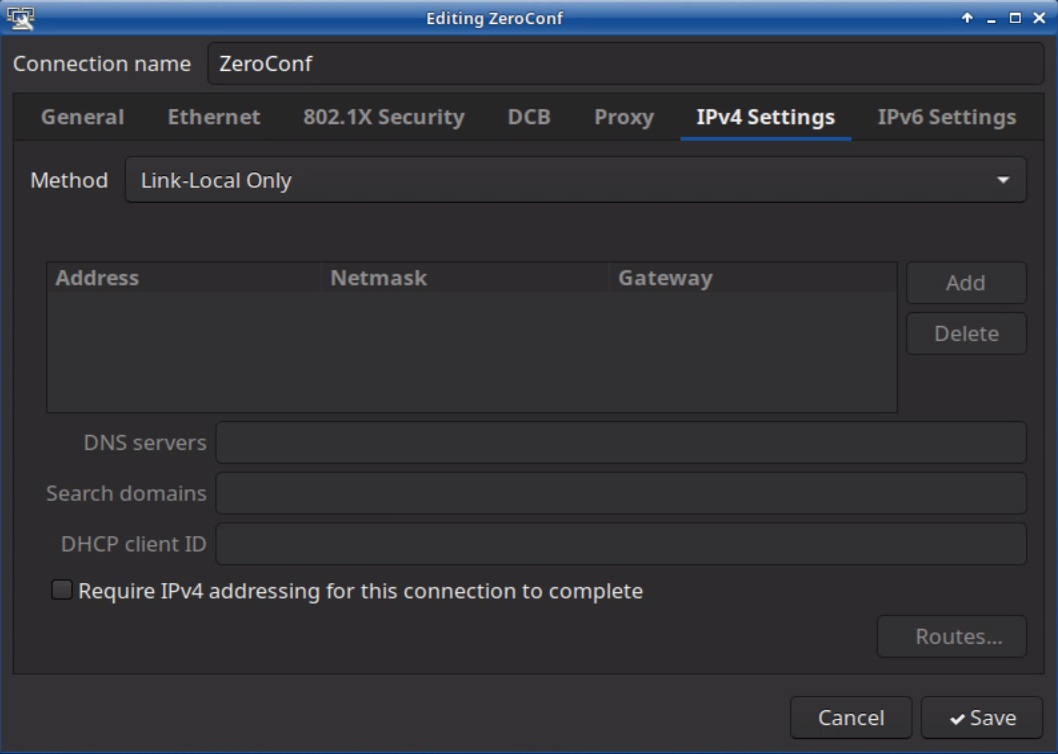
In the IPv4 Settings the Method must be set to Link-Local Only instead of Manual (Illustration 24)
-
The other settings remain at their default values. If they have been changed, please compare with the illustrations to verify
The ZeroConf connection can also be recreated by these two commands in a terminal window:
sudo install -m 0600 /usr/share/tracking/network/ZeroConf.nmconnection /etc/NetworkManager/system-connections
sudo nmcli connection reload
The root password is: tmgmbh51105k
6.3 Updating Software
Please check chapter 4 on this page about how to install the software for the first time.
Updates may go along with new dependencies such as driver- or kernel-updates. It is recommended to perform any updates only when sufficient time is available to react to further software modifications needed!
Open the Software Manager and navigate to the Network Tracking Repository or USB Repository respectively. The list on the right displays available packages. Installed packages are marked with a check mark. Behind the version number any newer version available is listed in parentheses. One left-click on the check mark will set the program to update the package. This will be indicated by a green upwards arrow and listed in the Installation Summary tab.
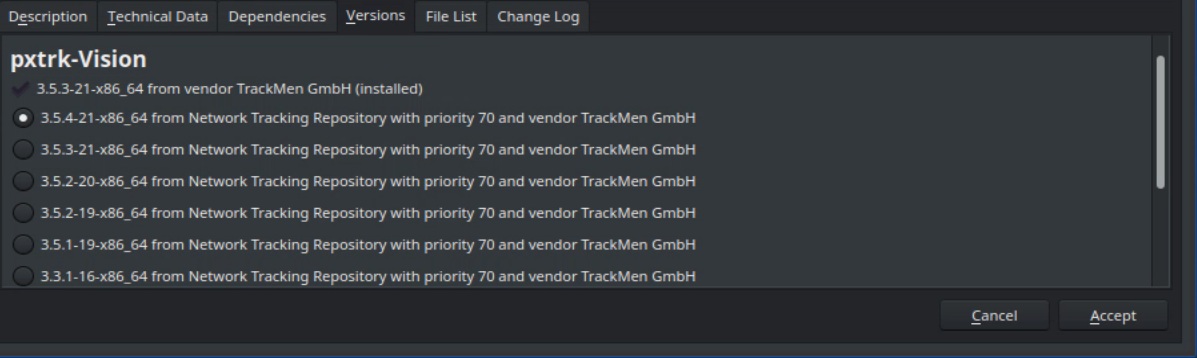
When clicking on a package, further information about it are displayed in the tabs below. Amongst others, there is the tab ”Versions”. The version to be used can be selected from this list manually.
6.4 Autostart
When booting the computer the operating system will automatically start the programs that are listed in the Autostart folder. The path of this folder is /home/tracking/autostart/.
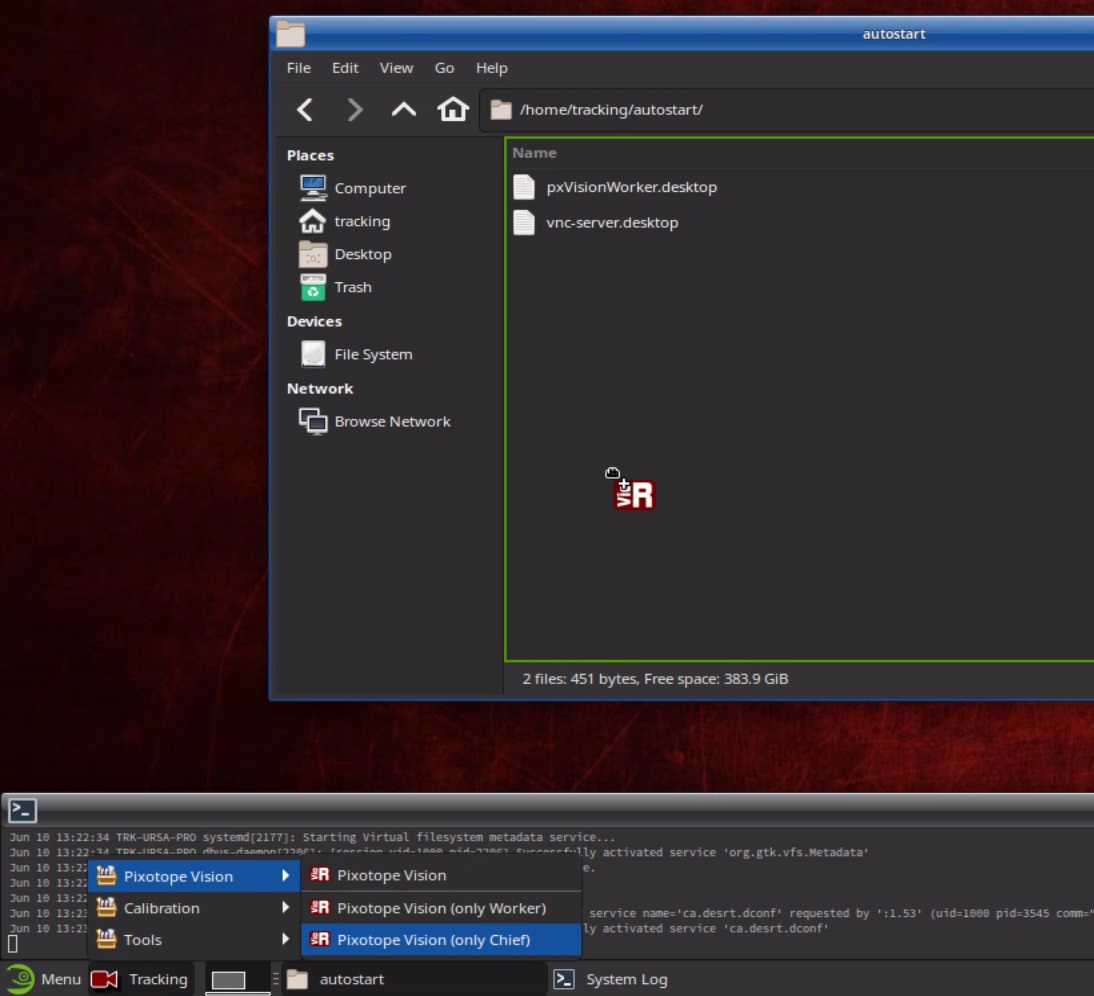
6.4.1 Automatic Start of Tracking
If the tracking programs shall start at boot, the Chief and the Worker have to be put individually into the Autostart folder from the Tracking menu in the task bar. Additionally the Worker has to be delayed, because after a reboot of the computer the sensor camera reboots and establishes a new network connection to the computer. If not delayed, this will result in the Worker program starting and not having an image source available. This can be solved by clicking on Restart image source in the Settings or by delaying the program start for as long as it takes the Sensor camera to boot and establish a connection.
-
Open the File Manager and navigate to the Autostart folder.
-
Drag-and-drop the Chief and the Worker buttons individually into the Autostart folder from the Tracking menu in the task bar (Illustration 27).
-
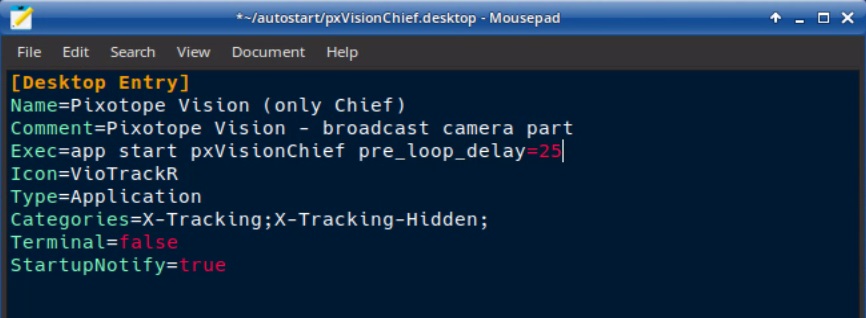
Rightclick on the pxVisionWorker.desktop in the Autostart folder.
-
Open the file with Mousepad.
-
Change the fourth line to: “Exec=app start pxVisionWorker pre_loop_delay=25”. This will add a delay of 25 seconds before the Worker is being started automatically for the first time after the system boot. The amount of seconds depend on how long the sensor camera takes to boot and connect to the computer. It usually varies between 15 and 30 seconds.
-
Save the file.
-
Reboot to test if the amount of seconds is suitable.
6.4.2 Automatic Remote Access Permission
The Remote Access link from the Tracking menu in the task bar can also be drag-and-dropped into this folder. Remote access will then automatically start when the operating system is booting. This will only work while an internet connection is already established. Therefore a start delay has to be set:
-
Open the File Manager from the Menu and navigate to the Autostart folder.
-
Drag-and-drop the Remote Access button from the Tracking menu in the task bar into this folder.
-
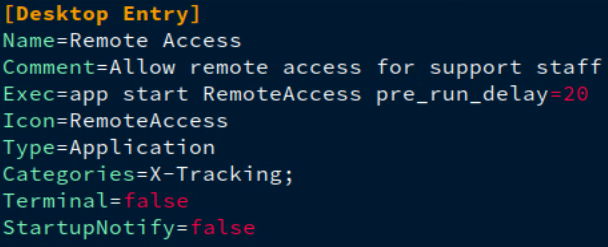
Rightclick on the RemoteAccess.desktop in the Autostart folder.
-
Open the file with Mousepad.
-
Change the fourth line to: “Exec=app start RemoteAccess pre_run_delay=20”. This will add a delay of 20 seconds before the program is being started automatically for the first time after the system boot. The amount of seconds depend on how long it takes the machine to connect to your network.
-
Save the file.
Putting the Remote Access into Autostart can be convenient in case remote support has to reboot the machine. It can of course be revoked by deleting the file from the Autostart folder after a remote session.
7 System Snapshots / Software Recovery using Snapper
By default an Operating System software called Snapper will create “Snapshots” of the software status before and after installing / removing packages in the Software manager. These snapshots can be used to track changes and to roll back to a previous state if needed.
When doing any changes to software, dependencies might go along with these and packages might be installed which users don’t actively select for installation. When attempting a downgrade, these additional packages will only be removed when they were set to be in conflict with any older packages. Since older packages are likely to not know of newer software parts, because they were not in existence when the old package was released, there is a chance that conflicting packages do not get removed when downgrading. That may end up in the system misbehaving and is especially true when it comes to things like Nvidia drivers.
Hence, downgrading should always be performed using the Snapper tool to revert to an earlier software state.
Note that a downgrade will in most cases only have to be considered when it turns out that the hardware is incompatible! If something in a software stops working or starts misbehaving, in the majority of situations, it is due to the machine not having been restarted to apply driver updates and/or launch all services.
7.1 Using Snapper
Snapper runs in the background and creates snapshots automatically without the user having to do anything. However, snapshots that are not marked important, will be removed after a certain time or amount of snapshots accumulated.
When using Snapper to rollback to an earlier software state, only the software packages in the Software Manager are being touched. It will not affect other files saved on the machine, or configurations that were made!
Snapper will automatically create an important Snapshot of the system after the OS was first installed.
It will also generate a “pre” and a “post” snapshot of before and after a software package change.
7.1.1 From the terminal
Snapper is a root application, requiring the respective privileges. So all Snapper operations must be preceded by sudo or be performed while logged in as superuser by writing su in the terminal, and the root password tmgmbh51105k should be at hand.
Why use this from the terminal when in the next section, there is a GUI explained for this? Well, you might have to rollback without the Linux GUI starting, because the Nvidia drivers turned out to be not matching the installed GPU.
Get a list of existing Snapshots by entering
sudo snapper list

Create a new snapshot
sudo snapper create --description “<description>”
where <descripton> is something meaningful to identify the snapshot, like
sudo snapper create --description “Commissioning status”
Rollback to a snapshot of your choice by entering
sudo snapper rollback <Number>
where <Number> is the number in the # column of the list. Then reboot the machine to apply (you may use sudo reboot)
7.1.2 Using SysSnapshot Manager
-
Install the System Snapshot Manager:
-
Open the Software Manager and go to Configuration → Repositories and enable the Network http://openSUSE.org Repository (the one with http://download.opensuse.org in the URL) to have all dependencies available
-
Back in the main Software Manager window, find the package trk-tools-syssnapshotmanager in the Network Tracking Repository and click the checkbox to mark it for installation. Hit Accept to perform the installation.
-
-
Launch SysSnapshot Manager from the start menu and enter the root password
-
The SysSnapshot Manger will present the full list of Snapshots and allow the following operations:
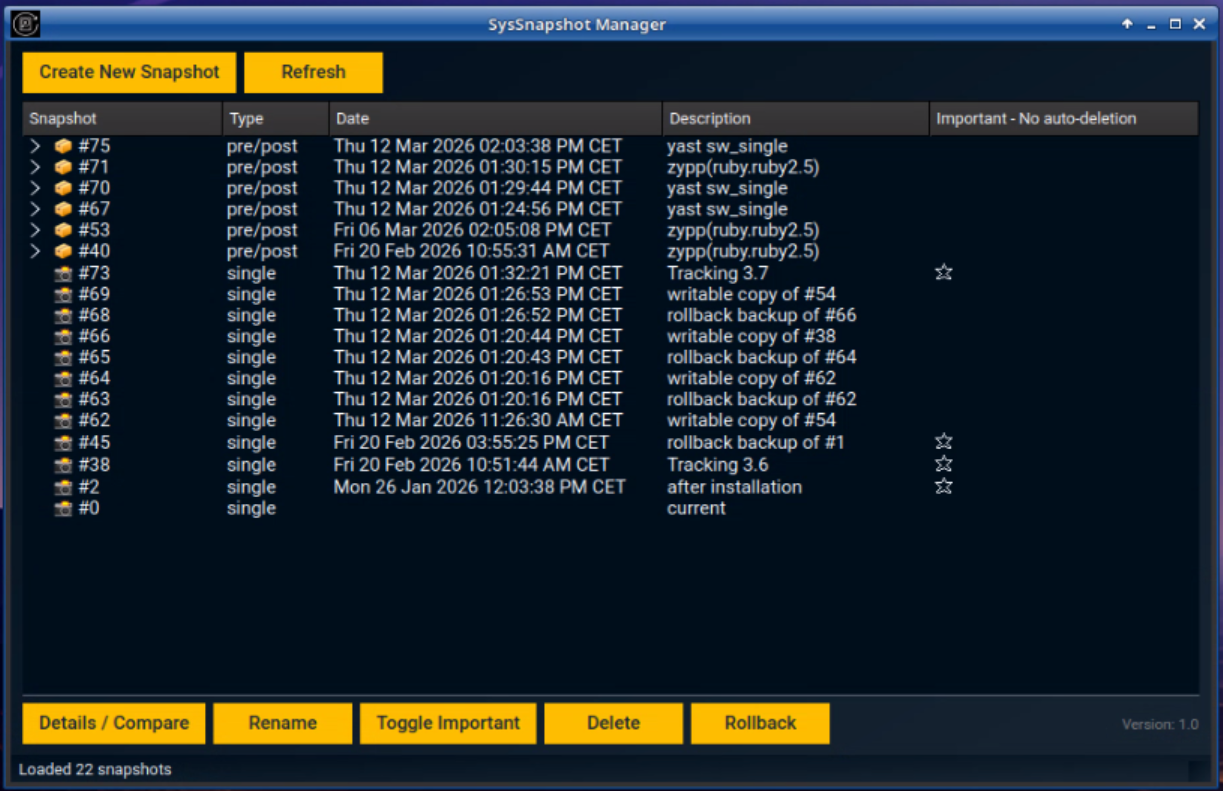
Create New Snapshot
This will generate a snapshot with the current software configuration. It will ask for a description. I recommend creating a snapshot by default after all the software is installed during commissioning! Then to make that snapshot “important” (see below).
Details / Compare
Compares changes in software packages between a selected snapshot and a second snapshot that was also selected with ctrl+left mouse button. Mind that the direction (installed/removed) depends on which selection was first.
Rename
Allows to put a description for a snapshot, such as “Pixotope Commissioning”, so it can be identified later.
Toggle Important
label this snapshot as important, so it will be kept forever! Non-important snapshots are temporary. For example, the commissioning snapshot should be “important”.
Rollback
The selected snapshot will be marked for rollback. Reboot the system to return to that software status.