With DMX, a control protocol commonly used to control stage lighting and effects, we can tie physical and virtual lights (or other effects) together. This creates more seamless environments for mixed reality content and improves its impact.
Check out our DMX example in the example projects
For functionality specific to the Unreal Editor and some in-depth knowledge, check out https://docs.unrealengine.com/en-us/Engine/Editor.
Control from Pixotope
For controlling virtual and physical lights via Pixotope's control panel (using the ArtDMX Light controller plugin) check out Art-Net / DMX control.
We currently do not recommend using the ArtDMX Light controller plugin and Epics DMX plugins side by side.
Control from an external DMX controller
Here we describe how you can control virtual and physical lights (or other fixtures) from an external DMX controller using Epics DMX plugins.
Epic's DMX plugins are still in BETA.
Setup in the Editor
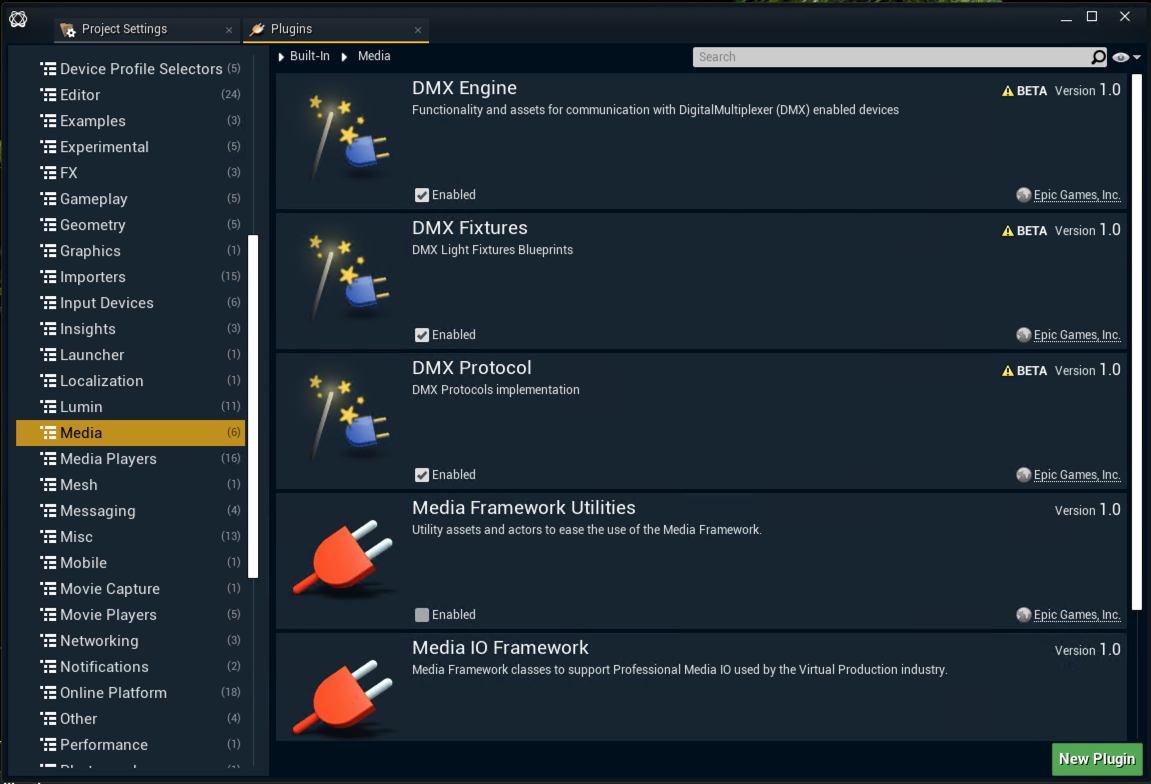
Enable plugins
-
Open the "Plugins" window via Edit > Plugins in the window menu
-
Click on the "Media" category or search for DMX
-
Enable the following plugins:
-
DMX Engine
-
DMX Fixture
-
DMX Protocol
-
-
Restart the Editor
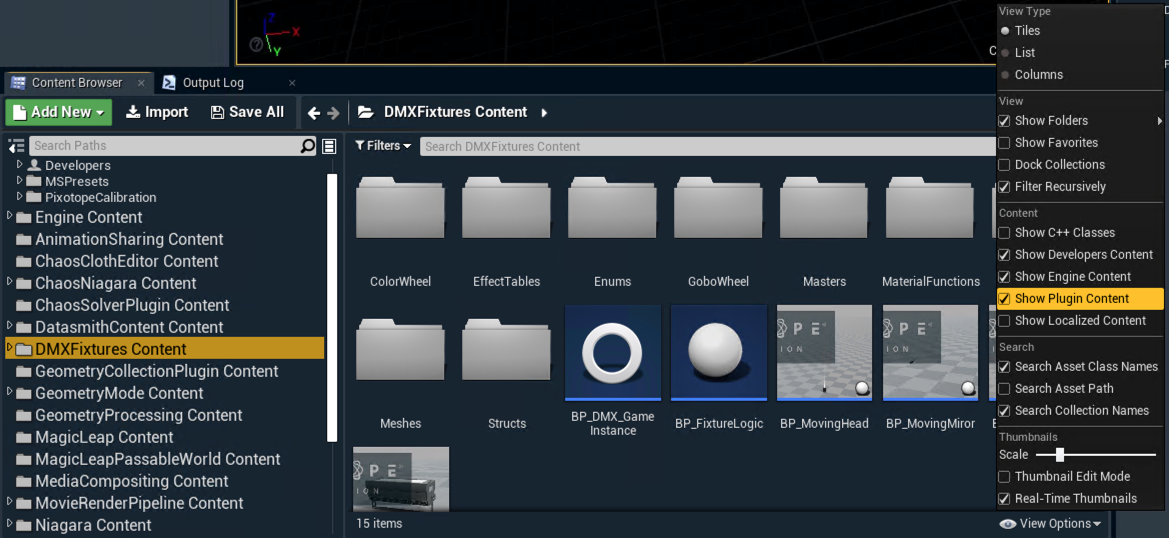
Get plugin content
-
Click "View Options" in the content browser on the bottom right
-
Check both the "Show Engine Content" and "Show Plugin Content" checkboxes
-
The "DMXFixtures Content" folder appears in the list
To use these fixtures in a project it is recommended to create child actors of the fixtures, in your main content folder.
Setup in the project
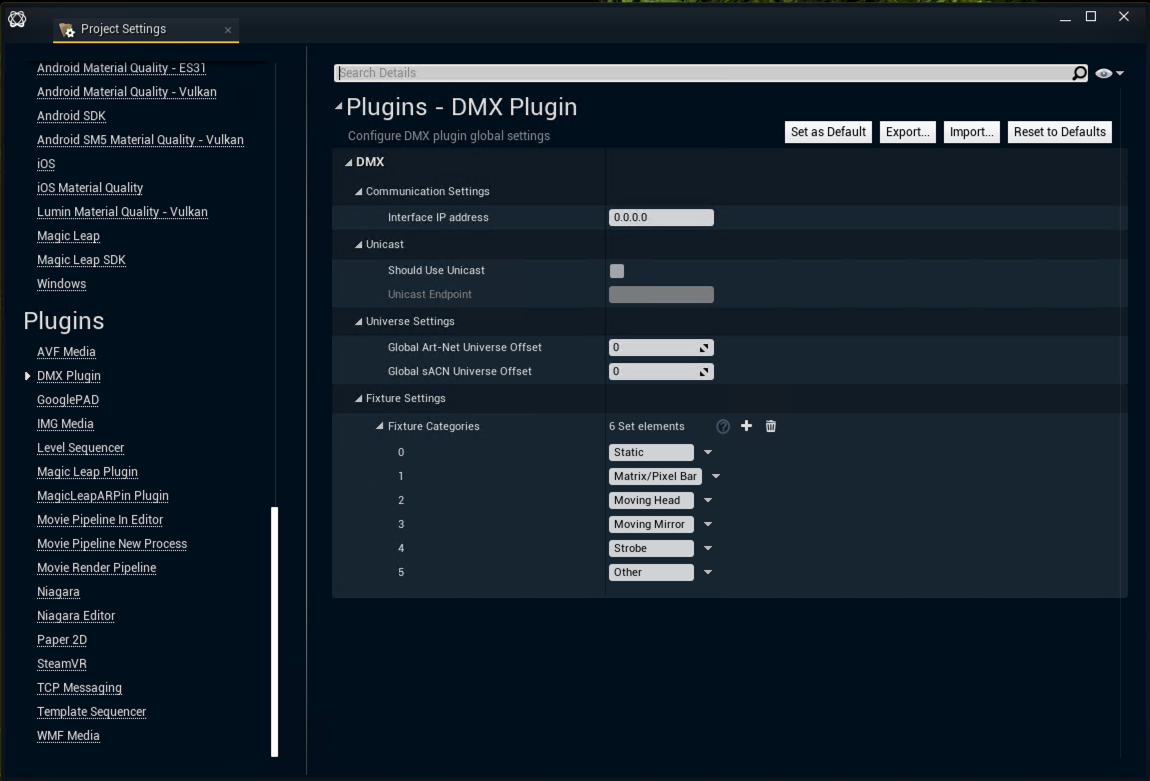
Configure the network
-
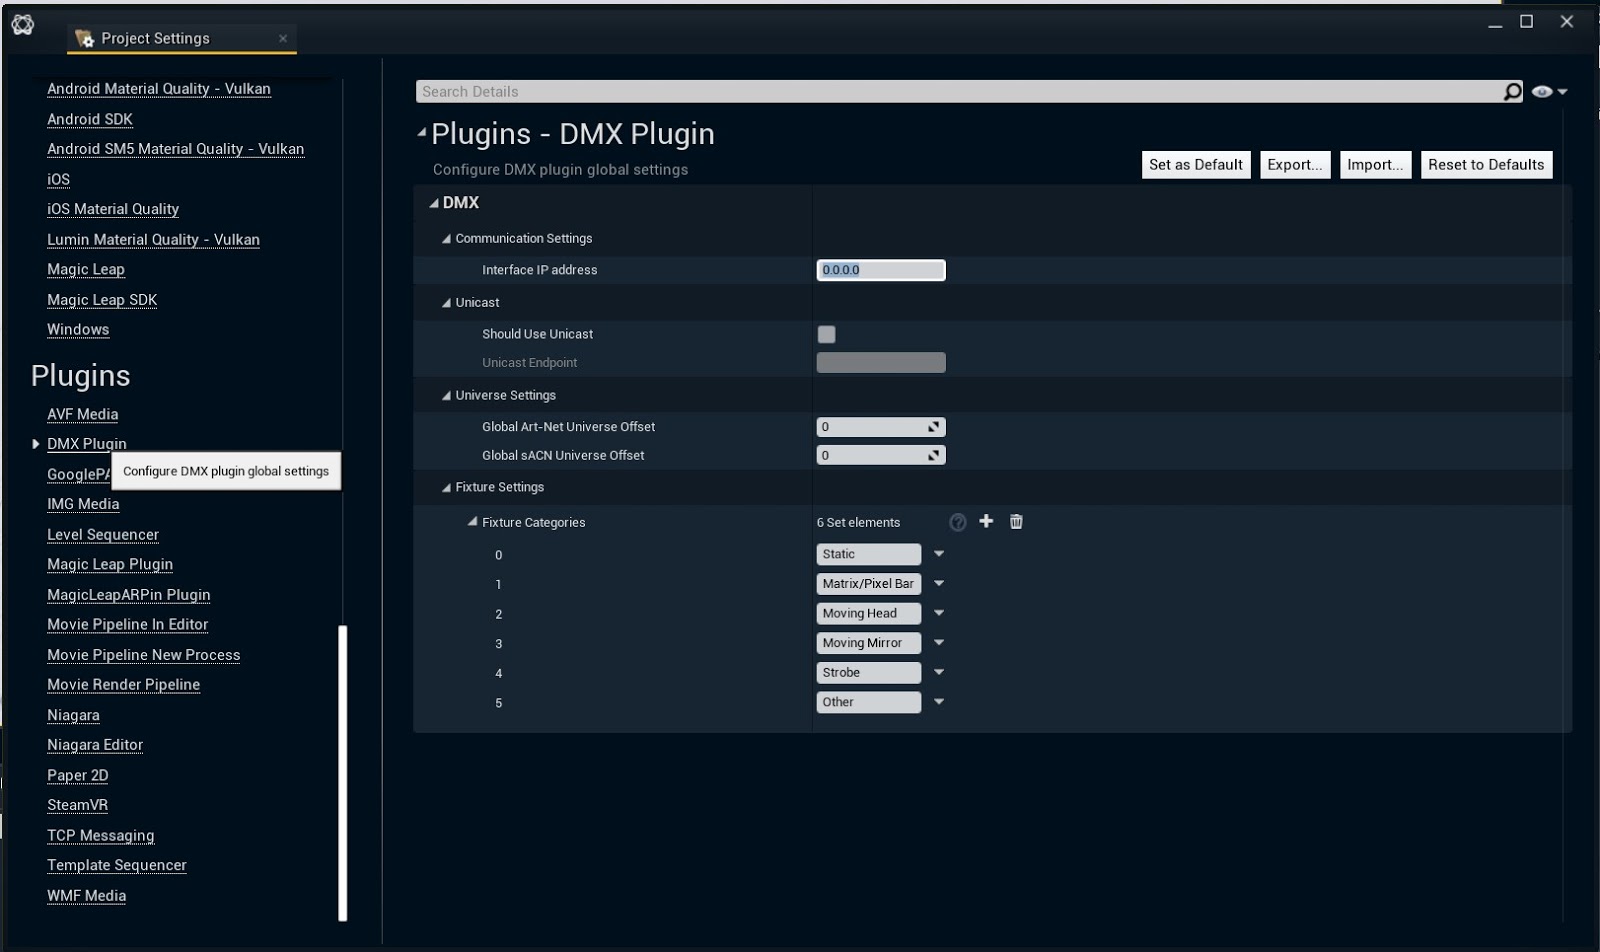
Open the "Project Settings" window via Edit > Project Settings in the window menu
-
Click the "DMX Plugin" category under Plugins
-
In the "Communication Settings" enter the "Interface IP address" of the network adapter the Editor should use
-
to listen
-
to send
-
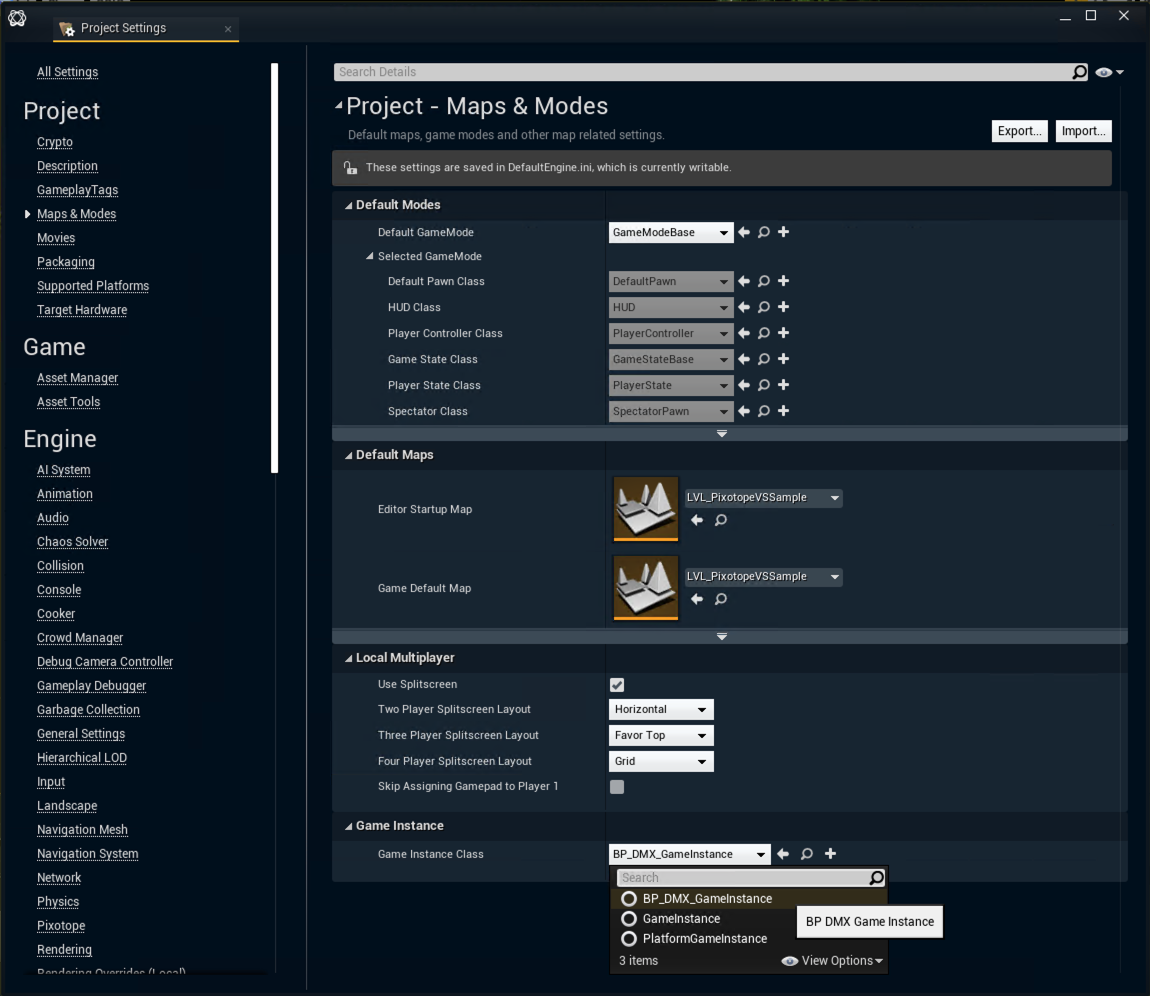
Set a custom GameInstance
Epic's current DMX implementation uses a custom GameInstance.
-
Open the "Project Settings" window via Edit > Project Settings in the window menu
-
Click the "Maps & Modes" category under Project
-
Select the BP_DMX_GameInstance
Create a DMX library
All the fixture mapping, in-engine faders and DMX communication setup lives inside a DMX Library asset.
-
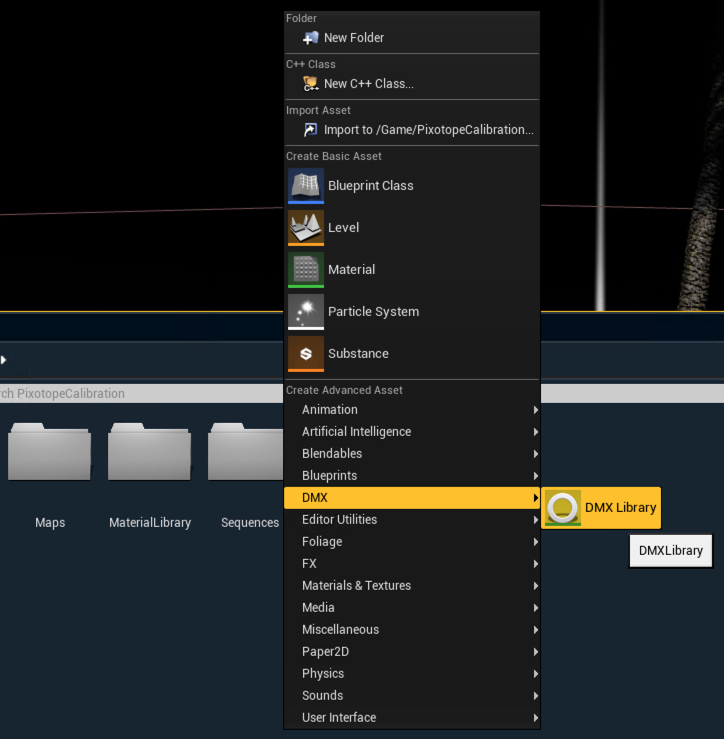
While showing the content of your project right-click in the content browser
-
Click "DMX Library" under Create Advanced Asset > DMX
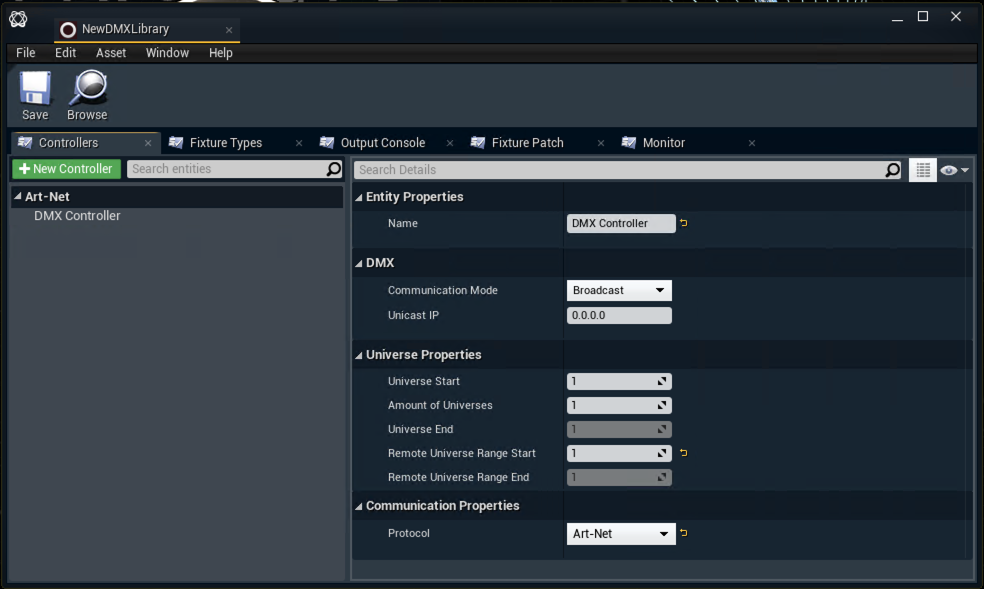
The DMX library contains the following tabs
-
Controllers - network settings and universe mapping for outgoing DMX data
-
Fixture Types - list of created fixture types and their settings
-
Fixture Patch - list of created fixture patches and their settings
-
Output Console - in-engine faders for testing
-
Monitor - monitor for in- and outgoing DMX data
Define Fixture types
-
Click the "Fixture Types" tab
-
Click "New Fixture Type"
-
Choose the DMX category (Static, Matrix/Pixel Bar, Moving Head, Moving Mirror, Strobe or other)
-
Add modes and functions for your fixture
-
Modes refers to how many channels a fixture uses, e.g. lights often have several modes, like 6-channel mode, 11-channel mode etc.
-
Functions refers to a specific function of a fixture and usually takes up 1 channel, but sometimes more. E.g. pan and tilt is commonly 16-bit and 2 channels, because they have both coarse and fine movement on separate channels (they are usually controlled with separate faders). The specifics for a fixture can be found in its technical documentation
-
To see which functions are available in the generic fixture blueprints for virtual lights, we can look at them in the level.
-
Drag one of the generic fixtures from the "DMXFixtures Content" folder into the level
-
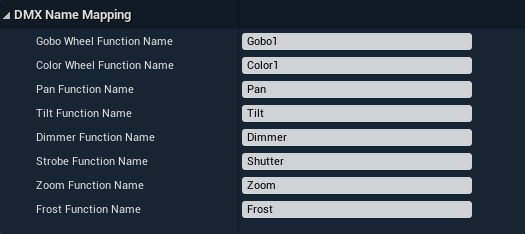
Check the DMX Name Mapping category in the Details panel
-
Use these name values when setting up your fixture type
-
The bit depth (8-bit, 16-bit, ...) for each function comes from the definitions of your physical fixture
-
Here is an example of the DMX Name Mapping of the BP_MovingHead fixture and the corresponding Fixture Settings
Notice that it has 8 functions, and uses 10 channels. This is because 2 of the functions (Pan and Tilt) are 16-bit and use 2 channels rather than 1 channel. Check the auto-calculated "Channel Span" on top of the function list.

-
Repeat this for all the different types in your setup
Assign Fixture types to universe
-
Click the "Fixture Patch" tab
-
Click "Add Fixture" and choose from the previously created Fixture Types
-
Create as many copies of each type as needed
-
-
Assign the fixture to a universe
-
Universe is a set of 512 channels on which DMX data is sent
-
-
Assign it to a specific channel or auto-assign it consecutively
-
Repeat this for all your fixtures
Assign virtual fixture to DMX Library
-
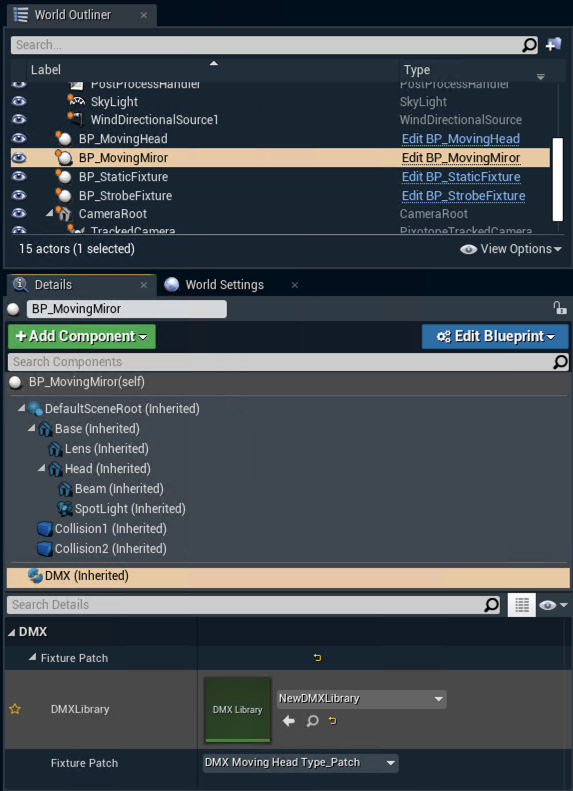
Drag your virtual fixture of the same type into the level
-
It is recommended to create child actors of the fixtures, in your main content folder
-
Generic fixtures can be found in the "DMXFixtures Content" folder
-
-
Select the "DMX" component of the virtual fixture in the Details panel
-
Choose your DMX Library for the DMXLibrary property
-
Assign the correct fixture patch to your virtual fixture
-
To control multiple virtual fixtures as a group, assign the same fixture patch to all of them
-
Debugging
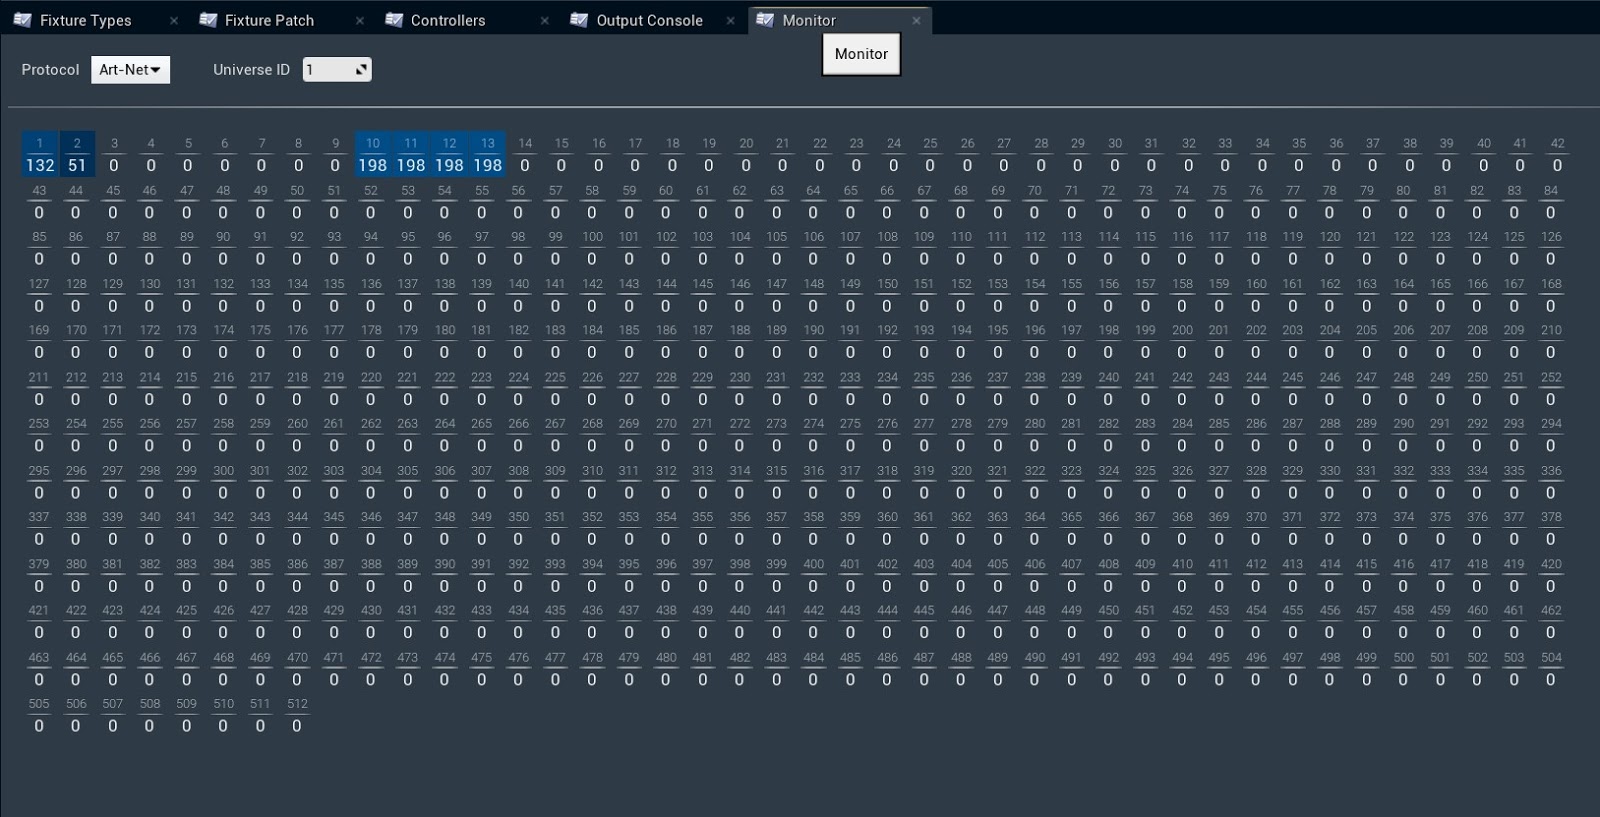
Monitor the data
-
Open the "Monitor" tab from your created DMX Library and check if data is coming in
Make sure the external DMX controller sends to the correct network adapter
-
Check the "Communication Settings" of the global DMX plugin settings in the Project Settings
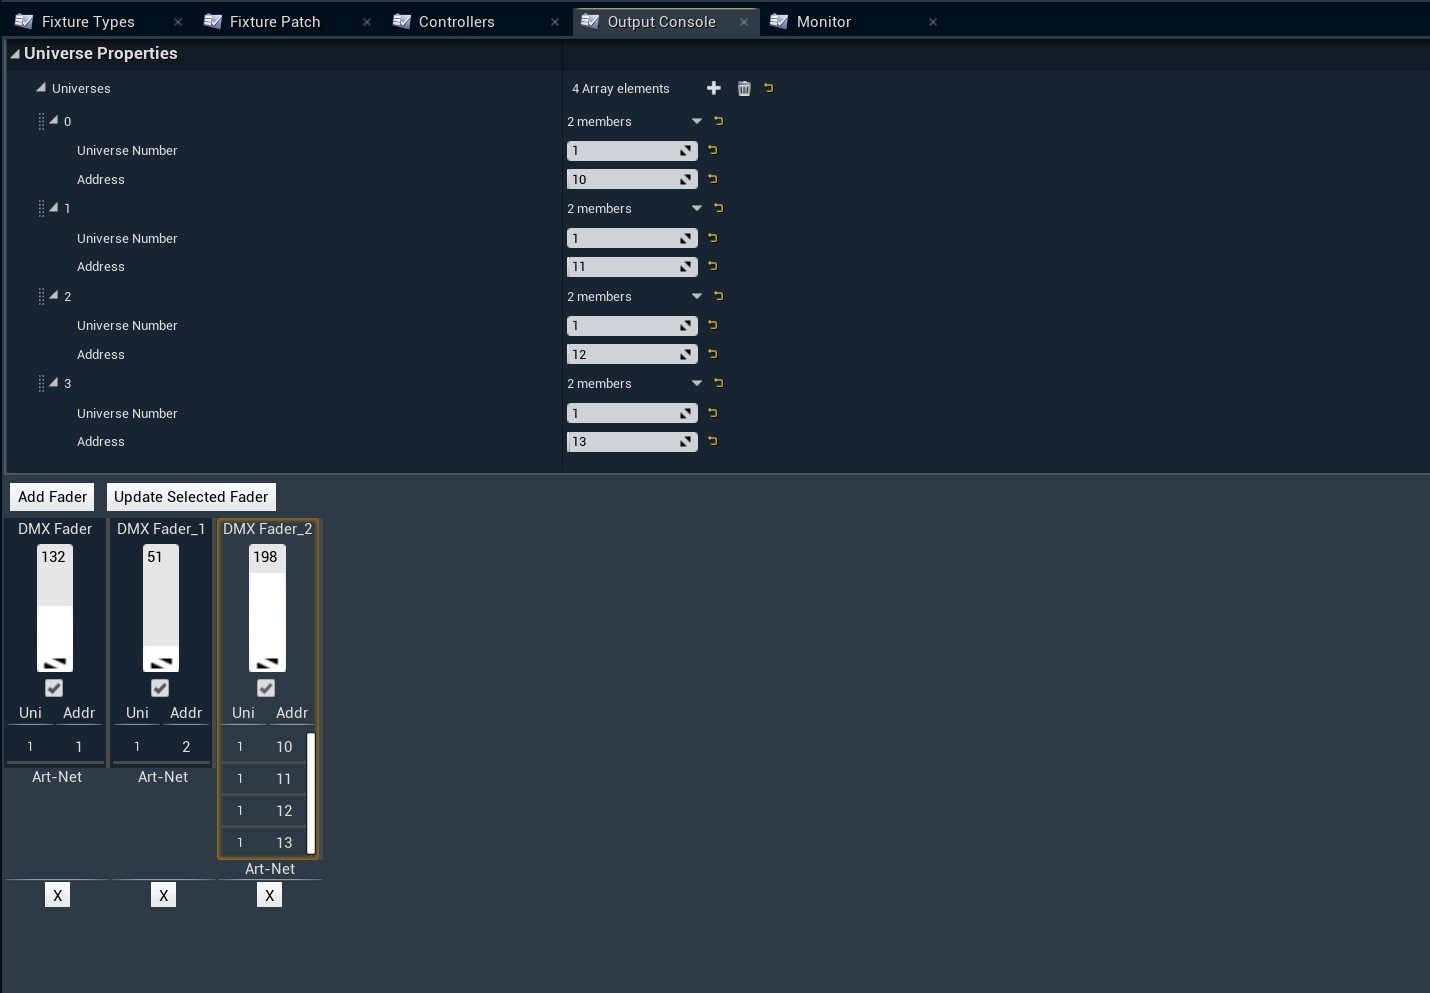
Send test values to virtual/physical fixtures
-
Go to the "Output Console" in your DMX Library
-
Click "Add fader" to add a fader
-
Select the correct protocol
-
Choose the universe and the channel address it should control
-
If you want to control more fixtures with the same fader:
-
Add more elements
-
Choose their universe and channel address
-
Click the "Update Selected Fader" button
-
-
Known issues
As Epic's plugin is still in BETA, there are some known issues.
Wrong settings for Lavender color texture
-
Double click the T_Color_Lavender texture in DMXFixtures Content > ColorWheel
-
Change Compression > Compression Settings to "Default"
-
Check Texture > sRGB
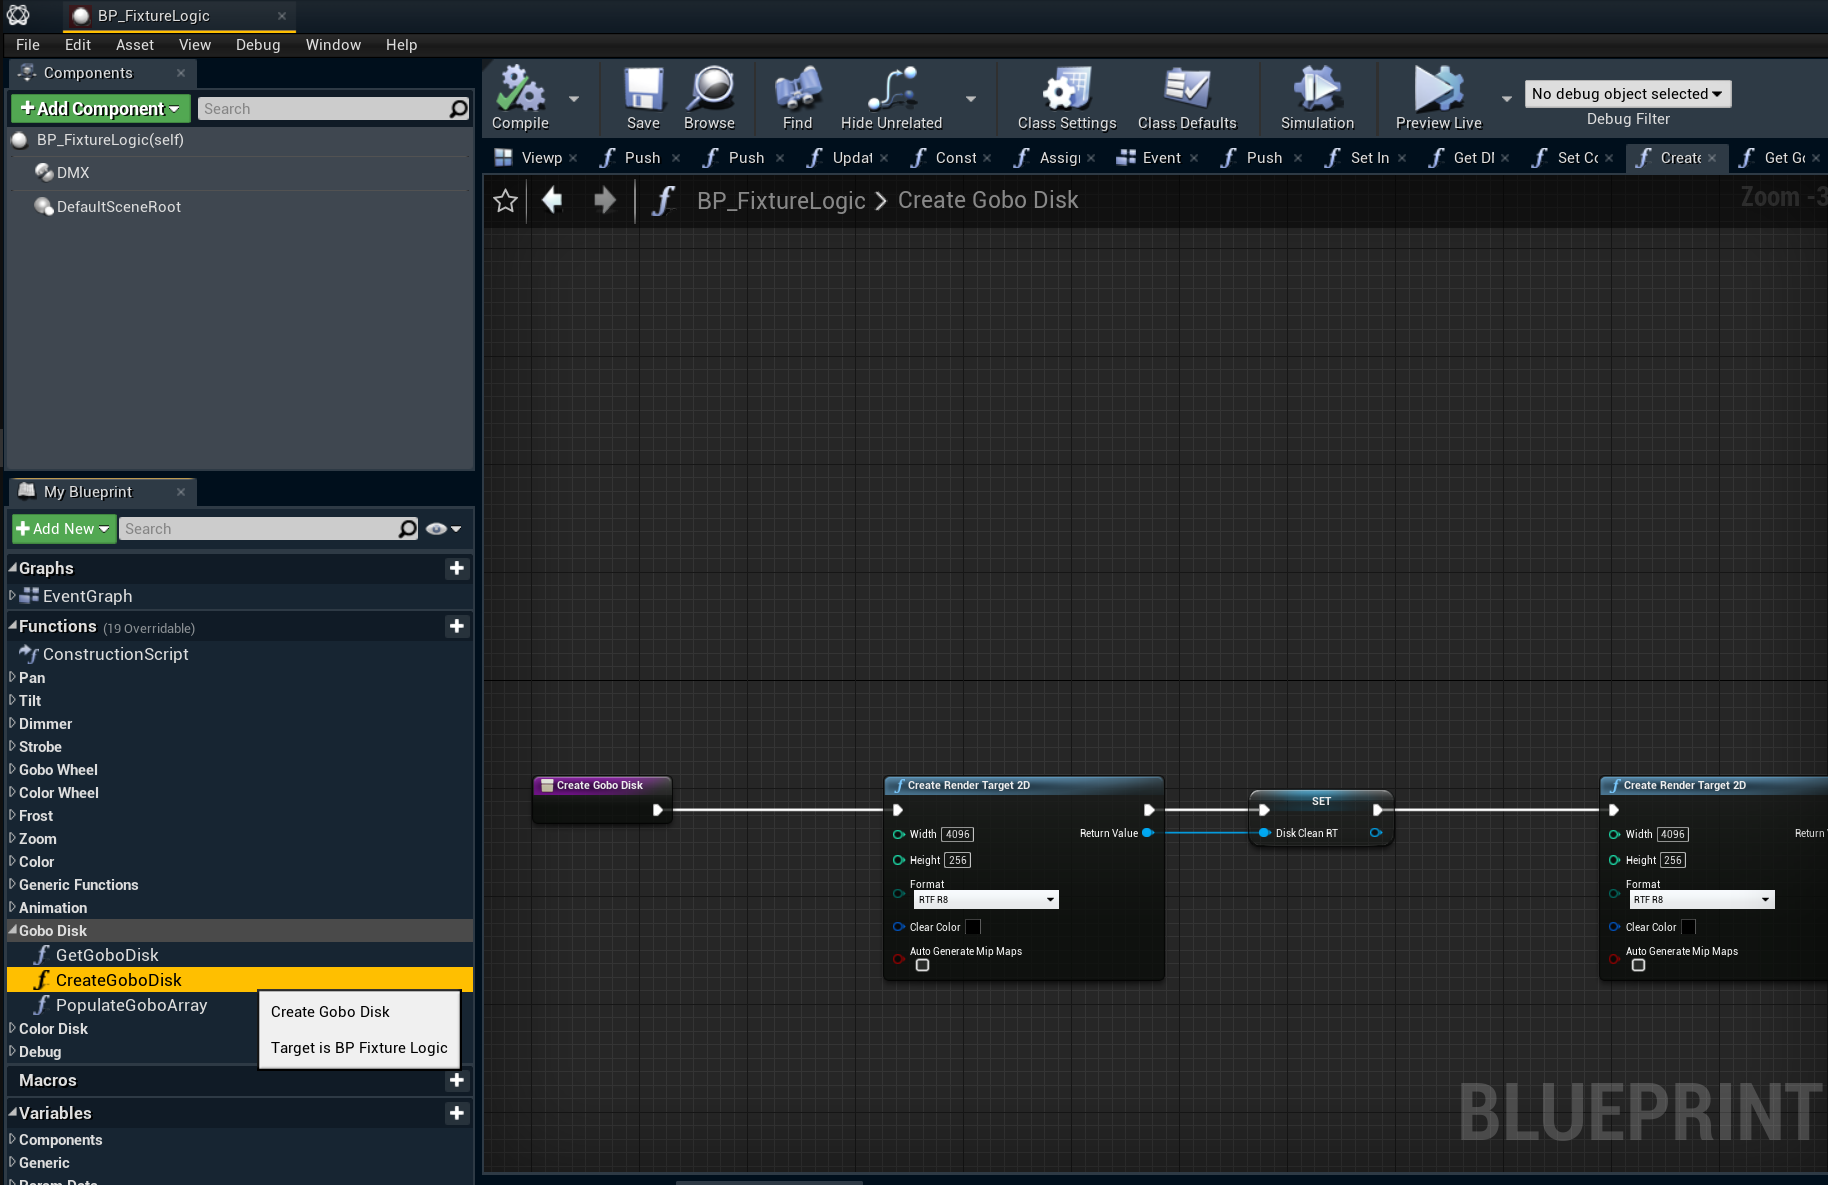
Using Create Render Target 2D, Auto Generate Mip Maps and DX12 crashes the Editor
-
Double click the "BP_FixtureLogic" blueprint in DMXFixtures Content
-
Go to the "CreateGoboDisk" function blueprint in My Blueprint > Functions > Gobo Disk
-
Uncheck "Auto Generate Mip Maps" on both "Create Render Target 2D" nodes
Third-party tutorials
-
Pixel Does... - YouTube channel - https://www.youtube.com/channel/UChKKeP-D_B1urx-HrABwjbw
-
LexyVFX - YouTube channel - https://www.youtube.com/channel/UCpwFkNUtz-jofw7RuHCM8DA
-
Geodesic Games - YouTube channel - https://www.youtube.com/channel/UCGNWkfzVq7gERVCnXAmapFg