
Configure camera tracking
Add a camera system
A camera system is a camera including its lens and a tracking system. The result is a tracked camera with various other tracked parameters depending on the tracking system you use.
Click "Add camera system"
Give it a descriptive name
Configure the camera and lens
Choose a filmback size that matches your output video aspect ratio
Choose from the drop-down of known cameras
All supplied camera definitions are either 16:9 or 17:9 in aspect ratio. Their aspect ratio is defined by their filmback width and height dimensions. If you do not match aspect ratios, the output image may be “letter-boxed” or “pillar-boxed” into the output video frame.
Or create your own for non-standard aspect ratios
Click on "Add camera type"
Enter camera type name
Enter width and height of the filmback (sensor size in millimeters) - check the documentation of your camera for the filmback size related to the aspect ratio you are shooting in
Choose your lens aperture
This is important when visualizing depth of field later on
Configure camera tracking
Here you configure everything related to the camera tracking system.
Choose the assigned tracking service
Best practice: Use the tracking service on the machine the camera system will be routed to
Choose the transmission method
Unicast
Send data from a single tracking source to a single tracking service
Recommended if you have a single tracking source per tracking service OR if your tracking system can send reliably to multiple IP addresses
Multicast
Send data from a single source to a group of interested tracking services in a single transmission
Recommended if your tracking system does not allow sending to multiple IP addresses
Unicast
The IP address field shows all network adapters of the machine the tracking service is running on.
Note down the IP address of your preferred network adapter
NOTE: We recommend using a different network adapter for tracking to the one specified in Machine settings, which is used for Pixotope communications.
Change the UDP Port if needed
This is the UDP port that tracking data is received on. Note it down.
On your camera tracking system:
Set the destination IP address and UDP port number to the values noted down.
For Ncam: the IP address should be entered in the Advanced section of the camera tracking protocol - the port number cannot be changed
Multicast
Most current IP stacks support the IP multicast routing protocol. Check the manual of your network hardware for details.
Note down the suggested default multicast IP address or change it if needed
Available range: 224.0.0.0 - 239.255.255.255
Change the port if needed
This is the UDP port that tracking data is received on.
Choose your preferred network adapter which should handle the multicast data
NOTE: We recommend using a different network adapter for tracking to the one specified in Machine settings, which is used for Pixotope communications.
For any additional camera system which should use the same tracking data
Choose the same multicast IP address and port as well as the preferred network adapter of the tracking service
On your camera tracking system:
Enter the noted down multicast IP address and UDP port number
For the Ncam SDK it uses TCP-IP, not UDP for communication. Multicast is not valid for use with TCP-IP so the option is disabled.
Continue configuration
Choose the camera tracking protocol for your camera tracking system
Check the status field
Your tracking configuration is set up correctly if it shows incoming data
You can also check the Network status in the Editor
Advanced
Optionally override some advanced settings
The "Advanced" section covers protocol-specific details and how the data should be mapped. When you calibrate tracking, you might have to come back here if the camera movement is mapped wrongly.
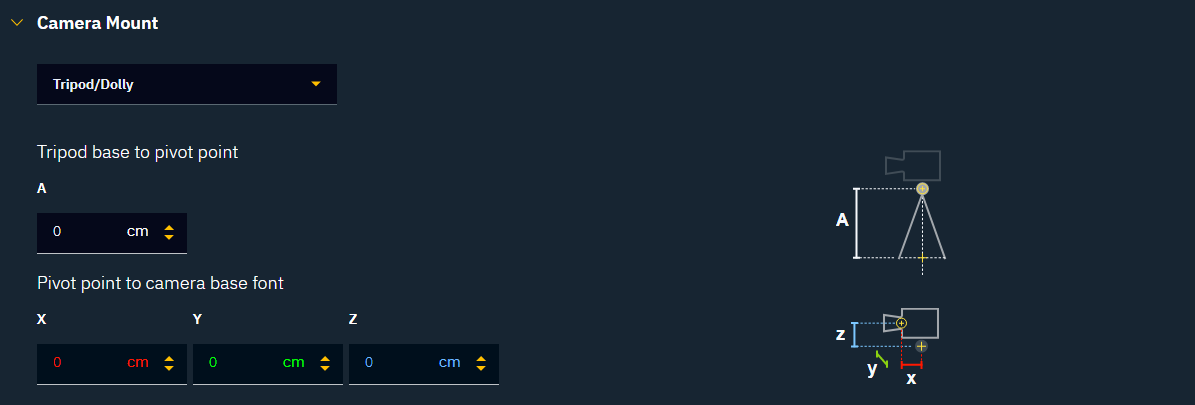
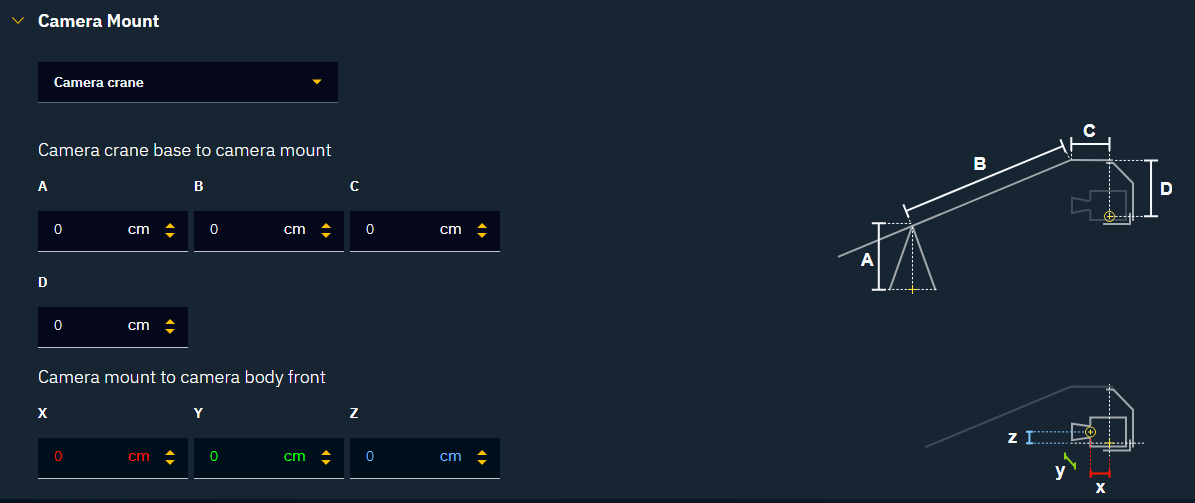
Camera mount
Choose a camera mount
Depending on the camera tracking protocol, you can choose between up to 3 different camera mount types:
No mount setup
For advanced camera tracking systems that provide correct position and rotation values of the nodal point out of the box e.g. Ncam
For untracked cameras
Tripod/Dolly
For tripods and dolly-mounted cameras
For PTZ cameras
Camera crane
For Mo-Sys F4 1.7 Mechanical
The helper images provide information on the measurements needed.
Optionally choose a lens file under Lens tracking > Advanced
Camera tracking systems most often have lens data (focus and/or zoom) integrated into their configurations. However, if you need to use a custom lens configuration, choose the lens file from the drop-down menu, and ensure that the zoom and focus encoder limits are correctly set.
A lens file contains additional calibration data for the lenses you are using. It can include the following parameters: Focus Distance, Distortion, Nodal Offset, FOV, and Center offset. These files can be generated:
manually by using the provided lens file template
by our internal Lens Calibration tool
from lens files of other manufacturers, using our internal conversion tools
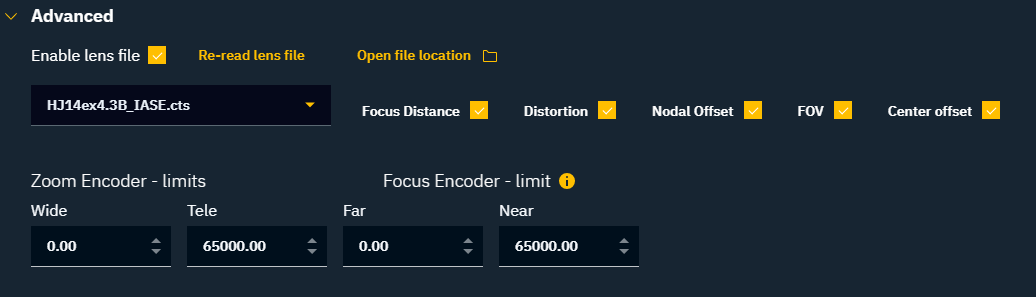
The lens files Distortion model will be enabled if Center offset is enabled.
Learn more about Lens files in Pixotope
Next step
Continue to Configure object tracking