An XR production with set extension consists of
-
one or more XR machines
-
to render the graphics for your LED volume
-
-
one Set extension machine
-
to render the set extension and output your final image
-
Setting it up is a 4-step process
Multi-machine setup
-
Give your machines names that make them easy to identify
Example: PIXOTOPE-XR1, PIXOTOPE-XR2, PIXOTOPE-EXTENSION1 -
Choose the machine you want to be the server machine and go to START > Storage > Machine settings and set its role to SERVER
We recommend using one of your XR machines for this.
-
Set the other machines to CLIENT and connect all of them to the server
-
On the server machine: Open the show you want to use
Level setup
We will set up
-
One XR level containing
-
XR walls - used on XR machines
-
XR holdouts - used on the Set extension machine
-
-
One or more Graphics levels containing
-
your graphics
-
Feel free to use our XR sample level or an example level in case you need content to test with.
Set up the XR level
-
Create an empty level
-
with only the Pixotope essential actors (TrackedCamera, CameraRoot, MaterialHandler, PostProcessHandler). If you do not see these actors in your level, enable "Auto-spawn essential actors" in Pixotope World settings > Startup and click Play in Editor to spawn them
-
-
In Director add the XR machine to the XR render group
-
Learn more about Render groups - AR, VS, AR+VS, XR and how to Configure machines
-
-
Create a Digital Twin to match your LED volume
-
If you are using Pixotope Tracking and want to use the Digital Twin functionality to automatically generate and map your XR actors, go to Automatic XR alignment
-
If you are using a different tracking system, you will need to create and align the twin manually, go to Create a Manual Twin
-
-
Create holdouts from the XR walls
-
If you are using Digital Twin, select the Digital Twin actor and click "create XR holdout" button in the details panel
-
If you are not using Digital Twin: select all your XR walls, right click and select "create XR holdout"
-
Set up your graphics level
-
Set up your graphics level(s) to be level streamed into your XR level
-
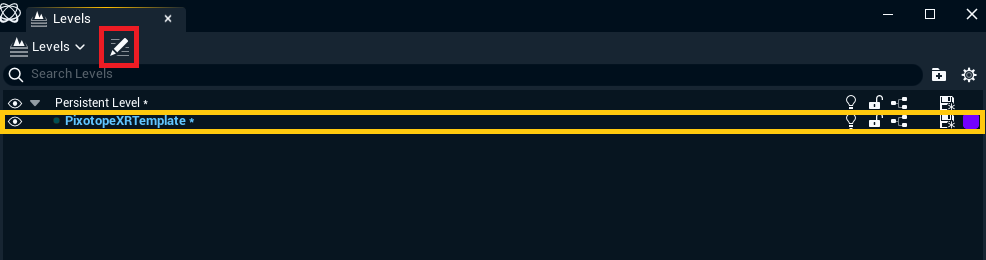
In Pixotope Editor with the XR level open, go to Windows > Levels, and add your graphics level(s)
-
Right click the added level(s) and change the streaming method to "always loaded" if you want them to always be visible and not manually loaded from blueprints. Otherwise set the streaming method to “blueprint”.
-
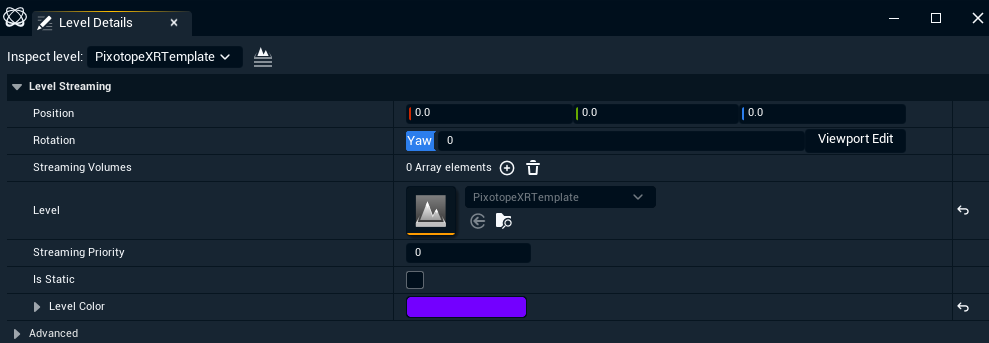
You can adjust the scale, position and rotation of the streamed level by clicking the “Summon level details” button in the “levels” window. We recommend adjusting the position and rotation of the streamed level rather than adjusting the camera root, since this will make it easier to add new graphics levels later.
-
-
With your graphics level open, disable "Auto-spawn essential actors" in your Pixotope World settings > Startup
-
Delete the PostProcessHandler, MaterialHandler, TrackedCamera, XROutsideFrustumPoint and CameraRoot from your graphics level if they are present
Syncing
-
In Pixotope Director, go to SETUP > Show > Show settings and set Multi-machine syncing to "Timecode"
-
Go to SETUP > Calibrate > Syncing and set the timecode source on all machines to match where you should be receiving timecode on your machines
-
Verify that you have timecode coming in by clicking "Get all timecodes" or the stopwatch icons.
-
Find a Set extension delay that looks like the image you see in your holdout is in sync with your set extension level
-
To verify this, you can try triggering any animation that moves between the intersection between camera footage and the virtual graphics, and if it is smooth then you can assume you have the correct value. Keep in mind that the Set extension delay only applies at the initial triggering of that animation, so if you change the value, you will have to re-trigger it to see if the value is correct.
-
-
If you have any level sequences, actor sequences, or Bink Media players that will animate across the output of multiple machines (for example, a car driving from one side of you XR volume to the other side), we recommend using our BP_syncTools to ensure that these stay in sync across machines even if one of your machines drop a frame. You can read more about how to use our sync tools blueprint here: Syncing blueprint helper tools
-
Make sure all materials and particle effects are using deterministic seeds and no per-machine randomness. For particle effects, go to your emitter properties, enable determinism, and make sure you are using the same random seed number across all your machines
Learn more about how to Set up timecode synchronized levels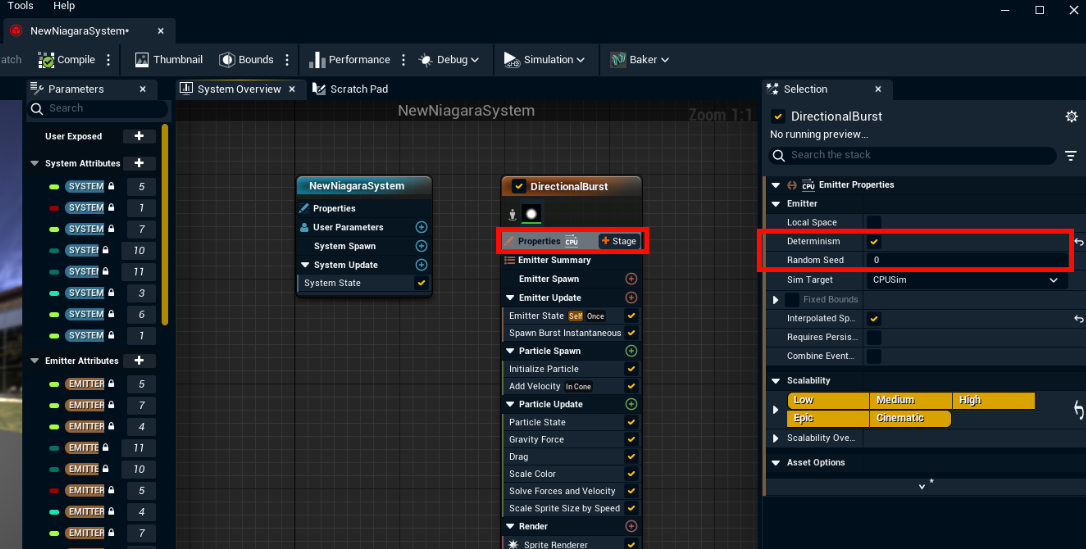
To use randomly generated numbers in blueprints, you can create a random stream variable and manually set the seed of all randomness derived from that variable, so that the "randomness" is in sync between all of your engines. You can read more about how random streams work here: https://docs.unrealengine.com/4.26/en-US/ProgrammingAndScripting/Blueprints/UserGuide/RandomStreams/
Learn more about how to Configure and calibrate multi-machine syncing
Color Matching
-
Now you should perform color matching, to match the colors between your LED volume and your set extension
Learn more about how to Calibrate color matching