Add a camera system
A camera system is a camera including its lens and a tracking system. The result is a tracked camera with various other tracked parameters depending on the tracking system you use.
-
Click "Add camera system"
-
Give it a descriptive name
Configure camera and lens
-
Choose a filmback size that matches your output video aspect ratio
-
Choose from the drop-down of known cameras
-
All supplied camera definitions are either 16:9 or 17:9 in aspect ratio. Their aspect ratio is defined by their filmback width and height dimensions. If you do not match aspect ratios, the output image may be “letter-boxed” or “pillar-boxed” into the output video frame.
-
-
Or create your own for non-standard aspect ratios
-
Click on "Add camera type"
-
Enter camera type name
-
Enter width and height of the filmback (sensor size in millimeters) - check the documentation of your camera for the filmback size related to the aspect ratio you are shooting in
-
-
-
Choose your lens aperture
-
This is important when visualizing depth of field later on
-
Configure camera tracking
-
Choose the camera tracking protocol for your camera tracking system
Learn more about our Supported Tracking Protocols
Advanced
-
Optionally override some advanced settings
-
The "Advanced" section covers protocol-specific details and how the data should be mapped. When you calibrate tracking, you might have to come back here if the camera movement is mapped wrongly.
-
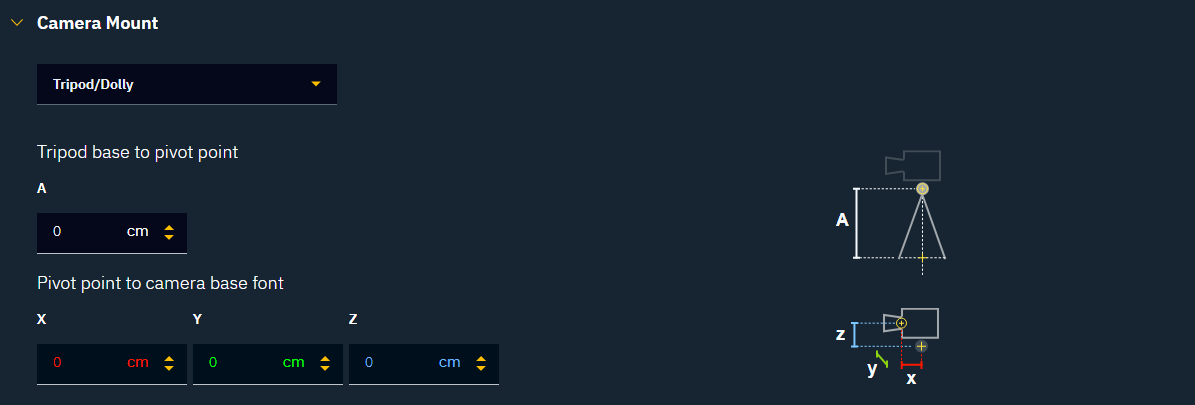
Camera mount
-
Choose a camera mount
-
Depending on the camera tracking protocol, you can choose between up to 3 different camera mount types:
-
No mount setup
-
For advanced camera tracking systems that provide correct position and rotation values of the nodal point out of the box e.g. TrackMen
-
For untracked cameras
-
-
Tripod/Dolly
-
For tripods and dolly-mounted cameras
-
For PTZ cameras
-
-
-
The helper image provides information on the measurements needed.
-
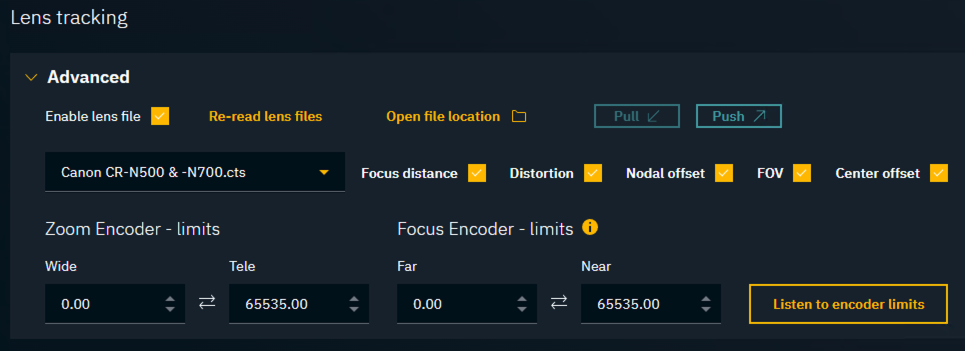
Configure lens tracking
Camera tracking systems most often have lens data (focus and/or zoom) integrated into their configurations. However, if you need to use a custom lens configuration, follow the steps below.
-
Choose the lens file from the drop-down menu
-
A lens file contains additional calibration data for the lenses you are using. It can include the following parameters: Focus Distance, Distortion, Nodal Offset, FOV, and Center offset. These files can be generated:
-
manually by using the provided lens file template
-
by our internal Lens Calibration tool
-
from lens files of other manufacturers, using our internal conversion tools
-
-
Ensure that the zoom and focus encoder limits are correctly set
-
To help find these values, checkout Find encoder limits below
-
The lens files' Distortion model will be enabled if Center offset is enabled.
Learn more about Lens files in Pixotope
Find encoder limits
-
Make sure that the camera is routed and that tracking data is coming in
-
Click the "Listen to encoder limits" button
-
On the camera: Move the Zoom and/or Focus controls to their min and max positions
-
Their values are continuously read

-
-
Click the "Stop and apply" button to stop listening and apply the limits
-
Optionally: Unselect Zoom or Focus in case only one of them should be applied
-
OR click "Stop" to not change anything
-
Next step
Continue to Configure routing