1 Tracking Persons
When started, TalenTrack will automatically recognize persons in view, based on their human appearance. It will then allocate their joints in each camera perspective. When a joint can be recognized in two or more camera views, the system will calculate their position in 3D space, in relation to the systems origin, and connect multiple joints to a skeleton.
The system does not need to recognize the whole person but will also construct a skeleton for e.g. the upper body only.
1.1 Starting TalenTrack
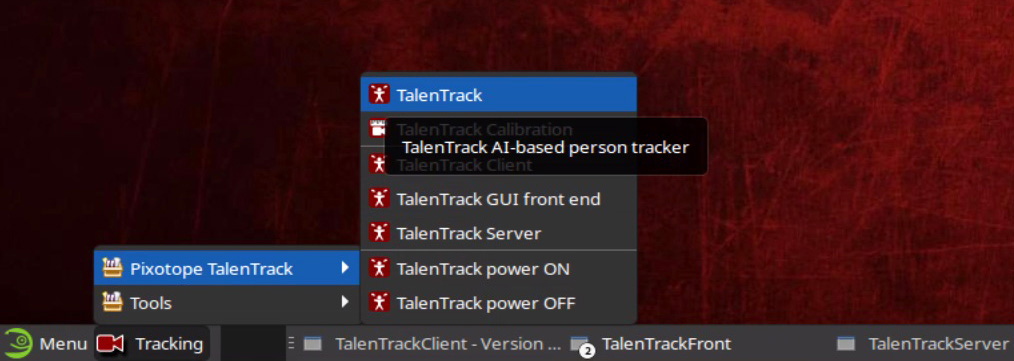
TalenTrack can be started in two ways:
-
Selecting TalenTrack from the Tracking menu or
-
Setting TalenTrack to autostart with the system launch by dragging and dropping the menu entry into the Autostart folder.
Both ways will automatically launch all programs necessary on all machines in the system, which will show up in the server engine interface as:
TalenTrack Client
TalenTrack Front
TalenTrack Server
1.2 Reviewing the tracking
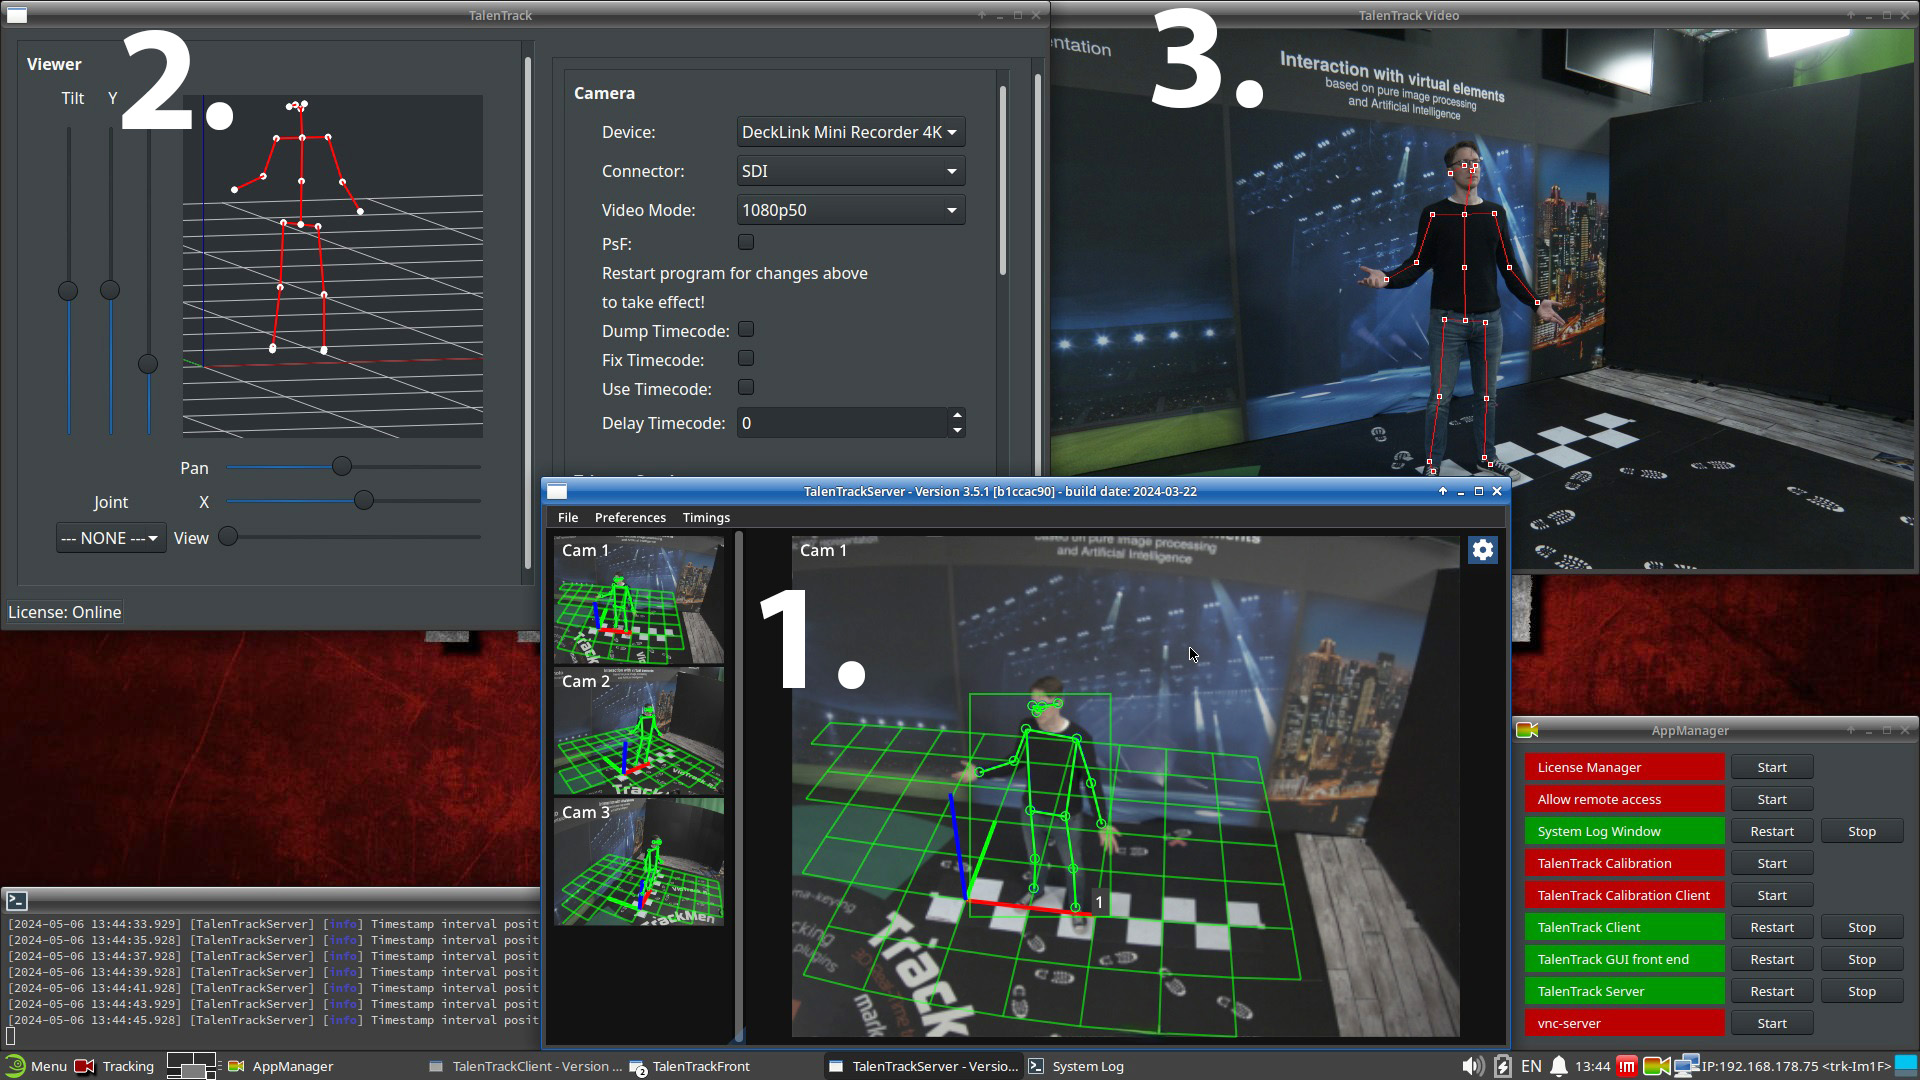
The tracking result can be pre-visualized in three ways:
-
In the TalenTrack Server window: Select a camera view from the list on the left side of the TalenTrack Server window to bring it to the large view. A person recognized will have a colored wireframe skeleton drawn onto it. If the camera is contributing to the 3D position of the skeleton, the body will also be outlined by a bounding box rectangle.
-
In the TalenTrack window: The TalenTrack window shows a window with the coordinate system of colored axes and a grid for the virtual floor in it. The view can be navigated using the mouse and the sliders around it. Every skeleton with 3D position data will be drawn in this window, in correct relation to the coordinate system.
-
In the TalenTrack Video window: The TalenTrack Video shows the video which is being used as reference source for the system. It can be combined with corresponding Pixotope camera tracking data to see the final result as a video overlay, taking the camera position and perspective for the graphics composition into account. To receive the tracking data do the following:
-
Create a sender in the camera tracking engine, that sends to the graphics network IP address of the TalenTrack server engine
-
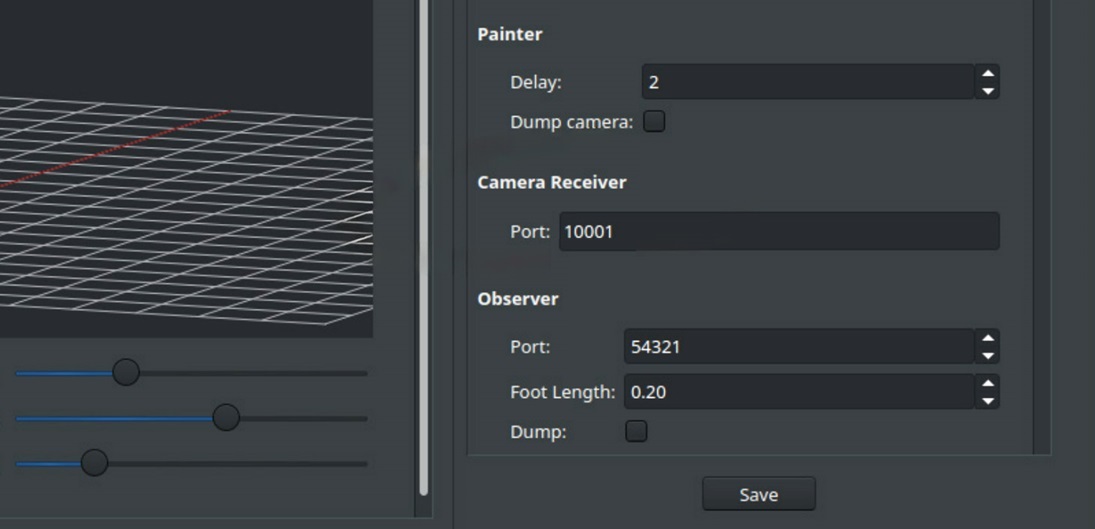
Open the TalenTrack window and scroll the menu on the right to the Camera Receiver section
-
Enter the Port specified in the camera tracking sender
-
Activate Dump camera to have the incoming data printed in the System Log
-
1.3 Assigning IDs
Each person entering the tracking area will automatically be labeled with an ID which will be transmitted in the tracking data stream. This ID will always be the next highest available number, starting at 1. The system does not recognize and save individual bodies beyond the live tracking. A person re-entering the tracking area will thus potentially receive a different ID than before. However, this behavior also enables the system to reliably recognize a person, indifferent of their clothing or other factors defining their appearance.
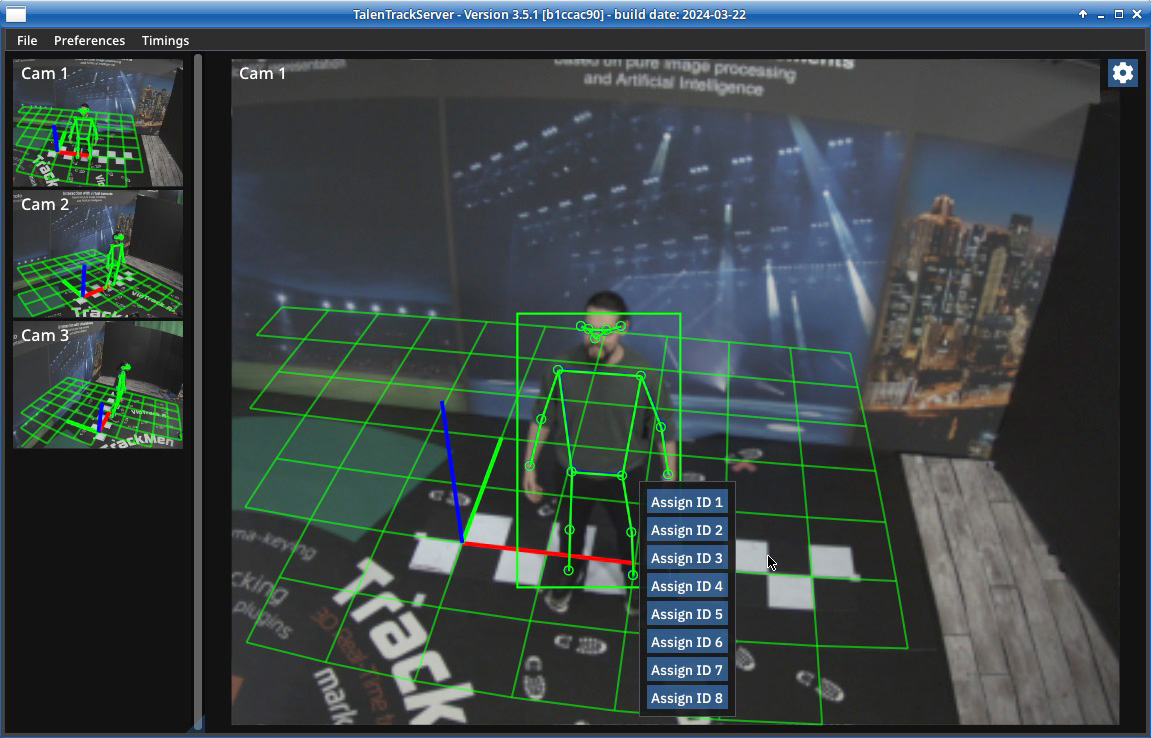
To assign a selected ID for a person for dedicated applications:
-
Open the TalenTrack Server window.
-
Select a camera view that recognizes the person (skeleton drawn, rectangle around the person).
-
Left-click the rectangle area and select an ID from the dropdown menu
2 Sender Settings
Sending the person tracking data to a graphics engine is handled by the TalenTrack window. Depending on application for the data and implementation on the graphics engine side, this can be done in three different ways, as explained below. Multiple senders of various protocols can be used at the same time and send to multiple graphics engines.
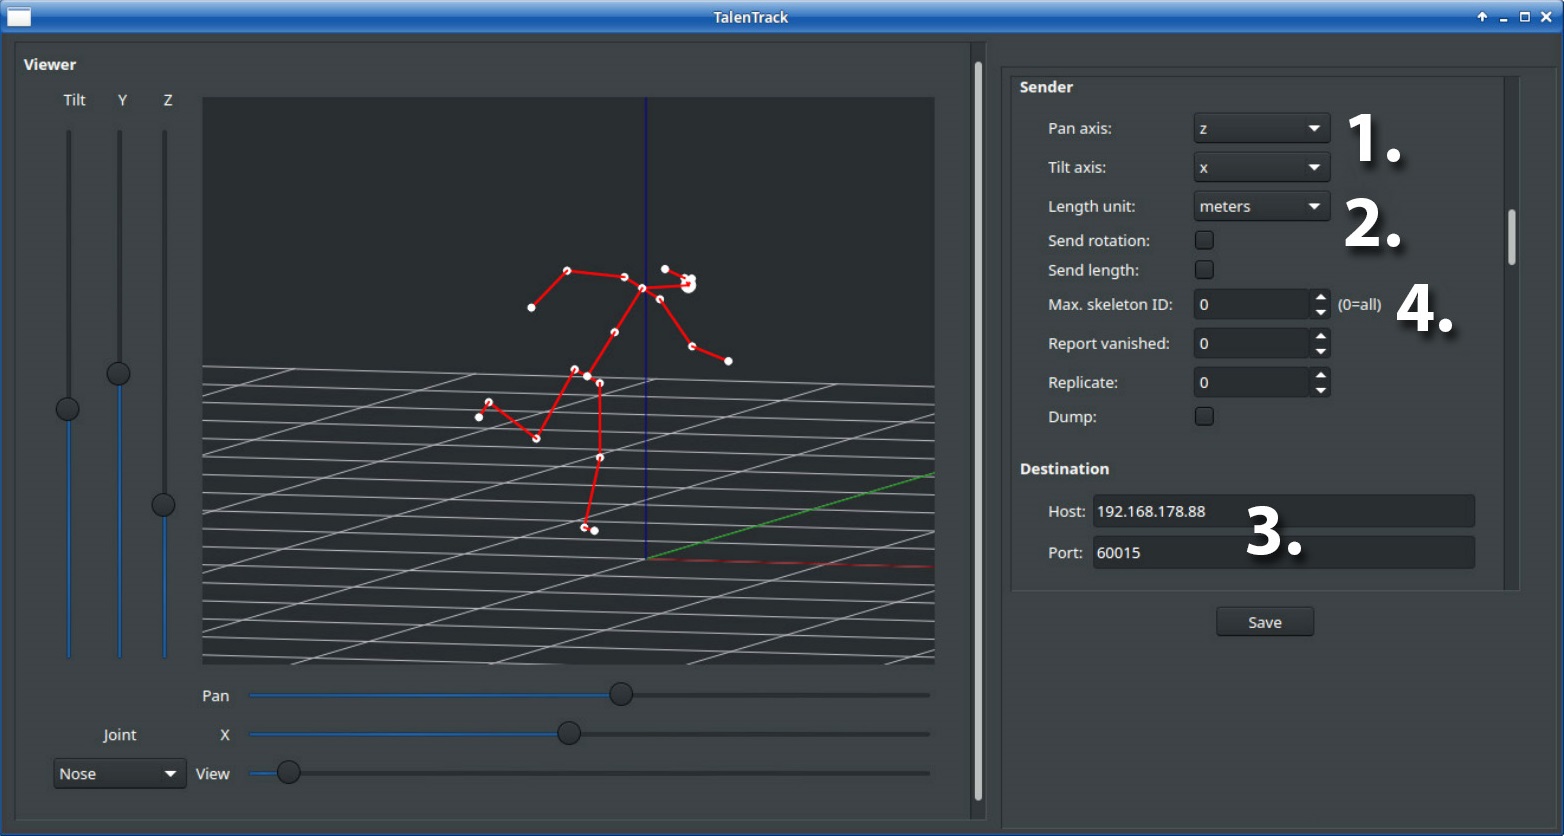
2.1 TalenTrack Sender
The native Sender of TalenTrack sends the complete set of all skeletons and their joints to the specified receiving engine. To set up a sender:
-
Set the Pan and Tilt axis to match the graphics engines coordinate system
-
Set the length unit used in the graphics engines coordinate system
-
Set the IP address of the graphics engine as Host and define a Port to send to
-
Optionally, define a maximum number of skeletons to be allowed to be sent to the graphics engine. To set no limit, enter 0
2.2 Camera Tracking Sender
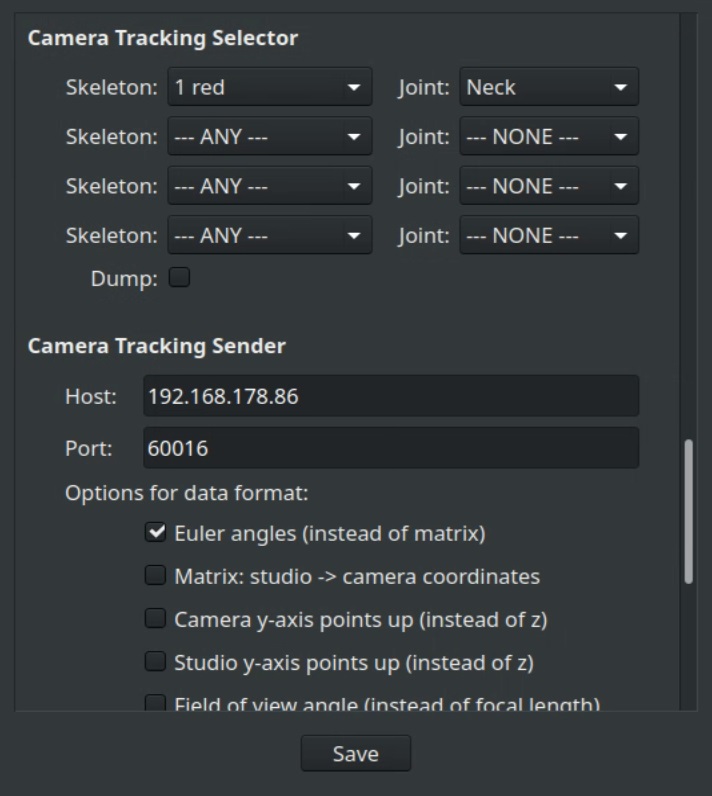
If a graphics engine does not have an interface with the TalenTrack sender, the system can also send the positions of single joints as camera tracking data, since most graphics engines can receive this format. To set up a Pixotope Tracking (TrackMen) camera tracking sender:
-
Set the IP address of the graphics engine as Host and define a Port to send to in the Camera Tracking Sender section
-
Set the Options for data format to match the format expected by the graphics engine
-
Select up to four streams to be transmitted per sender by choosing a Skeleton and the respective Joint position from the dropdown lists in the Camera Tracking Selector. These may be e.g. the two ankles of a skeleton, to know the position of a persons feet, or the pelvis to have a good estimation of the position of the person in the room.
A camera tracking sender naturally only transmits a single position. Thus, the system is set up to send one stream per selection. The first selection will be sent to the defined Port in the Camera Tracking Sender section. The following selections will be sent to the subsequent port numbers. If for example the Port 4548 is set, the top selection will be sent to that port, the next one below it goes to the port 4549, the next one to 4550 and the last one to 4551.
2.3 FreeD Sender
The FreeD protocol is widely implemented in various graphics engines as well and can be used as an alternative to the TrackMen camera sender. The sender is set up the same as the Camera Tracking Sender in the previous chapter but the sections are labeled FreeD Sender and FreeD Selector.
The ---ZOOM--- and ---FOCUS--- sections are part of the general sender module and can be ignored for this application.
2.4 Tracking Data Delay
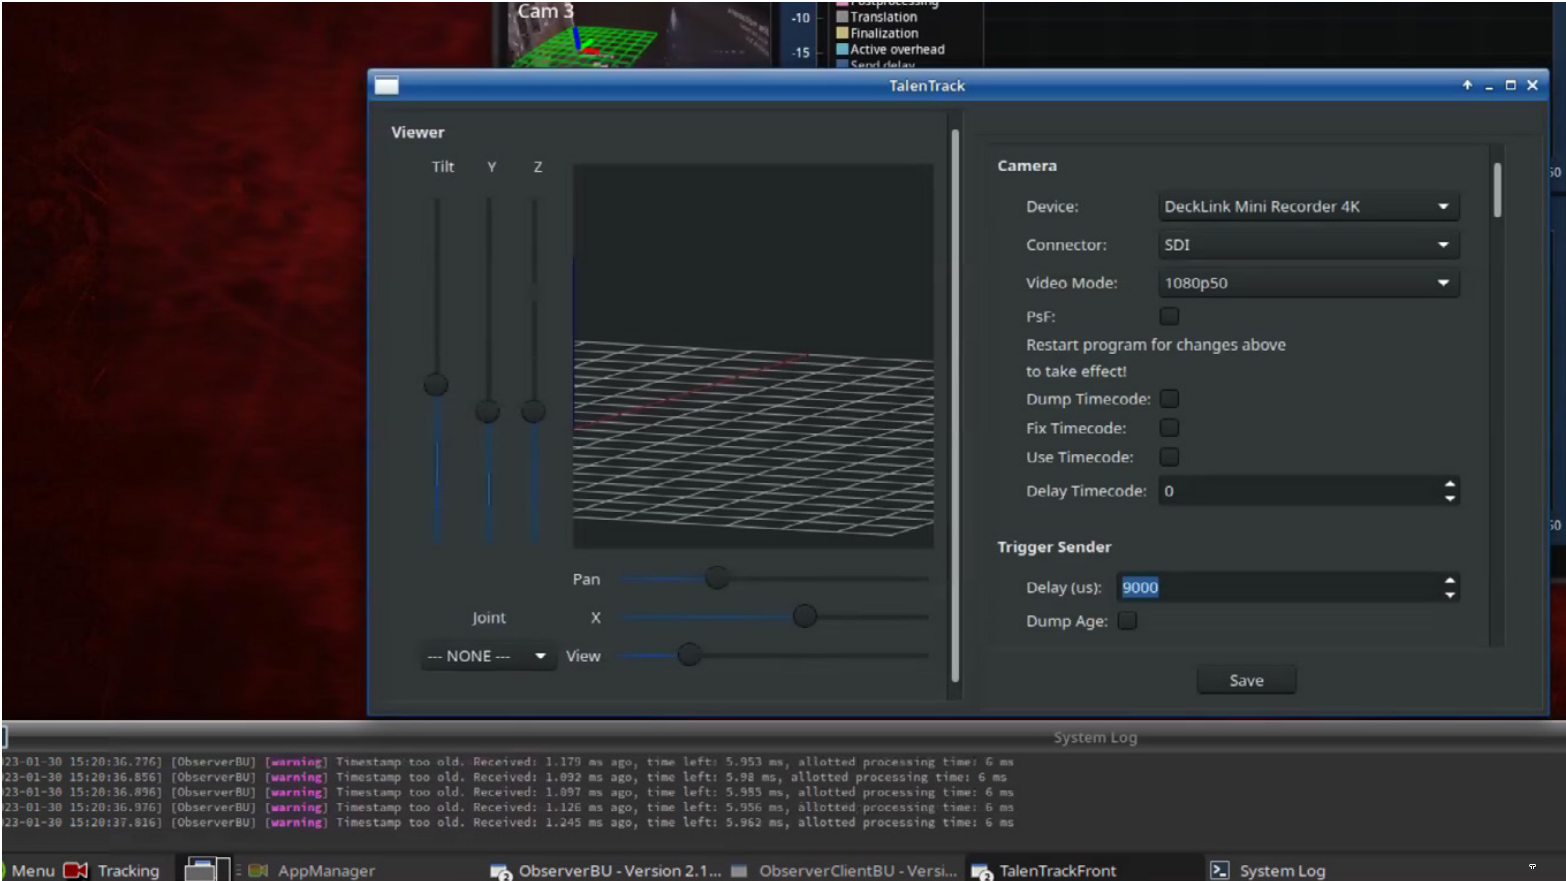
The tracking data transmission can be delayed if necessary to match rendering times and video throughput of the overall system. To adjust the tracking delay:
-
Open the TalenTrack window and scroll the left menu to the Trigger Sender section
-
Adjust the Delay (us) value to match the needs of the overall system
Note that this value can not be lowered below an minimum value, to allow allocation of processing times for the systems calculations!
-
Check the system under on-air conditions, with a sufficient number of persons in the tracking area. Look for “Timestamp too old” error messages in the System log. If these appear, the Delay (us) has to be raised!
2 Troubleshooting
Tracking camera doesn’t work
If a camera doesn’t connect correctly, it’s view will remain empty in the TalenTrack Server. Try stopping the program in the App Manager and after some seconds starting it again. If the camera remains disconnected, try rebooting the camera itself by disconnecting the Power over Ethernet connection.
Persons are not recognized
If persons in the tracking area do not appear as skeletons in the TalenTrack Front, or the recognition is unstable, check the various views in the TalenTrack Server.
Check whether at least two cameras can recognize a decent number of joints of the same person or maybe perspective and person position block too many joints.
If multiple cameras detect a skeleton but it does not receive the 3D recognition bounding box, the system may have trouble aligning the joints from multiple views. Check the calibration results again. Cameras may have been accidentally moved e.g. during works on the lighting, and need re-calibration.
Joints are not reliably recognized
If the joint tracking seems unstable, check the various views in the TalenTrack Server as described in 1.2 Reviewing the tracking.
Check whether the joints can be seen from multiple views in the respective position within the tracking area.
Check whether the persons appearance has sufficient contrast towards the surroundings in the camera view. Increasing the brightness may help, see Camera Settings.
If none of the above applies, but recognition seems unreasonably unstable, the camera calibration may be off. This is usually visible by a change in focus and may be caused by accidentally hitting the camera or extreme temperature changes. The calibration procedure should be redone as described in Calibration.
Tracking data is dislocated in the composition
If the tracked joints do not appear in the correct position in the virtual space, make sure the coordinate systems of TalenTrack and the camera tracking systems align correctly. Check the spacial calibration in the Calibration program.
The coordinate system may have been put in the wrong place in the Coordinate system step or even the camera tracking may be incorrect.
Possibly, individual cameras have been accidentally moved e.g. during works on the lighting, and need re-calibration.
No data sent to the graphics engine, data stream unstable
TalenTrack data generation and transmission is based on the video input reference. Check video input signal for instabilities.
Check the 2.4 Tracking data delay and make sure the Trigger Sender Delay (us) is high enough to not cause errors. Send a ping to the graphics engine for a basic network test:
-
Open a Terminal Emulator from the Menu
-
Type and confirm with Enter key:
ping <IP of the graphics engine>
-
If reachable, the terminal should show a timing with a low ms value, otherwise it will display “Destination Host Unreachable”