We do not recommend that you upgrade your Pixotope machines in the middle of a production or pre-production phase.
When choosing to upgrade, we recommend that you back up your existing Pixotope projects, so that you will be able to go back if you need to.
Engine
Projects will be migrated to version 5.7.
Digital Twin
We've refactored how Digital Twins (bodies, mappings, holdouts, and 2D media) are stored, moving them out of the level into the Show file.
This architectural change improves manageability in multi-machine environments especially when it comes to failover handling. It is a first step towards a more visual way of handling LED mappings.
Sharing projects containing a Digital Twin, now need to include the Show file as this is where the data is stored.
Migration of the Digital Twin
Levels with Digital Twins need to be migrated!
Before migration
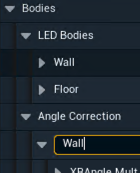
Have you used LED Angle correction? Open the level in 25.2 and make sure that the body names manually entered there match the actual body names.
Migration in Editor
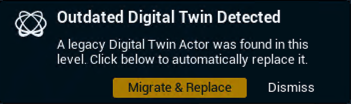
When opening a level with an old Digital Twin, a notification is shown.
-
For a one-click migration, you can click "Migrate & Replace"
-
inside the notification
-
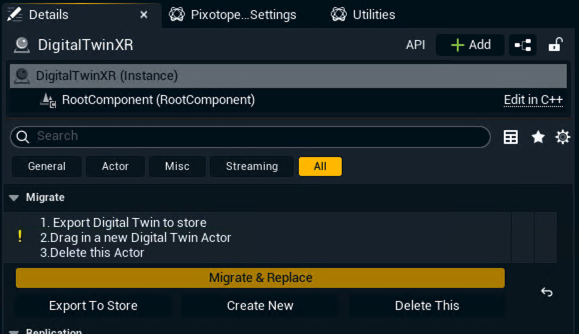
OR from Details > Migrate of the Digital Twin
-
This will
-
Export all the Digital Twin's data to the Show file
-
Create a new Digital Twin actor
-
Delete the outdated Digital Twin actor
As the way mappings work has changed, they might need to be recreated!
If you are unsure or run into issues, reopen the level without saving and do the 3 steps separately, using the buttons below (Export To Store, Create New, Delete This).
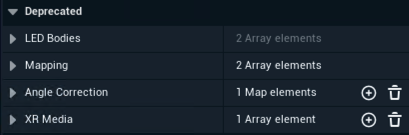
The values of the outdated Digital Twin actor can be found in the Deprecated section.
Migration in Director
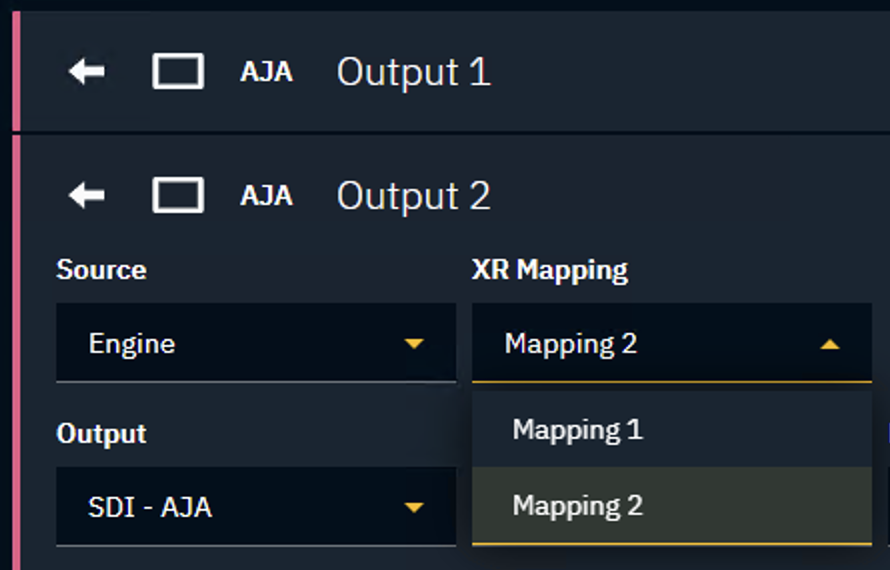
Make sure the XR machines are added to the XR render group in the Machines panel.
-
Go to SETUP > Configure > Routing
-
Select the correct mapping for each machine using the XR Mapping dropdown
Mapping changes
A mapping defines which LED panels/XR walls render to which video outputs.
-
There is a 1-to-1 relationship between an output and a mapping
-
A single mapping can render
-
a single LED body
-
one or multiple parts of an LED body
-
multiple parts of multiple LED bodies
-
multiple LED bodies
-
Learn about the updates on how to Create mappings - Digital Twin XR
2D Media changes
2D Media can now span across multiple bodies. For this to work, you need to specify how the bodies are laid out next to each other on a 2D canvas.
-
For each body, you need to enter its position on a fictitious 2D canvas
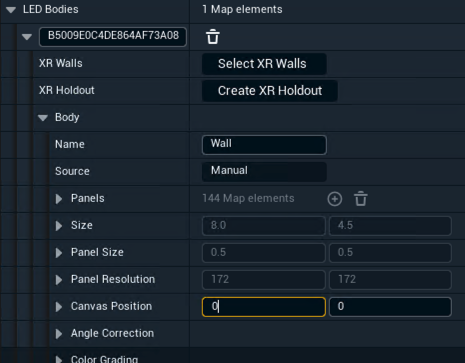
Color grading now per body
Individual color grading is now done per body and no longer per XR wall.
Renaming of Digital Twin
Digital Twins, which were automatically created using Pixotope Tracking, are now called Pixotope Tracking Twin to avoid confusion with the actor name. They are all digital twins; we just differentiate how they have been created.
-
Pixotope Digital Twin XR
-
Pixotope Tracking Twin
-
Manual Twin
-
Spline Twin
-
Essential Actors
The handling of Pixotope Essential Actors when working with streamed levels has been improved:
-
Essential Actors in streamed levels do NOT have to be deleted anymore. They are now automatically hidden/disabled
-
This can be overridden by the Has Priority Over Persistent setting in Pixotope World Settings is enabled
-
-
Auto Manage Essential Actors (previously Auto Spawn Essential Actors) and does NOT have to be disabled anymore for streamed levels
-
Disable Post Process Handler If Not Priority allows to use the streamed level's Post Process Handler to be taken into account even if the above setting is not enabled
Learn more about Pixotope Essential Actors
VideoIO
We resolved an issue where extremely bright pixels (such as virtual lamps) could produce unwanted saturated color artifacts instead of properly desaturating to white when tone mapped or clipped.
Director
Render groups
As Render groups can depend on the Show file, we made setting them in Director mandatory.
It is now mandatory to set Render groups in SETUP > Configure > Machines
Renamed panels
We have renamed two panels as the similar names caused some confusion.
|
Old panel name |
New panel name |
|---|---|
|
Camera tracking |
Camera systems |
|
Tracking |
Tracking offsets |
Server role change aftermath
Changing the role of the Server machine does not change the Client’s roles anymore. They will now keep trying to connect to the Server unless the user changes their role.
Control panel
The values sent from the control panel are now parsed based on their type. Previously, all of them were sent as String.
Learn more about Supported target property types
API
The values for setting the DLSSQuality within Pixotope World Settings were changed to use numbers, making it easier to control.
0 < UltraPerformance
1 < Performance
2 < Balanced
3 < Quality
4 < DLSSAsAA
5 < UpscaleSome
6 < UpscaleMore
7 < UpscaleEvenMore
8 < UpscaleMorest
Logs
We now log if the engine runs below the target rate:
[2025.10.29-09.12.55:237][887]LogPixotope: Warning: Performance:
         Target: 16.68ms
         Raw Delta: 19.76ms
         Game: 3.15ms
         Game total: 3.15ms
         Render: 19.71ms
         RHIT: 9.69ms
         GPU time: 18.36ms
         Total frames bellow target: 75878
CG > MOTION
Pixotope CG is now Pixotope Motion.
Machines assigned to the CG group need to be manually changed to the MOTION feature group via the Machines panel.
Created a Motion Design project in Pixotope CG? Learn more about Migrating existing Motion Design projects
Looking Ahead: Windows 10 Support Ending
Starting with the next release (26.1) we will stop testing on Windows 10 and focus our efforts on Windows 11 as Microsoft has ended support for Windows 10 in October 2025.
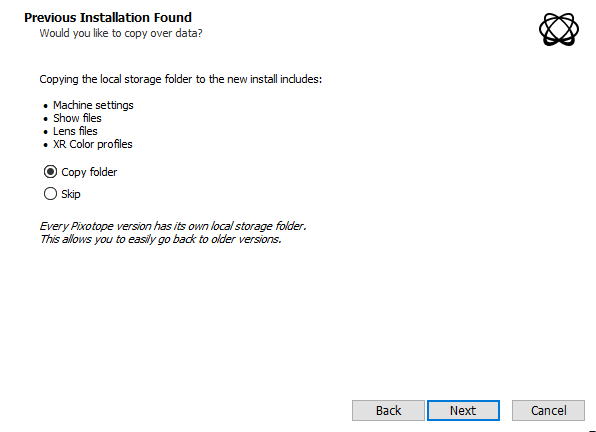
Migrating show files
To carry over show files and machine settings from an old installation, you can
-
Click "Copy folder" at the start of the installation
-
OR manually copy the files into the Local storage folder of the new installation
Learn more about Show files and where they are stored
Migrating projects
When opening a project from Unreal or an old Pixotope version:
-
When prompted in the Editor, click "Update"
-
This will update your .uproject file

-
-
Restart the Editor
Unreal projects can be used in Pixotope right away and do not need any migration steps.