
We use the Electra Media Player plugin for media playback. Electra is Epic's native, cross-platform media player that supports local file playback of .mp4, .mkv, and .mov files as well as internet streaming - with no additional transcoding tools required.
Read more about Electra Media Player → https://dev.epicgames.com/documentation/en-us/unreal-engine/electra-media-player-in-unreal-engine
Recommended video format
Electra supports a range of codecs, and we encourage testing different options to find the right balance of performance, file size, and load time for your specific use case. The table below summarises the supported codecs and their characteristics.
|
Format |
Container |
Alpha support |
Notes |
|---|---|---|---|
|
HAP |
|
No |
GPU-decoded, intra-frame. Best overall performance for large files based on Pixotope testing |
|
HAP Alpha |
|
Yes |
GPU-decoded, intra-frame. Best overall performance for large files based on Pixotope testing. This variation supports Alpha channel. |
|
Apple ProRes 444 |
|
Yes |
Intra-frame with alpha. High quality but higher decode cost than HAP Alpha |
|
Apple ProRes 422 HQ |
|
No |
Intra-frame, high quality. Good performance, larger files than HAP |
|
H.264 / AVC |
|
No |
Inter-frame (GOP). Higher decode cost; much higher compression (smaller files) than Intra-frame codecs, but heavier decode cost |
|
H.265 / HEVC |
|
No |
Inter-frame (GOP). Smaller files than H.264 but heavier decode cost |
Pixotope recommendation: Based on our extensive testing, HAP and HAP Alpha deliver the best playback performance when loading and playing larger files in real-time virtual production contexts. HAP is GPU-decoded and uses intra-frame compression, which eliminates GOP overhead and offloads decode work from the CPU - resulting in lower latency and more headroom for the rest of the Pixotope pipeline.
We recommend starting with HAP and benchmarking against your specific content before selecting a final codec.
For best real-time performance with any intra-frame codec, store video files on a fast local NVMe drive to sustain the required read throughput.
Enable the required plugins
The following Engine plugins are required depending on the codec you intend to use. All ship with Pixotope Engine and need to be enabled in your project.
-
Open the Pixotope project in the Unreal Editor
-
Go to Edit > Plugins
-
Search for and enable the relevant plugins:
|
Plugin |
Required for |
|---|---|
|
Electra Media Player |
All codecs - core media player enabling local file and streaming playback |
|
HAP Decoder for Electra |
HAP and HAP Alpha playback |
|
Apple ProRes Decoder for Electra |
ProRes 422 HQ and ProRes 4444 playback |
|
D3D12 Hardware Accelerated Video Decoding for Electra |
All codecs - offloads video decoding to the GPU via D3D12 for improved real-time performance |
-
Restart the Editor when prompted
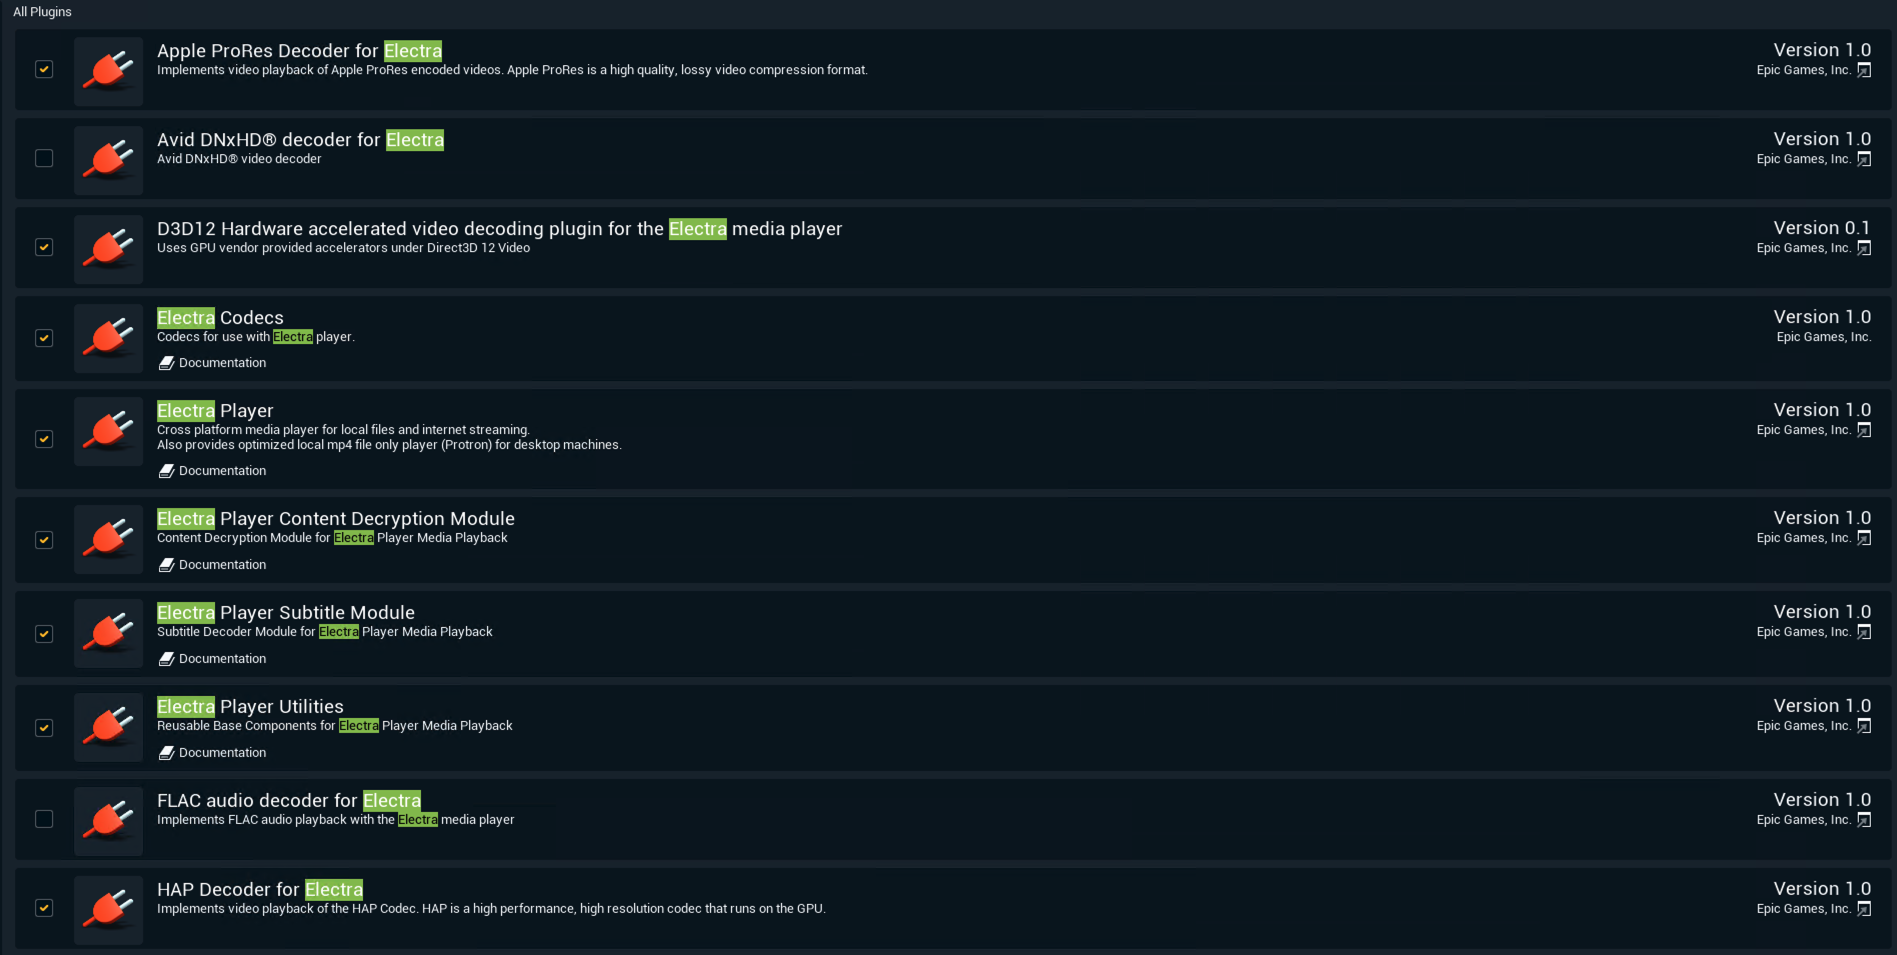
The D3D12 hardware decoding plugin requires a compatible GPU and Windows 10 or later. If decoding issues occur, disable this plugin and fall back to software decoding.
Create a File Media Source asset
The File Media Source asset tells the Engine where to find the video file at runtime.
-
Right-click inside the Content Browser
-
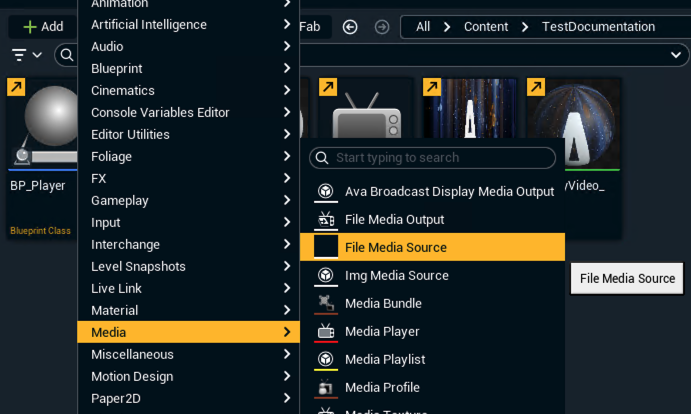
Navigate to Media > File Media Source and create a new asset - name it, for example,
FMS_MyVideo -
Open the asset and set
-
Player Overrides > Windows > Electra Player
-
File Path to the full system path of your video file, e.g.:
D:\Media\Videos\MyVideo.mov
-
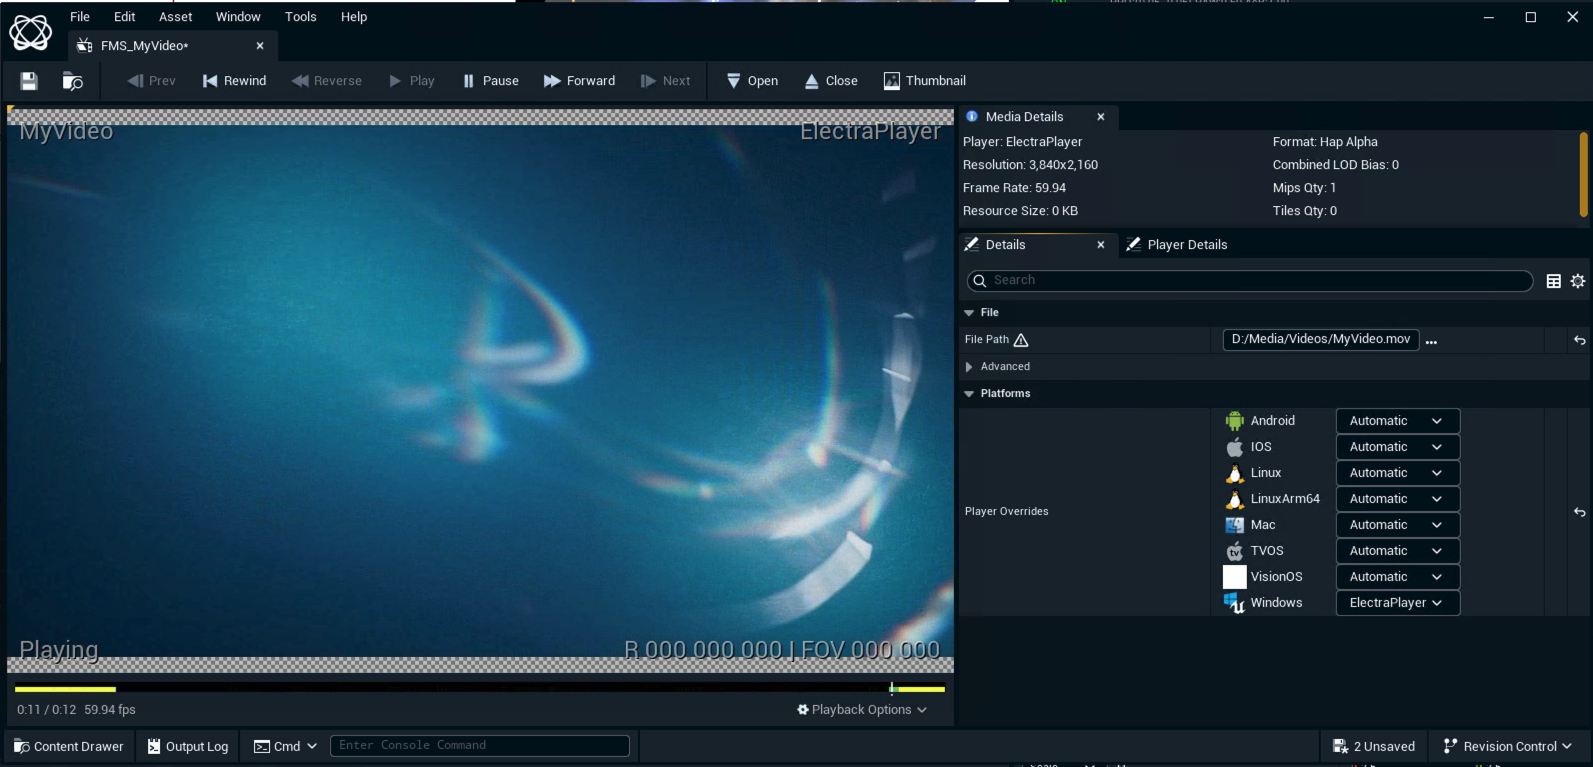
You can also change the file path at runtime via Blueprint, which makes it easy to swap video sources without modifying the asset. See the Load a video file at runtime section below.
Create a Media Player asset
-
Right-click inside the Content Browser
-
Navigate to Media > Media Player and create a new asset - name it, for example,
MP_MyVideo -
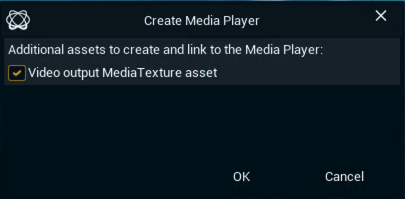
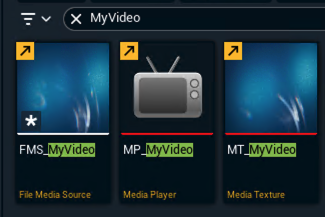
In the creation dialog, make sure Create Media Texture is checked - this will automatically generate a linked
MP_MyVideo_VideoMedia Texture asset. We recommend to rename this toMT_MyVideo -
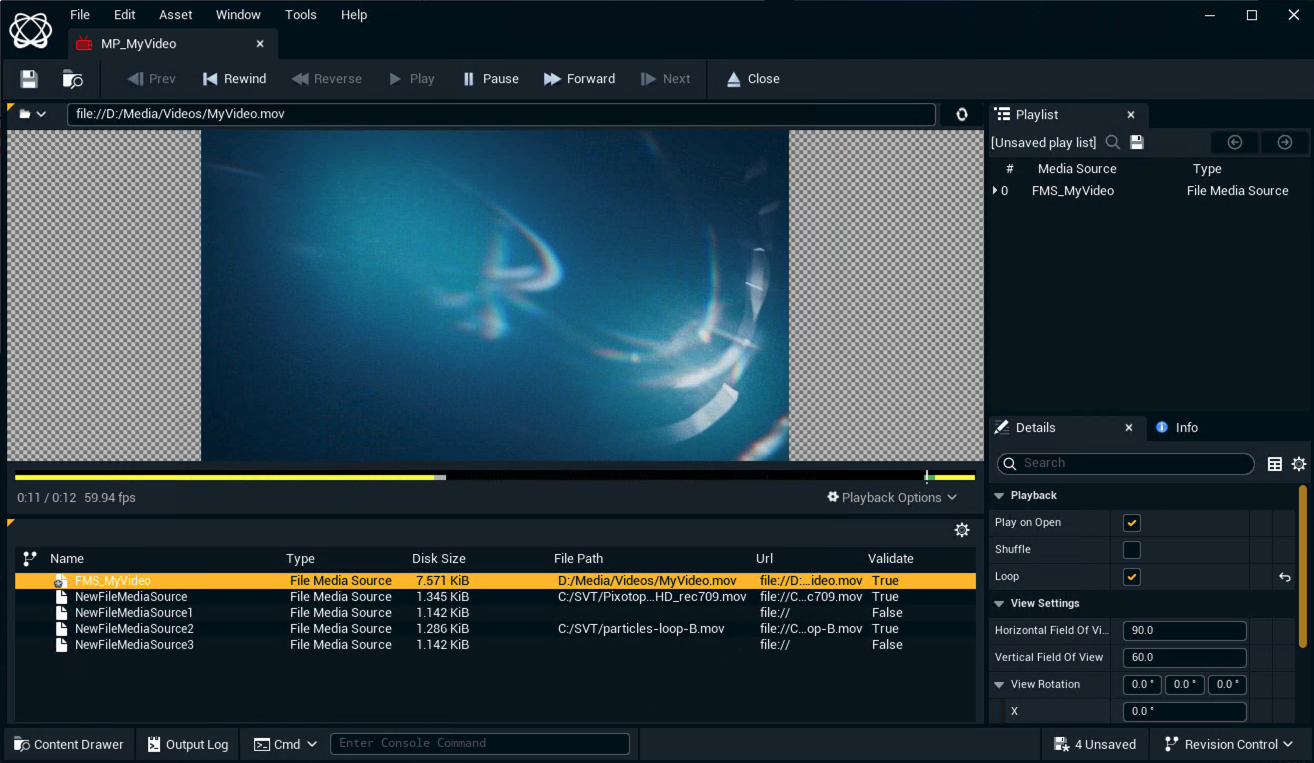
Open the Media Player asset
-
Enable Play on Open if you want the video to start automatically when the source is opened
-
Enable Loop if the video should repeat
-
To test the media player, double-click on the File Media Source created in the previous step,
FMS_MyVideoin the browser at the bottom of the Media Player window
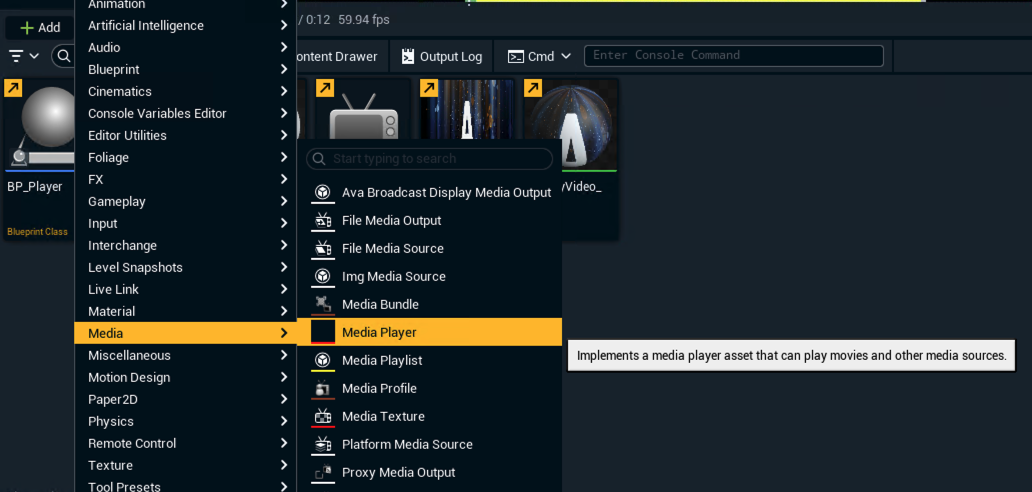
You need one Media Player asset per video stream.
Visualize video playback in the virtual scene
The Media Texture linked to a Media Player asset contains the decoded video frames and can be applied to any element in the virtual scene. It is most commonly used to simulate virtual monitors by applying it to a Plane actor, but it works on any mesh or surface.
There are two ways to display the video in the scene, each with different visual characteristics. Choose the one that best fits how the virtual monitor will appear in your shots.
|
|
Material |
Media Input component |
|---|---|---|
|
Anti-Aliasing (TAA) |
Affected |
Not affected |
|
Depth of Field |
Affected — focuses and defocuses with the rest of the scene according to lens information |
Not affected |
|
Best for |
Virtual monitors that need to integrate naturally into the scene, matching the lens behaviour of surrounding elements |
Virtual monitors where fidelity to the original recorded image is the priority |
💡 If the virtual monitor will be positioned so that it naturally focuses and defocuses with the rest of the scene, the Material approach will give the most seamless integration. If the monitor is always in focus or in the foreground and reproducing the original recorded image accurately is the priority, use the Media Input component.
Option 1 — Use the Media Texture in a Material
This approach integrates the video into the standard Unreal rendering pipeline. The virtual monitor will be affected by Anti-Aliasing and Depth of Field, making it behave like any other element in the scene. This is the best choice when the monitor needs to feel naturally embedded in the virtual environment.
-
Locate the Media Texture asset linked to your Media Player (e.g.
MT_MyVideo) -
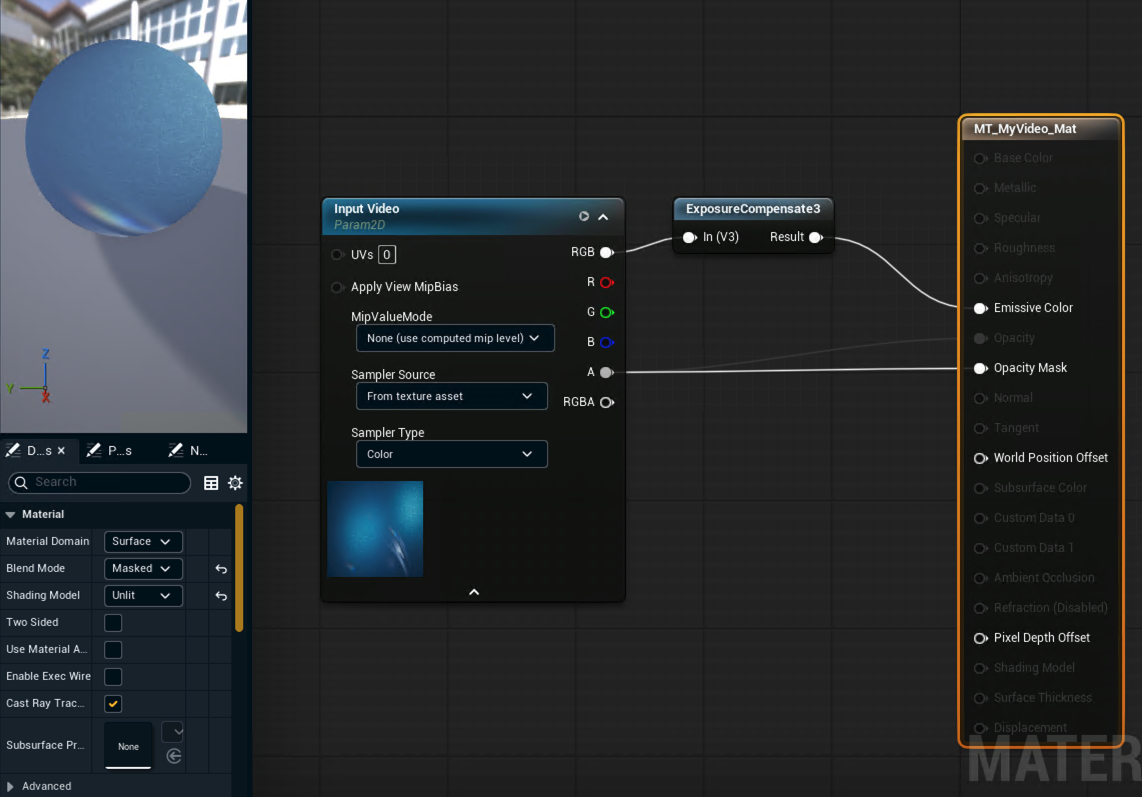
Open an existing material or create a new one and add a Texture Sample node
-
Assign
MT_MyVideoto the Texture Sample node -
Drag a Material Function node into the Material Graph and set it to ExposureCompensate3
-
Connect the RGB output of the Texture Sample into the input pin of ExposureCompensate3
-
Connect the Result output of ExposureCompensate3 into the Emissive Color input pin of the Material node
-
Click on the Material node and, in the Details panel on the bottom left, find Shading Model and set it to Unlit
-
Apply the material to your Plane actor or mesh in the scene
-
Adjust the scale of the mesh to match the video's aspect ratio
Option 2 — Use a Media Input component
This approach bypasses the standard rendering pipeline for the video surface, giving the video higher fidelity by avoiding Anti-Aliasing processing. The trade-off is that the virtual monitor will not be affected by Depth of Field. This is the best choice when reproducing the original recorded image as accurately as possible is the priority — for example, for a monitor that is always in focus and in the foreground.
-
Select the Plane actor (or preferred mesh) in the scene
-
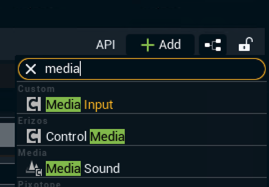
In the Details panel, click Add and search for Media Input — add the Media Input component to the actor
-
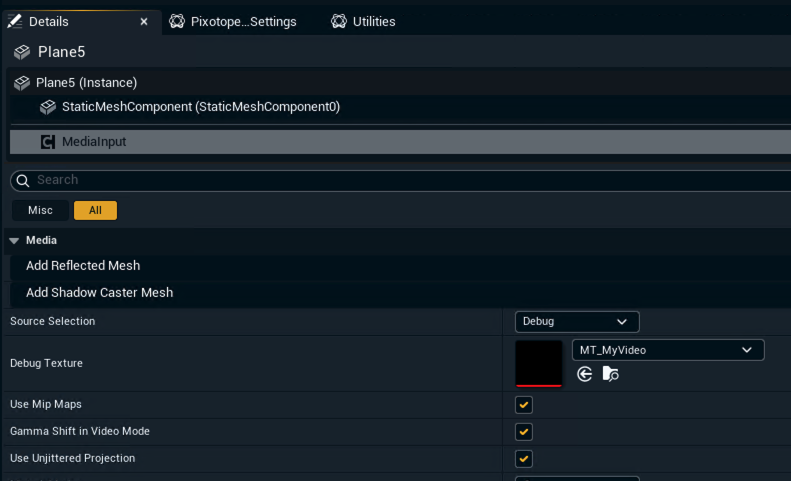
Select the Media Input component in the Details panel
-
Under Source Selection, choose Debug
-
In the Debug Texture property that appears, drag and drop the
MT_MyVideoMedia Texture asset -
If the mesh is a flat surface (e.g. a Plane), enable the Unjittered Projection checkbox
Create a Blueprint to control playback
-
Right-click in the Content Browser, select Blueprint Class, choose Actor as the parent class, and name it - for example,
BP_VideoPlayer -
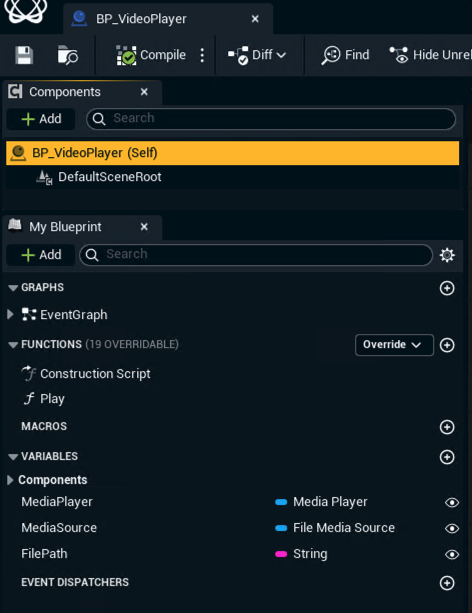
Inside the Blueprint, create a Media Player Object Reference variable:
-
Click + in the My Blueprint panel to add a new variable
-
Set the variable type to Media Player > Object Reference
-
Name it
MediaPlayer -
Click the eye icon to make it instance-editable, then Compile
-
-
Create a File Media Source Object Reference variable the same way - name it
MediaSource -
Create a String variable and name it
FilePath. This will allow you to set a different path to a file externally and load that file from the blueprint -
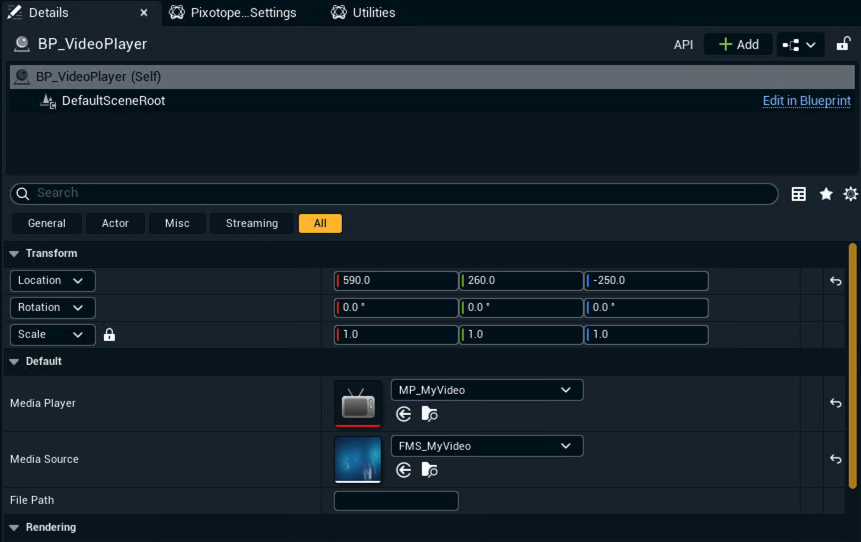
Drag the Blueprint into the level, select it, and in the Details panel assign:
-
Your
MP_MyVideoMedia Player asset to theMediaPlayervariable -
Your
FMS_MyVideoFile Media Source asset to theMediaSourcevariable
-
Add Blueprint events
Load a video file at runtime
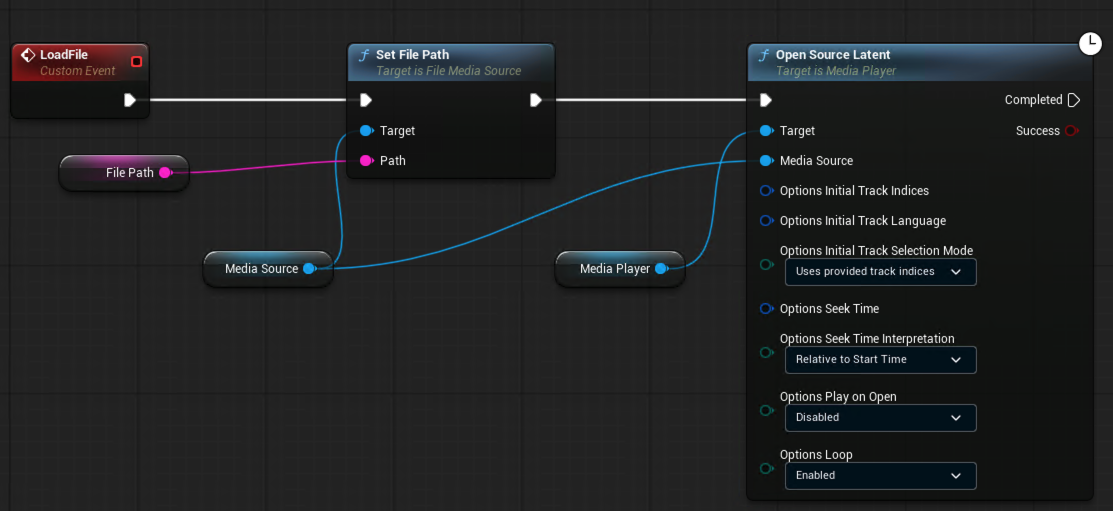
The LoadFile custom event allows you to change the video file being played at runtime without stopping or restarting the Media Player. It takes a file path as input, updates the Media Source asset with the new path, and then opens it asynchronously - ensuring the source is fully ready before playback begins.
This is the recommended way to switch video files dynamically, for example when driven by a Dropdown or Playlist widget in the Control panel.
Create the event
-
In the Event Graph, right-click and add a Custom Event - name it
LoadFile
Set the file path on the Media Source
-
Drag your
MediaSourcevariable into the graph to get a reference to it -
Drag off the
MediaSourcepin and search for Set File Path -
Connect the
LoadFileexecution pin to Set File Path -
Wire the
File Pathinput parameter to the Path pin on Set File Path
Open the source asynchronously
-
Drag your
MediaPlayervariable into the graph to get a reference to it -
Drag off the Set File Path execution pin and search for Open Source Latent
-
Wire the
MediaSourcevariable to the Media Source pin on Open Source Latent -
Wire the
MediaPlayervariable to the Target pin on Open Source Latent -
In the Open Source Latent node, configure the options:
-
Options Play on Open →
Disabled- the video will not start automatically after loading; trigger playback separately using yourPlaycustom event -
Options Loop →
Enabled- the video will loop continuously once playback starts
-
How to use it
Once the Blueprint is compiled and placed in the level, you can drive LoadFile from the Control panel by selecting BP_VideoPlayer in the Engine browser tab and dragging the LoadFile function onto the canvas.
Play and Pause custom events
-
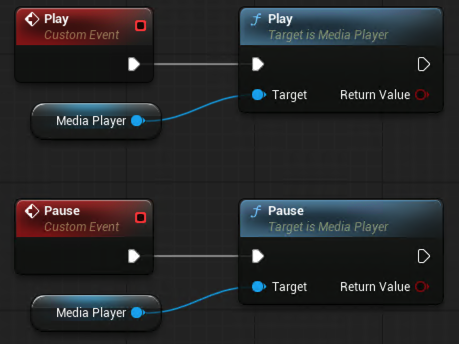
Right-click in the graph, add a Custom Event and name it
Play- wire it to a Play node targetingMediaPlayer -
Add another Custom Event named
Pause- wire it to a Pause node targetingMediaPlayer
Example blueprints for more advanced controls
Use these patterns for more advanced controls like playing from a specific time or changing the video source at runtime.
Play from a specific time
-
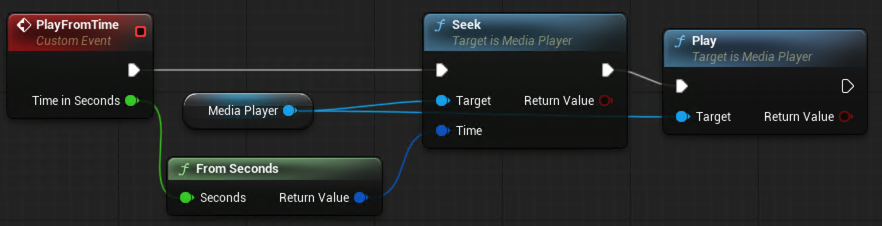
Add a Custom Event named
PlayFromTimewith a Float input parameter namedTimeInSeconds -
Wire it to Seek (target:
MediaPlayer) followed by Play -
Use a From Seconds node to convert
TimeInSecondsinto a Timespan value and wire it to the Time input in the Seek node.
Control the video playback via a control panel
-
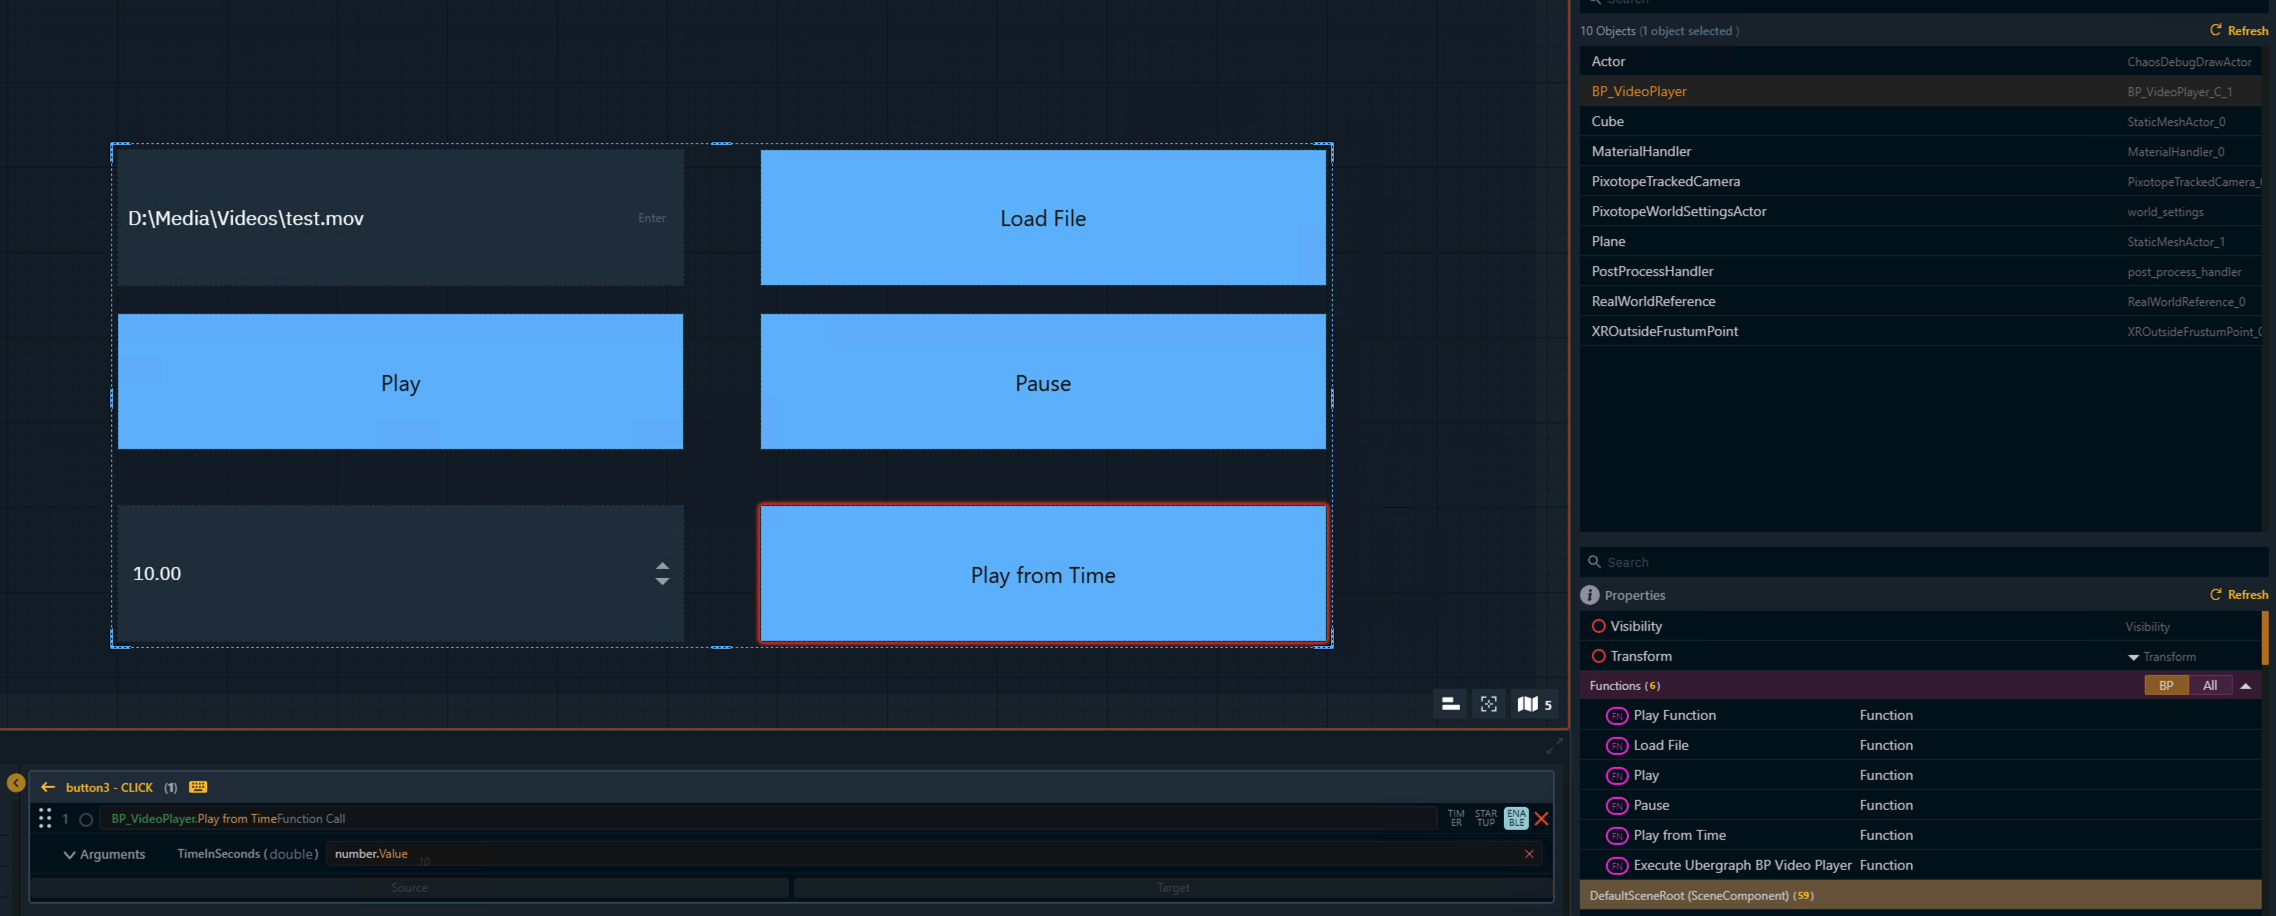
Create a new control panel
-
Select the
BP_VideoPlayerobject in the Engine Browser tab -
Drag the functions (custom events) created in the previous section onto the canvas and select the desired widgets for each of them
Learn more about Creating a control panel - PRODUCTION
Set up synchronized video playback
Learn more about how to Set up synchronized video playback