Pixotope allows users to create custom Control Panels for real-time DMX lighting control, enabling precise manipulation of parameters such as Pan, Tilt, Dimmer, Color, and more. By designing a tailored interface, users can efficiently control DMX fixtures directly from a Control Panel without needing to modify Blueprints, enhancing flexibility and ease of use in live productions.
Prerequisites
-
Basic knowledge of Pixotope and Blueprint scripting
-
DMX set up
-
DMX communication configured
-
At least one fixture placed on the level
-
DMX Functions and Patches configured
-
Fixtures addressed and linked to a DMX Library correctly
-
Learn more about how to Set up DMX lights
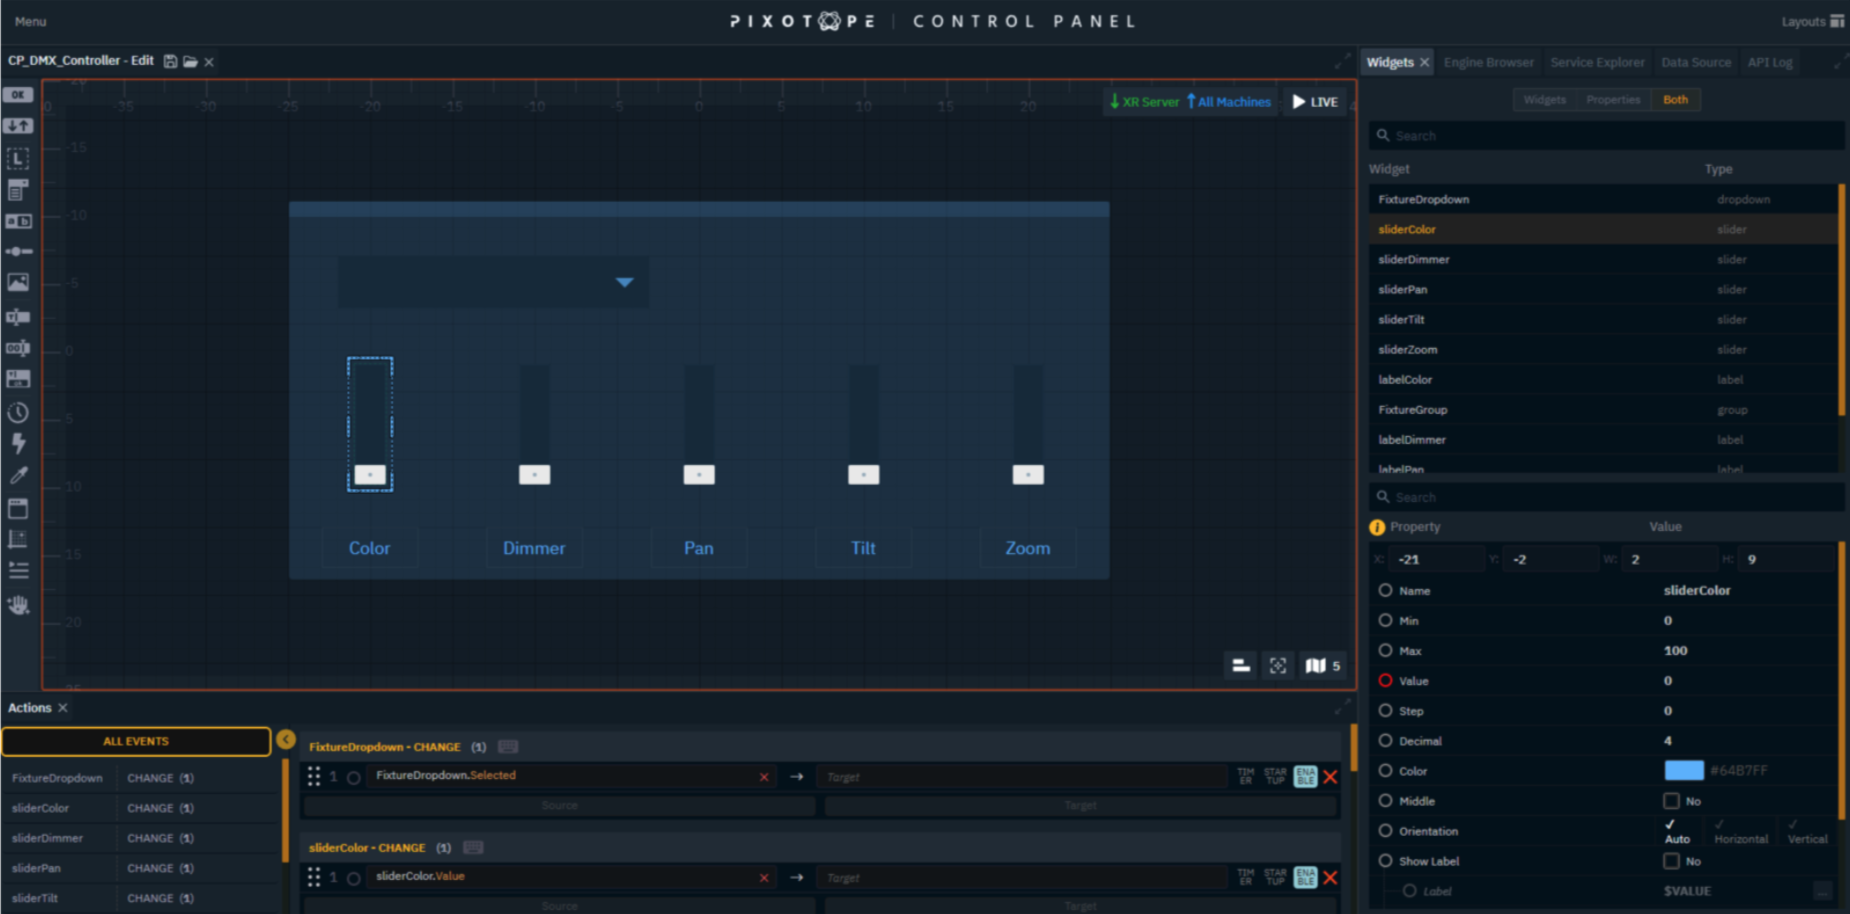
Step 1: Design the control panel interface
A custom Control Panel can be easily built with the following Widgets:
-
Sliders → Adjust Color, Pan, Tilt, Dimmer, and Zoom
-
Labels & Groups → Helps to easily identify parameters and allows each controller to be separated into groups
-
Selection Dropdown → Choose which fixture to control
Each UI element is created to a corresponding DMX function.
Learn more about Creating a control panel - PRODUCTION
Step 2: Define the blueprint logic and map values
Next, we'll create a Blueprint actor to handle the information and logic.
-
Create a new folder called Blueprints and open it
-
Press the +Add button in the top left corner, create a new Blueprint asset, and select Actor as Parent Class

Once inside the new Blueprint we just created:
-
Call the DMX Subsystem by right-clicking on the grid and typing "DMX Subsystem" in the search box
-
From the data return in the blue dot, drag and drop the call “Get All Fixtures in Library” module
-
Select your DMX Library from the drop-down in the module
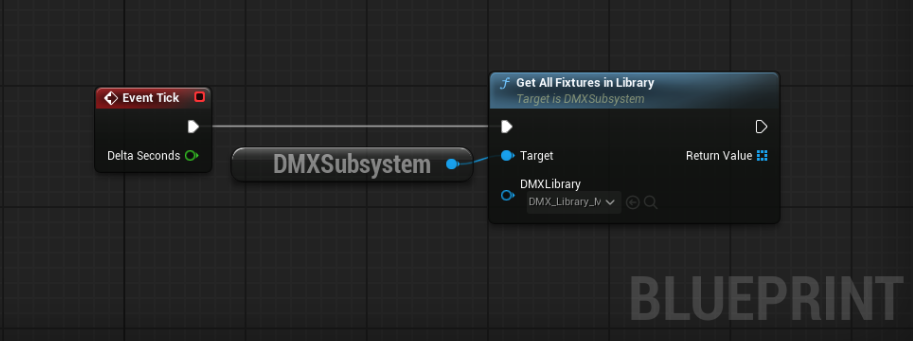
The previously called module will obtain in its return value an array with all the fixtures available in the library.
-
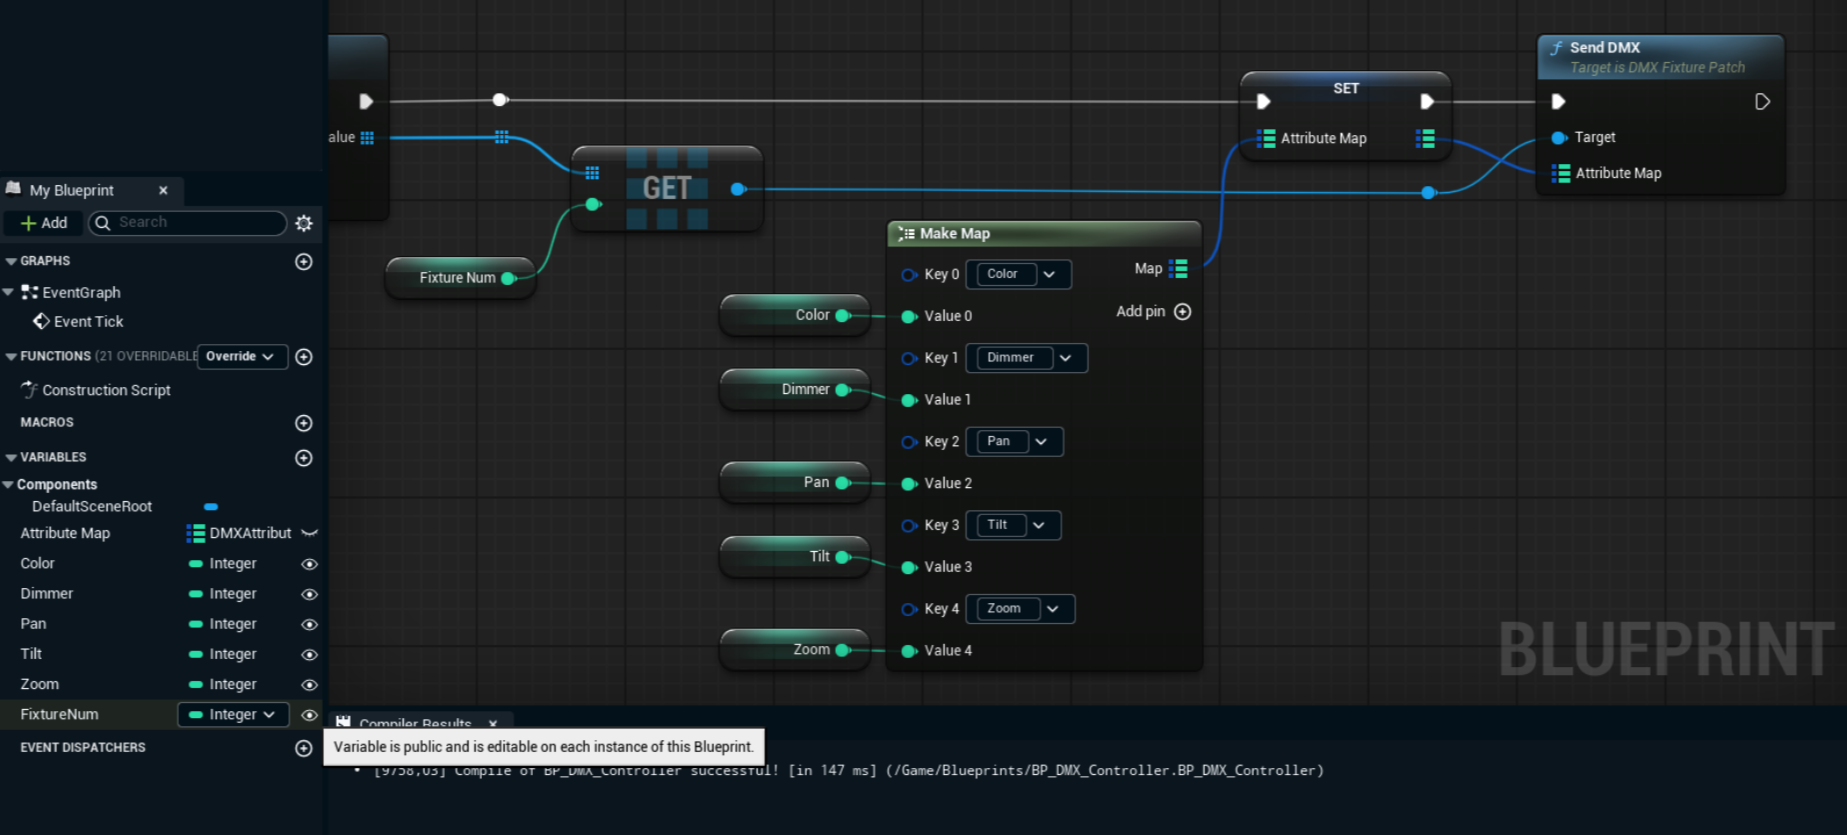
Drag and drop from the Return Value and call the "Get (a copy)" utility
The created copy will be an indexed container from which we can create an Integer variable to assign the number of the fixture we want to call. -
Create a Variable from the index of the copy obtained by right clicking the value and selecting Promote to Variable, then name the variable as Fixture Num
-
From the data return blue dot, drag and drop the call “Send DMX” module

Now we'll create a mapping for the fixture values from the Send DMX module's Attribute Map pin.
-
Promote to Variable the Attribute Map param by right-clicking on the pin
-
Drag and drop the newly created variable from Variables Menu and select the Set option
-
The created Set module must be executed before the Send DMX module in the execution chain

In this final step, we create a mapping of the values that each fixture has to manipulate in real time:
-
Pull from the Attribute Map parameter in the Set module and type Make Map in the search box
-
By default, you will get a Key parameter and its Value, you can add as many pins as you need
-
In the Key parameters, assign the DMX attribute you want to manipulate
(In this case we will have Color, Dimmer, Pan, Tilt and Zoom) -
Create or promote a new Integer variable for each of the Key parameters and name them the same as the attribute they will control
-
Make sure all created or promoted variables are exposed or made public by clicking the Eye Icon to the right of each variable so they can be edited in real time
Step 3: Link UI controls to DMX functions
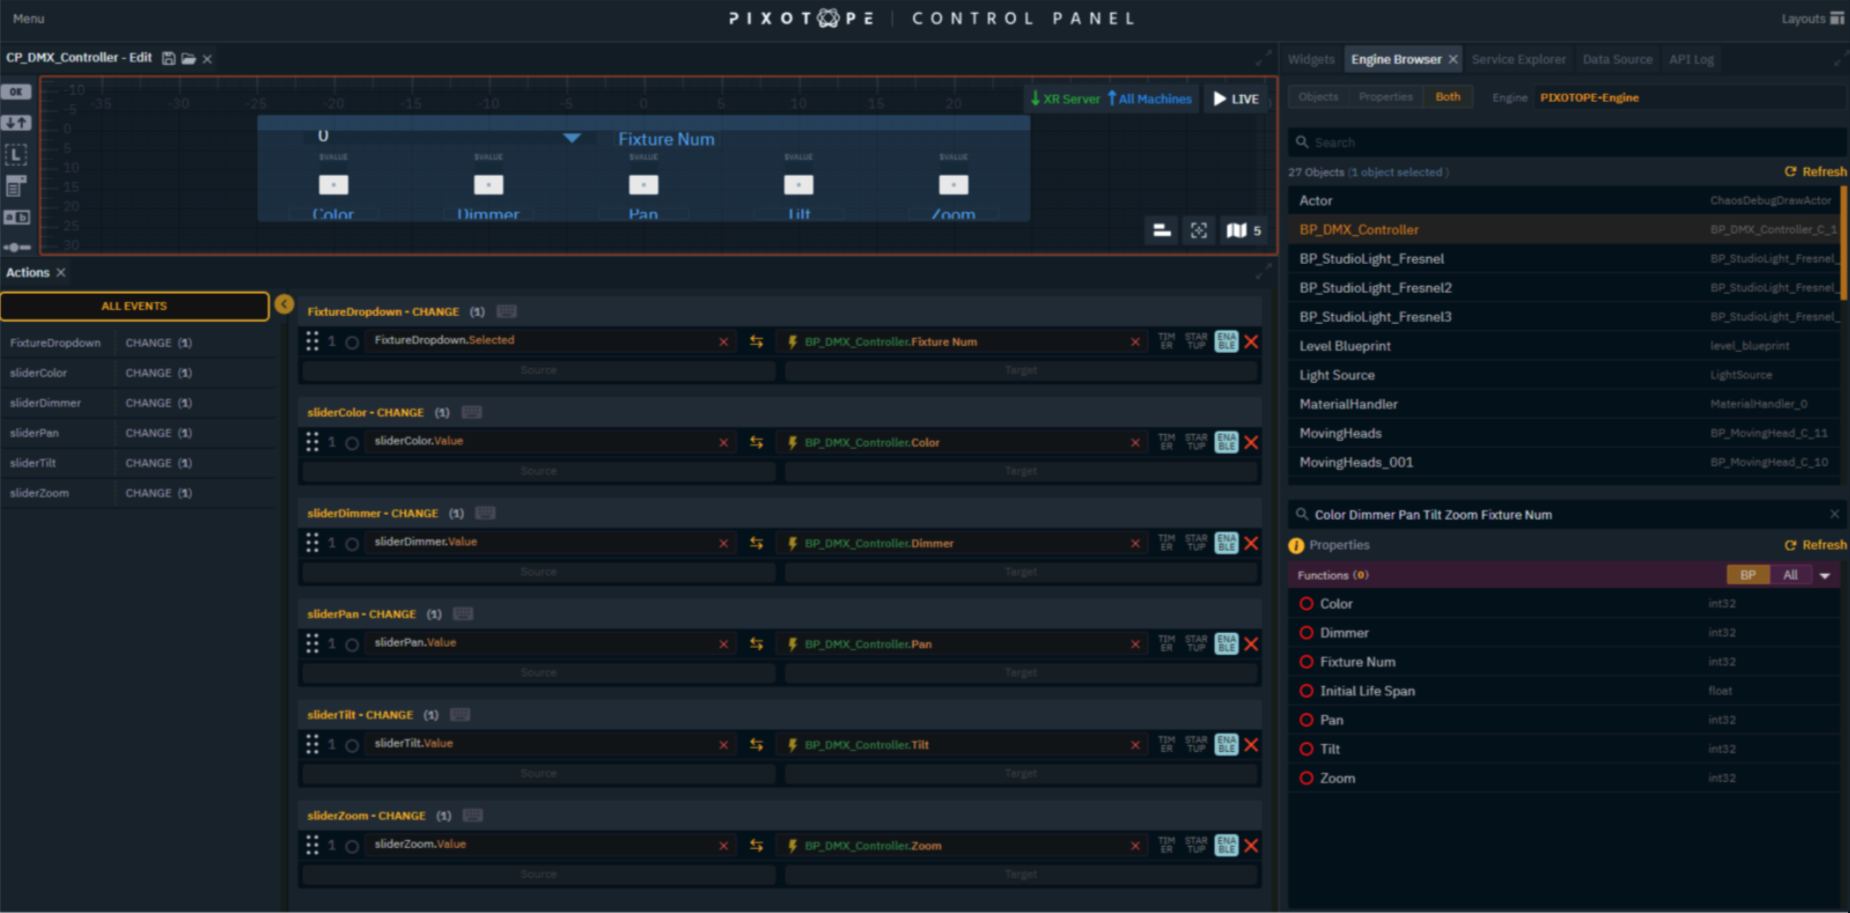
Once our Blueprint is finished and fully functional from the Editor, we can return to our Control Panel created in Step 1 to link the Widgets with the DMX functions.
-
Go to the Engine Browser tab and select the Both option to view the Objects and their Properties
-
Locate the Blueprint actor you created and placed in the level (BP_DMX_Controller)
-
In the Properties search bar, type the variables you want to work with, without commas or other symbols (Color Dimmer Pan Tilt Zoom Fixture Num)
-
Drag and drop each Property/Variable into the Target field of each widget in the Actions window Ensure the data processing is bidirectional by clicking the arrow icon between the Source and Target fields.
Learn more about how to Add widgets and actions
Step 4: Fine-tune widgets
With the controls linked to the DMX Functions, the Control Panel should now be working perfectly. It only remains to fine-tune a few details to get the most out of each Widget:
-
Go to the Widgets tab and choose the Type you want to fine-tune
-
In the Properties section, you can correctly name each Widget, choose colors and font sizes, etc
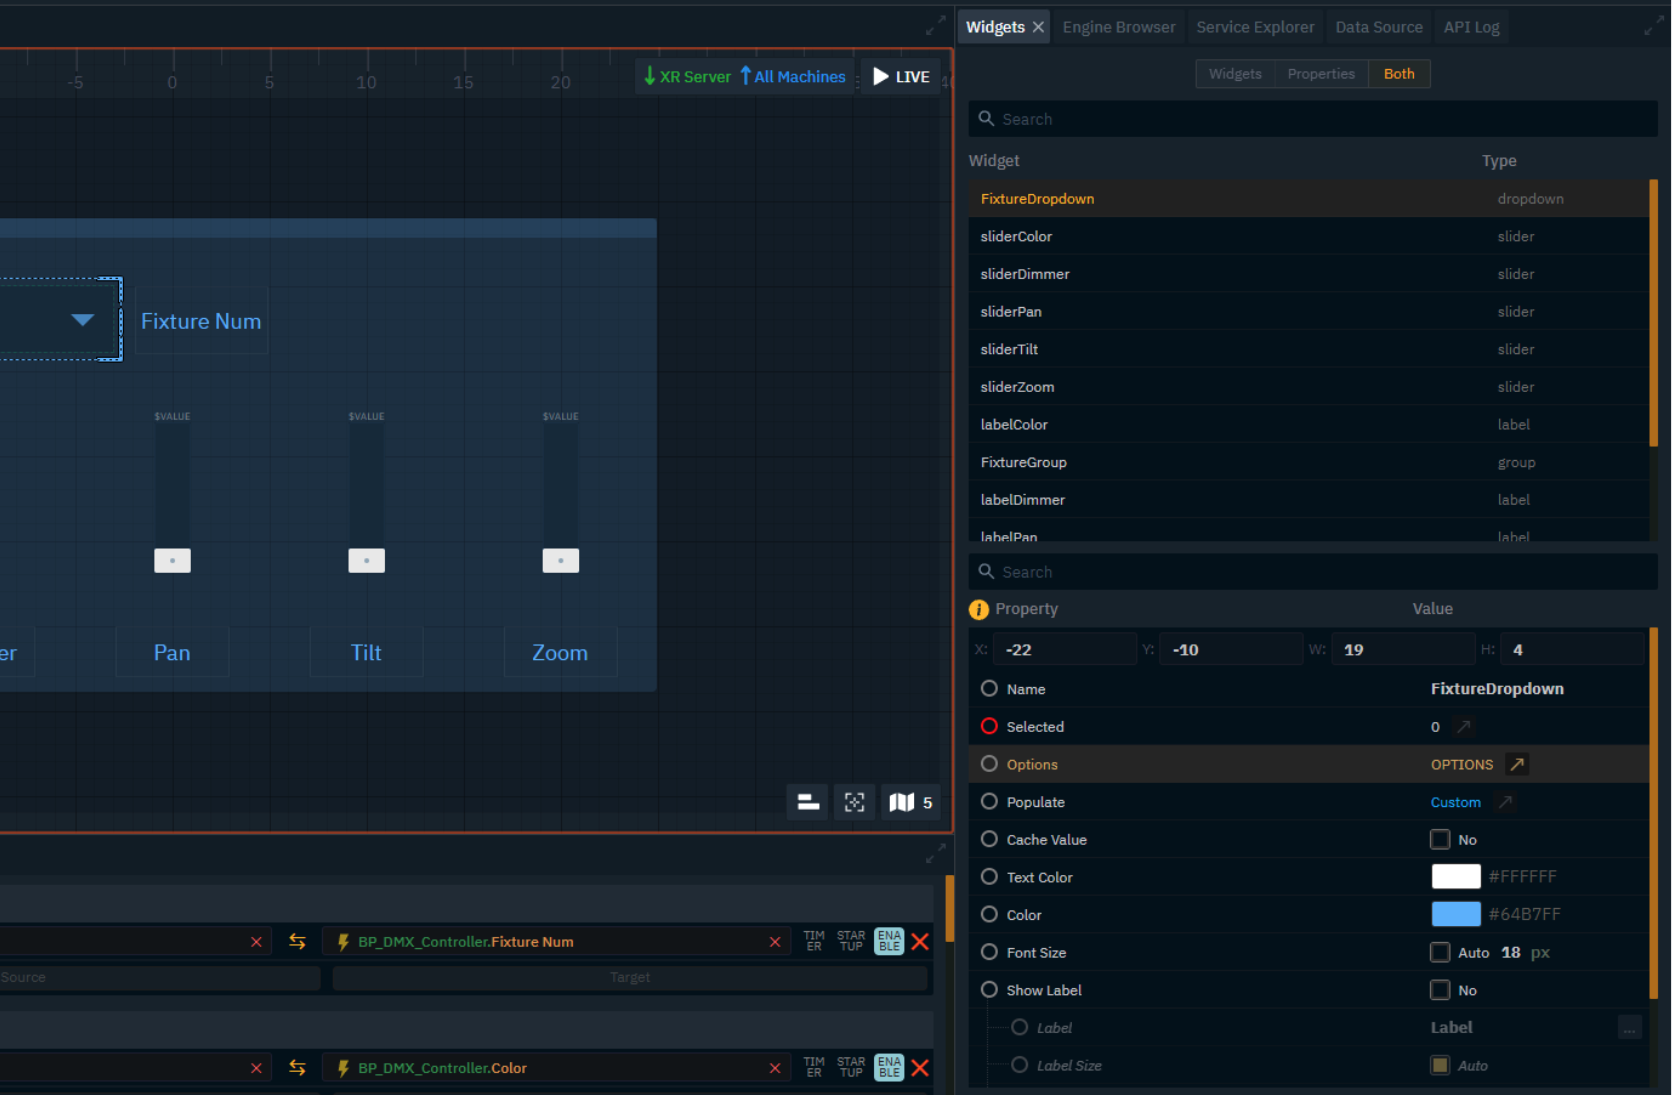
-
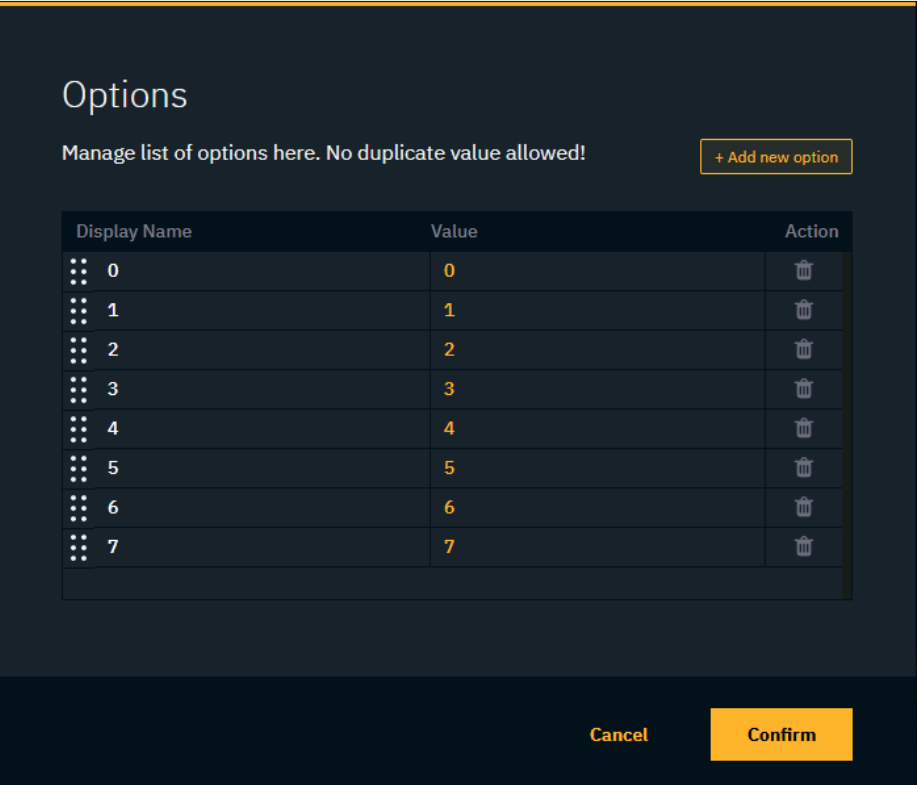
For the Fixture Dropdown, open the Options section and add the corresponding index for each existing Fixture in the scene (In this case, there are 8, and the counter starts at 0)
-
For Sliders, you can adjust the maximum values for each DMX Function, adjust the increment steps, remove decimal places, and activate the Show Label option to display the current slider value at the desired position.

Below you will find a table with the range of values that exist for each Function created and the value that corresponds to the DMX:
|
Control Panel UI Element |
DMX Function |
Value Range (UI) |
DMX Value (0-255) |
|
Pan |
Pan (X Rotation) |
0 to 45000 |
0 to 255 |
|
Tilt |
Tilt (Y Rotation) |
0 to 70000 |
0 to 255 |
|
Dimmer |
Light Intensity |
0 to 255 |
0 to 255 |
|
Color* |
RGB Values |
0 to 255 |
0 to 255 |
|
Zoom |
Beam Width |
0 to 255 |
0 to 255 |
* DMX Color Macro which provides access to preset colors and dynamic color effects through a single channel.
Now that we're done, we can launch the scene and Control Panel in Live Mode to check that the Sliders and Selector are working correctly and completely in real-time, eliminating the need to open the Editor to operate the DMX lights.

Conclusion
With Pixotope's flexible custom Control Panel system, users can build intuitive, user-friendly DMX lighting controls tailored to their specific production needs. This allows for seamless real-time adjustments without modifying engine settings, making it a powerful tool for virtual productions.