Error Diagnostics Procedure
When encountering errors or unexpected behavior by the tracking, the troubleshooting in the Pixotope Tracking Maintenance Procedure should be consulted: Tracking Maintenance Procedure | Troubleshooting . For more advanced troubleshooting, check the descriptions below and expand the excerpt when they seem to describe your issue.
How to use this guide
-
Find the excerpt that seems to describe your issue
-
Read the Symptoms and see whether one or more definitions apply to your case. Sometimes, details differ, such as “engine does not boot” or “engine does boot but doesn’t show and output”. The symptoms description can help to narrow down the actual issue, for example by indicating how to move the camera to pinpoint a discrepancy.
-
In the expanded issue, read the Note part, if present. It may contain common tips or distinctions between different cases and can save you following wrong leads.
-
Read the Checks. They are mostly sorted in the order in which the checks would be performed.
-
If a check applies to your situation, expand the below excerpt to see troubleshooting steps
Operating System
Troubleshooting Nvidia drivers: Updating
Symptom
The tracking engine will boot past the Trackmen operating system loading screen but the monitor output will turn black after that
Tracking engine shows no output after OS installation
Tracking engine shows no output after GPU change
Note: This only applies if the tracking operating system does actually start. If the OS loading screen is not reached, refer to “Tracking engine does not boot” .
Checks
Tests that lead to this troubleshooting procedure are outlined in “Tracking engine boots but shows no output”. These steps apply when the GPU has been swapped to a more recent one (including older cards with new firmware) or when the Operating Systems default drivers fail to give an output after initial installation. If the engine stopped giving an output with the same GPU but after a driver update, please refer to “Troubleshooting Nvidia drivers: Downgrading” below.
Actions
In general, this behavior is caused by the display manager failing to start properly. It may mean that the system is still accessible by other means, which are:
-
Placing the older card back into the machine, to get the GUI back, then handling the driver as explained below.
-
Nomachine remote access: Open NoMachine on a computer in the same network and try connecting to the affected engine. (Nomachine is also a freeware and detects machines on when installed on any machine on the same network)
-
Consoles: Linux runs multiple command line consoles simultaneously. They can be switched between by pressing Ctrl + Alt + F-keys. The GUI usually runs on Ctrl + Alt + F7. The other consoles can be accessed when the display manager doesn’t work, and can be used to type commands.
If the GUI is accessible
-
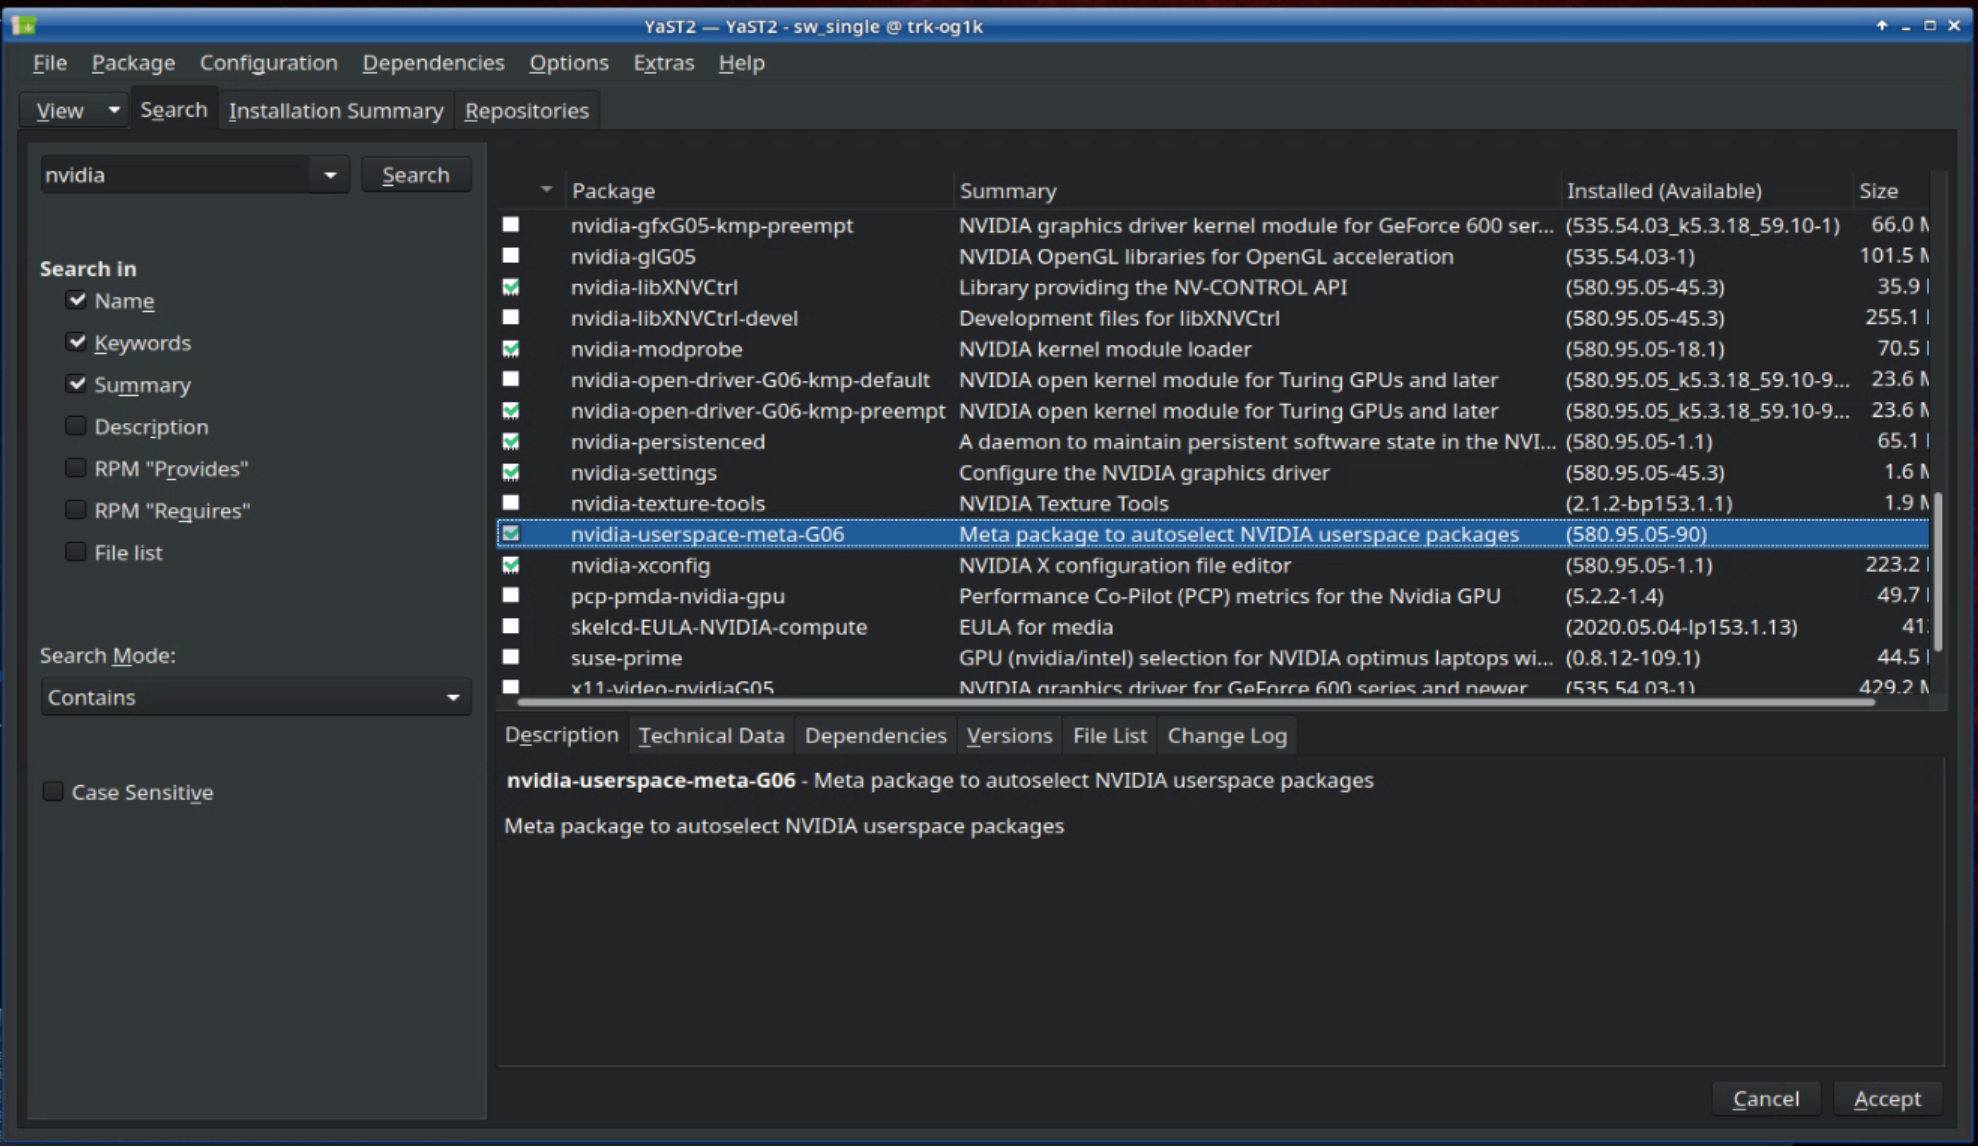
bring up the Software Manager. Learn more about the Software Manager here:Operating System | 4 Software Installation[inlineExtension] .
-
For updating, enter the search term “Nvidia” and find the package nvidia-userspace-meta-G06 (status: January 2026) to choose the correct package. Click the checkbox next to the package until it shows either a green checkmark (that means that a previous package with a different name is currently installed) or a green arrow (that means the package is installed but will be updated). A window is likely to pop up, asking you for a conflict resolution. Choose to install, making the suggested changes. Do not choose to not install or even to break the package. Other packages will also appear with green checkmark/green arrow, or with a red X. These are changed due to dependencies.
-
For a rollback to an older driver, select the package, then switch to the Versions tab below the package list. Select a different version and proceed as explained above.
-
Click Accept to install, wait for the process to finish, then click Finish and reboot the engine.
-
Tools and Utilities
Can't log into License Manager
Symptom
License Manager won’t accept login credentials
License Manager fails to connect
License Manager is not working
Check
-
Has the system recently been updated? Frequently, it just needs to be rebooted after a License Manager or Nvidia driver change, to (re-)launch all services.
-
Double-check both the network connection and the login credentials. Sometimes typos slip in because of keyboard settings and similar factors.
Action
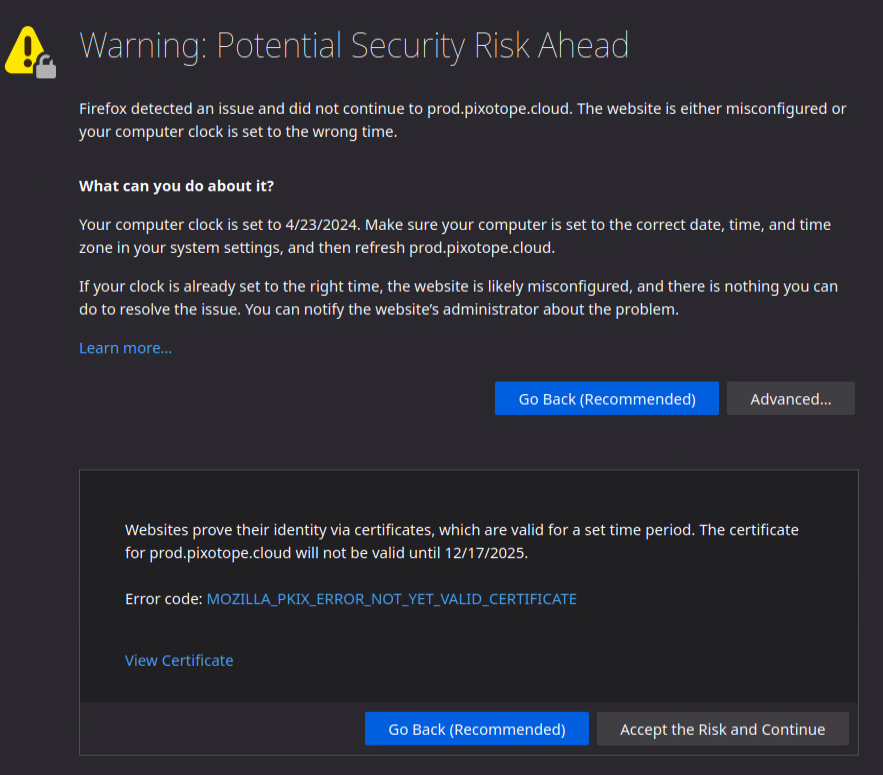
Bring up the browser on the machine and try to log into the Pixotope cloud on https://prod.pixotope.cloud. This will both test your login credentials and the internet connection. Mind that the browser reporting a non-valid certificate (see image) can be an indicator for the system date being off!
-
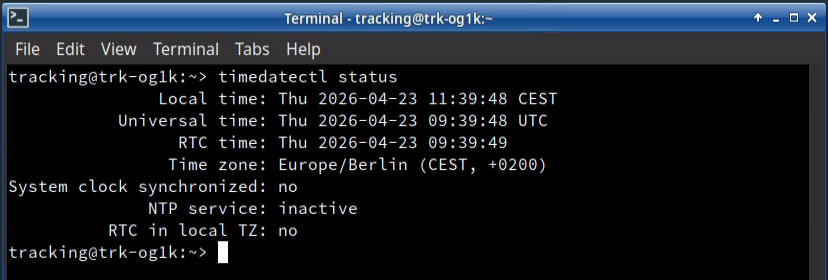
Check the system clock; are time and date correct? In order to double-check, you may use the terminal command
timedatectl status
Action
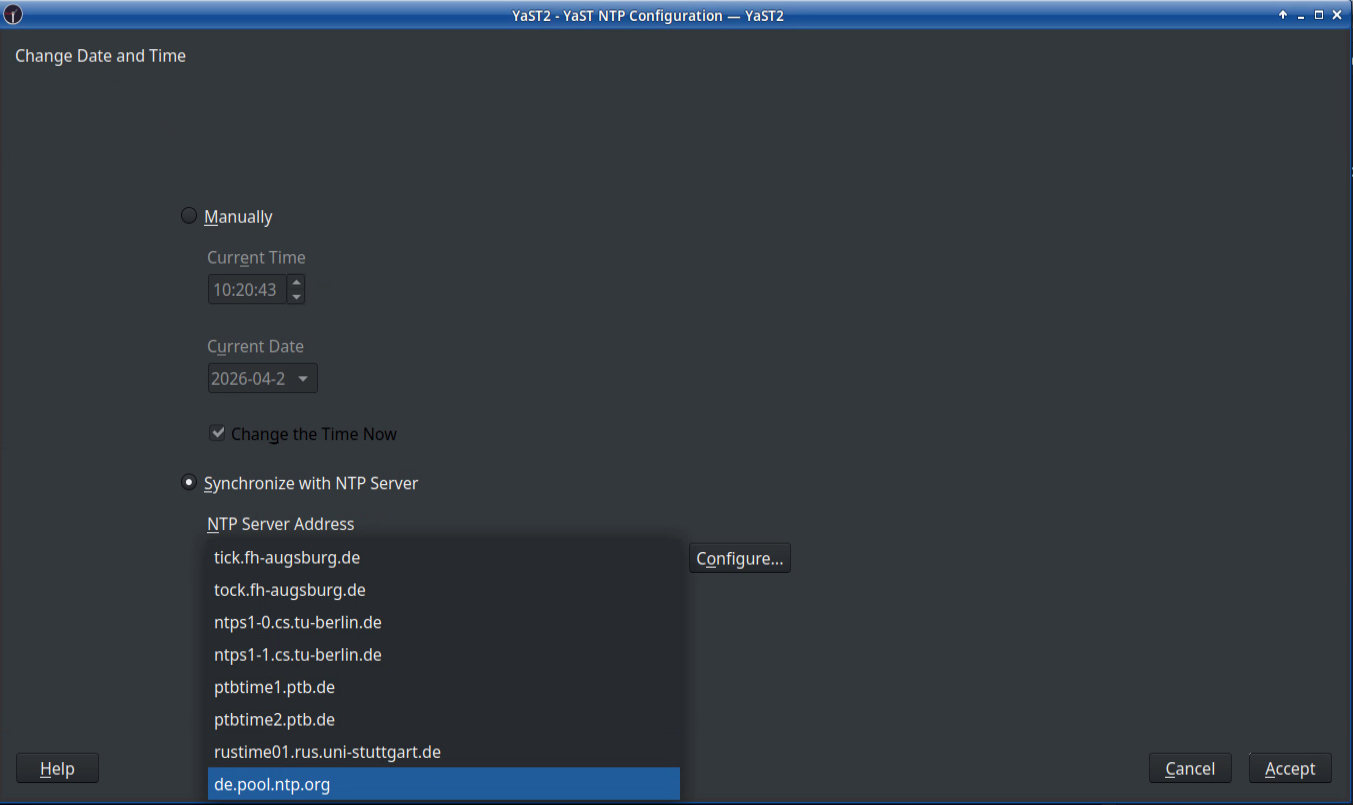
To set the clock correctly, go to the time and date settings from the startmenu:
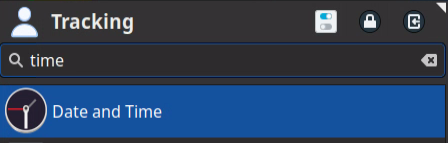
In the window coming up, set the region and time zone to match your location, then click Other Settings… on the lower right of the window. Then, if your engine is offline, select Manually and enter the correct time and date. If the engine is online, you may select to synchronize it with an NTP server, for example pool.ntp.org. Finally, Accept the changes.
-
Make sure the network connection is free of incongruities. There should be only one network connection going through the same router, the DNS server must make sense and there should be no connections to faulty networks or “bridge” Network connections in the list.
License Manager doesn't display my license
Symptom
Can’t select my license in the License Manager
Released a license in the Cloud but it doesn’t appear in the License Manager
License Manager logs in but doesn’t display any licenses
Check
-
Check the system clock; are time and date correct? In order to double-check, you may use the terminal command
timedatectl status
Action
To set the clock correctly, go to the time and date settings from the startmenu:
In the window coming up, set the region and time zone to match your location, then click Other Settings… on the lower right of the window. Then, if your engine is offline, select Manually and enter the correct time and date. If the engine is online, you may select to synchronize it with an NTP server, for example pool.ntp.org. Finally, Accept the changes.
-
Has the license only just been released in the cloud, rather than the License Manger?
Sensor Unit (Worker) and SCB
No live video in Vision/Marker/GhosTrack Worker
Symptom
There is no live video in the Worker after setting it up according to Worker | 2.1 Video input and Worker | 3.1 Worker Video or Signal Collector Box (SCB) respectively.
The video in the Worker is frozen and doesn’t move
The area for the Worker video in the Worker main window is empty
This article is about connection to a Sensor Unit. For Pixotope Fly, please check “No video in Fly Worker” below.
Note
If the connection to the sensor unit or the power for the sensor unit gets interrupted, the video in the Worker will freeze, at default settings, and only be live again after restarting the image source or restarting the Worker.
If the video window is there after restarting the image source, but it is merely black, the Worker should get an image but it is actually black. In that case, check the iris, brightness software setting an potentially infrared light of the camera/sensor unit.
No video signal in the worker is very rarely resulting from a broken sensor unit. More often than not the cables connecting the sensor unit camera feed to the engine are at fault, or some misconfiguration may have happened. Follow these actions in order to efficiently troubleshoot a sensor unit that does not show video feed.
Check
-
Is the camera powered? There are 2 small red and green lights on the back of each sensor unit which will reveal if the Sensor Unit has power.
-
Is the camera recognized as a network device when connected to the tracking engine? Disconnect and re-connect the cable on the engine side. The System Log should display messages about the connection, also referring to the NIC (for example eth1) when doing so. Note that these messages can be checked for on both tracking engine and an SCB.
-
Cables: the vast majority of connection failures is due to the cable connection. The cable should be a high-quality cable and the connection a direct and exclusive connection, with no switch with other devices in between.
-
Check Worker Camera tab settings whether they are all as intended.
Action
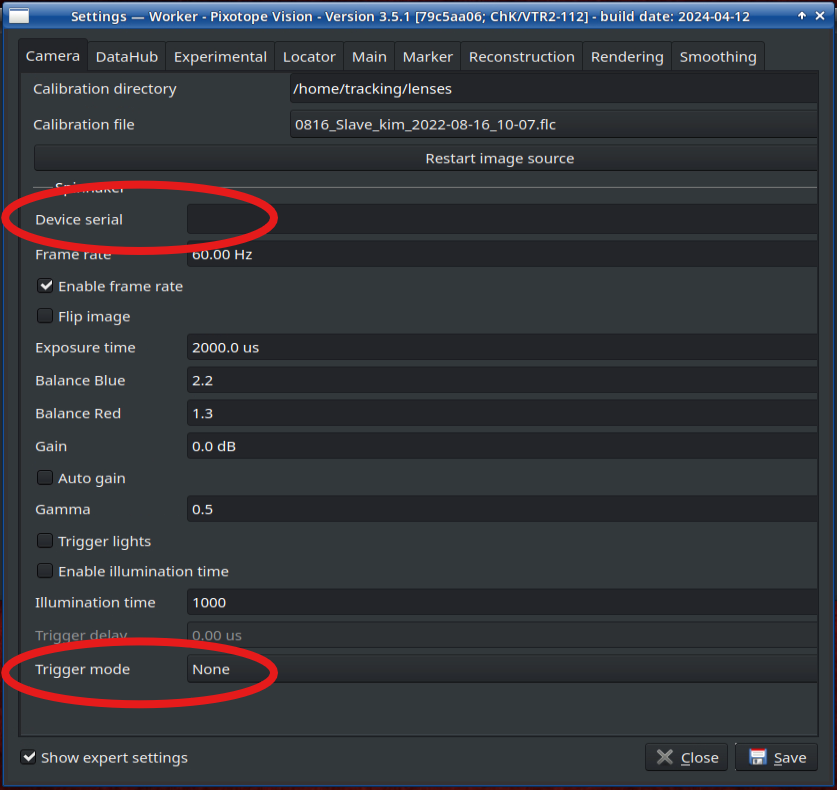
Two settings that can interrupt the camera connections are in the expert settings:
-
Device Serial: this entry should be empty.
-
Trigger Mode: this setting should be None for Vision and Marker edition and Hardware for GhosTrack. The hardware trigger will only work with a GhosTrigger box that has a valid Genlock input.
-
For more debugging, individual programs for the sensor unit’s cameras may be checked.
Can not connect to the SCB
Symptom
The SCB cannot be reached remotely, although it has been set up according to Signal Collector Box (SCB) | 2.2.1 Network
The SCB does not appear in the Nomachine Maschines window or won’t connect when selecting it and clicking connect
Note
The SCB is configured to automatically negotiate the connection between itself and the tracking engine. For this, the ZeroConf connection is crucial, so please double check the setup steps linked above and make sure the ZeroConf connection has not been manipulated. Check Operating System | 6.2.1 ZeroConf Connection[inlineExtension] for this.
Check
-
The SCB will indicate power supply with a green light. It will also show an active network connection visible on the lights on the respective port.
-
Is the Nomachine main window refreshed? Is the issue persistent after restarting Nomachine?
Action
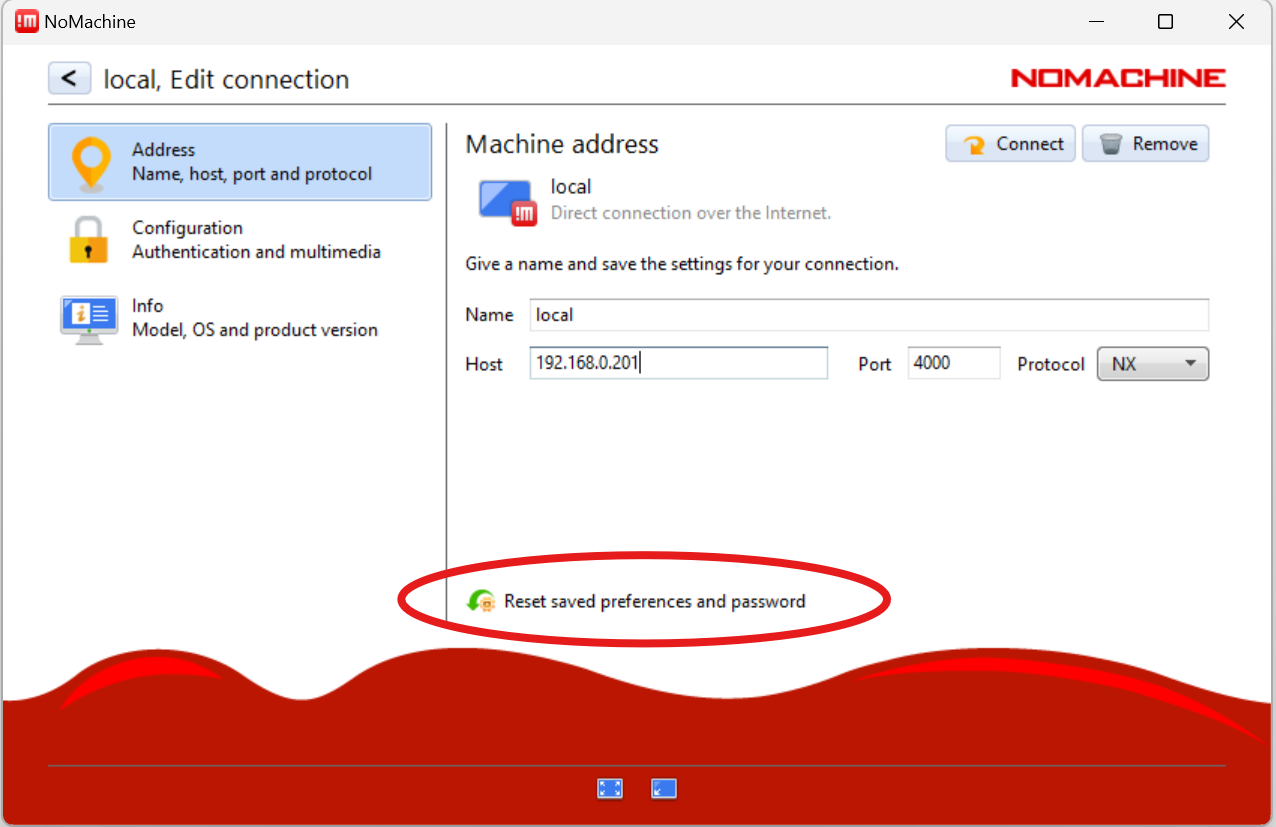
Nomachine might not have registered a change in IP addresses after for example rebooting the SCB. Restarting Nomachine should refresh it. Do not edit the connection to manually enter an IP - it will change that connection permanently while the IP might change later! If this has been done, it is possible to reset the Nomachine connection settings by selecting the connection and clicking Edit. In the Edit connection window, click Reset saved preferences and password:
-
Is the connection issue persistent after restarting the SCB (power off - power on) and after restarting the tracking engine?
Zoom Lens Data, Focus and Distortion
No zoom / lens data from Canon / Fujinon zoom lens with internal encoders
Symptom
Graphics don’t change when zooming in/out or focusing
Zooming in does not zoom in on the cuboid in the tracking engine
Zoom lens is not tracked even though the hardware setup Setup Checklist | 1. Hardware Setup and software setup Chief | 3 Setup and/or Signal Collector Box (SCB) | 2.2.2 SCB Software was completed correctly
Note: The TrackMen camera tracking protocol sends the full ready-to-use lens data (field of view or focal length, distortion and other parameters). This is the standard use case. If a FreeD sender is used, the tracking can only send raw data for zoom and focus (encoder count) and details that include data from the lens file explained below will not apply.
Checks
-
Does this apply to both graphics in the render engine and in the tracking engine Chief?
-
Is lens data coming into the tracking engine? Go to the Chief window and switch to the Lens tab. Check the Dump Parameters option and check the live lens data in the System Log.
-
Is the lens file being read correctly and are zoom lenses authorized? When starting the Chief, check the System Log for messages. When using an SCB, connect to it via Nomachine and check for the same messages in the SCB system log after restarting the SignalCollector. Possible messages in connection with zoom lenses are:
-
Engine "lensSerial" -> status changed to 2 -> "Failed to specify serial device for engine lensSerial" -
Engine "DigitalDrive" -> status changed to 2 -> "No connection to lens" -
Engine "zoomLens" -> status changed to 2 -> "READING ZOOM LENS FILES IS NOT LICENSED" -
Engine "zoomLens" -> status changed to 2 -> "Failed to read lens file
-
Action
The respective system log messages can give clues:
a. The serial-USB-converter has not been found. Possibly it is connected to a faulty USB port?
b. This message means that there is no connection to the lens in general. Refer to point 2 if it does not go along with other system log messages listed here.
c. There is no active Vision or Marker license checked out in the License Manager. After checking out the license, restart the Chief to apply the change.
d. The .zlc lens file can not be read correctly by the system. If it is an old lens file, it may be bound to a specific dongle. It may also be corrupted during download or file transfer. Try re-downloading the lens file from the cloud, in Downloads → Tracking → Lens Files. When using FileZilla for the file transfer to the tracking engine, make sure to set the Transfer type to Binary.

No zoom / lens data from external encoders
Symptom
Graphics don’t change when zooming in/out or focusing
Zooming in does not zoom in on the cuboid in the tracking engine
Zoom lens is not tracked even though the hardware setup External Encoders and software setup Chief | 3 Setup was completed correctly
Note: The TrackMen camera tracking protocol sends the full ready-to-use lens data (field of view or focal length, distortion and other parameters). This is the standard use case. If a FreeD sender is used, the tracking can only send raw data for zoom and focus (encoder count) and details that include data from the lens file explained below will not apply.
Checks
-
Does this apply to both graphics in the render engine and in the tracking engine Chief?
-
Is lens data coming into the tracking engine? Go to the Chief window and switch to the Lens tab. Check the Dump Parameters option and check the live lens data in the System Log.
-
Is the lens file being read correctly and are zoom lenses authorized? When starting the Chief, check the System Log for messages. When using an SCB, connect to it via Nomachine and check for the same messages in the SCB system log after restarting the SignalCollector. Possible messages in connection with zoom lenses are:
-
Engine "zoomSerial" -> status changed to 2 -> "Failed to specify serial device for engine zoomSerial"Engine "focusSerial" -> status changed to 2 -> "Failed to specify serial device for engine focusSerial"Engine "zoomQSB" -> status changed to 2 -> "QSB communication error"
Engine "focusQSB" -> status changed to 2 -> "QSB communication error" -
Engine "zoomLens" -> status changed to 2 -> "READING ZOOM LENS FILES IS NOT LICENSED" -
Engine "zoomLens" -> status changed to 2 -> "Failed to read lens file
-
Action
The respective system log messages can give clues:
a. The serial-USB-converter(s) can not be found. Possibly they are connected to a faulty USB port?
b. There is no active Vision or Marker license checked out in the License Manager. After checking out the license, restart the Chief to apply the change.
c. The .zlc lens file can not be read correctly by the system. If it is an old lens file, it may be bound to a specific dongle. It may also be corrupted during download or file transfer. Try re-downloading the lens file from the cloud, in Downloads → Tracking → Lens Files. When using FileZilla for the file transfer to the tracking engine, make sure to set the Transfer type to Binary.
Tracking Data and Precision
IMU Troubleshooting
Pixotope Fly