Check out the following examples:
-
PixotopeARSample level in the Pixotope Calibration project included in the installer
-
Pixotope example projects, which can be downloaded from the Pixotope cloud → login.pixotope.com
For functionality specific to the Unreal Editor and some in-depth knowledge, check out https://docs.unrealengine.com/en-us/Engine/Editor.
Academy Tutorial - Introduction to Augmented reality (AR)
This tutorial showcases an older version of Pixotope.
-
An introduction to Augmented Reality (AR)
Create a new show
If you already have a show you work on you can skip this step.
-
Go to START > Storage > Shows
-
Click on "Create new show", select "from template" and choose AR project
Learn more about how to Create, open and manage shows
Launch a level
In the Director
-
Go to SETUP or PRODUCTION > Show > Launch
-
Open the PixotopeARTemplate level by clicking on "Launch in EDITOR"
Learn more about how to Run levels in Edit, Preview Live and LIVE mode
Create a new empty level
You can reuse the PixotopeARTemplate level, or create a new empty level.
Learn more about how to Create level and set up color-managed viewport
Enable AR
-
In Director: Add the machine to the "AR" Render group in SETUP > Configure > Machines
-
OR In Editor: Set the Compositing Type to "AR" in Pixotope World Settings > General
On the video output (or when clicking "Preview Live" in the Editor) you should see your video input passed through onto the backplate.
Learn more about Render groups - AR, VS, AR+VS, XR and how to Configure machines
If you do not have a video live feed, enable "Use Debug Video Input" in Pixotope World Settings > General > Debug
No backplate visible on your video output?
Check SETUP > Configure > Routing, to see whether there is a camera system routed to the machine. Media inputs do not work as backplate, as they lack tracking data.
Add 3D assets
Any actor that you add to the scene will automatically be considered a foreground object and be composited on top of the video.
-
Add your 3D assets, or as an example choose "Pixotope Text Mesh" from the Modes > Pixotope panel
Scaling
When you add or import assets, remember to work in scale. The Unreal unit system is 1 unit = 1 meter.
Place asset
If your CameraRoot was matched correctly with the Studio origin, placing your asset in the scene is as easy as entering the measured values where the asset should be seen in the real world.
Video tutorial - Importing Assets
Set up lighting
-
Add a directional light
-
Place and rotate the light so it matches the key light in your studio
-
Make sure that "Cast Shadows" is enabled (Details panel > Light)
-
If your objects are moving, set the Mobility of the light to "Movable" (Details panel > Transform)
Set up shadows, reflections and lights
Add a shadow, reflection and light catcher
A shadow, reflection and light catcher only renders shadows, reflections and light that are cast onto it. The object itself is not visible.
-
Add a plane
-
Scale and place it to cover the floor and the shadows that the assets will cast
-
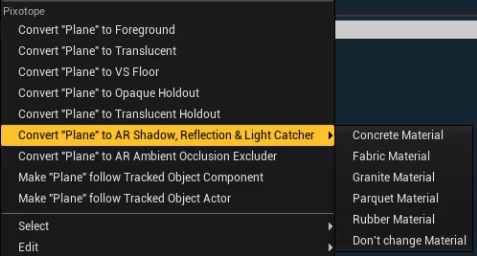
Right-click the plane and go to the Pixotope > Convert it to the "AR Shadow, Reflection & Light Catcher" object type
-
Choose between one of the material presets or the "Don’t change Material" option
Learn more about Object types in Pixotope
Learn more about AR light catcher
To cast reflections from video onto virtual objects, you can add the AR Reflected Plane actor from the "Pixotope" actor panel. This will play back the same video as the background, but on a plane that can be positioned in the scene.
If you choose to disable screen space reflections (as we recommend), a planar reflection actor should be added to the scene. You can learn more about setting up planar reflections in the Unreal documentation.
Planar reflection actors will add cost to the scene rendering and should be optimized. (To speed up processing, use the include list to choose which objects are rendered.)
Next step
Continue to Making adjustments
Or go directly to Adjust composite to match video and 3D graphics