An XR license is needed for
-
Rendering XR Walls
-
Showing the XR panel
-
Showing World settings > Pixotope XR Compositing
For functionality specific to the Unreal Editor and some in-depth knowledge, check out https://docs.unrealengine.com/en-us/Engine/Editor.
Check out the following guide How to set up an XR production with set extension
Preparation
Follow the initial steps from Set up a VS level:
-
Create a new show
-
Make sure you are working in Video space
-
In Director check: SETUP > Show > Show settings > Compositing color space
-
-
Launch the level
-
Go to the Editor
-
Create a new empty level
-
Create a virtual scene
-
Add or import your 3D assets
Virtual set extension
If you plan an additional virtual set extension, separate the graphics and XR content using a level streaming setup.
Learn more about how to Set up a virtual set extension with translucent holdouts
Add XR wall
Add XR wall actors for all real world LED screens.
-
Add an "XR wall" to the level from Place Actors > Pixotope
-
Position and scale the XR wall to align with the real world LED walls
-
Enable WYSIWYG to make aligning the walls easier
-
Academy Tutorial - XR Manual Alignment
-
Learn how to align the XR walls in Pixotope with the physical LED wall
Convert pre-made meshes to XR walls
Often aligning the 3D XR wall with the physical LED wall is difficult. Our creative engineers have created a tool that allows you to convert any mesh, or multiple meshes, into XRWall actor(s). Technically we create an XR wall for each mesh quad.
If your mesh is properly measured to represent your physical LED setup (from a CAD drawing or .obj file for example), the setup should only take minutes.
-
Import mesh(es) into your level
-
Right click the selection
-
Select “Generate XR walls from Actors”
-
Use the following menu to fine-tune the generation
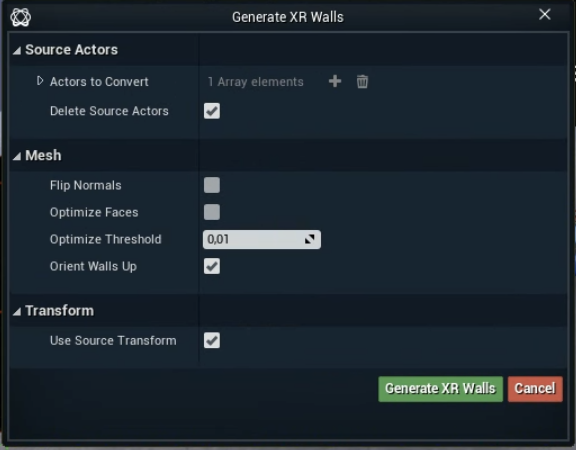
-
if your XR walls are facing the wrong way, toggle “Flip Normals”
-
“Optimize Faces” will collapse faces that share vertices and have a similar normal direction. See the following gif for an example
-
“Optimize Threshold” is for the normals' value. By default this value is almost touching, but can be manipulated if the normals are at all shifted
-
Choose output position
From Director
-
Go to the "XR wall settings" tab in PRODUCTION > Adjust > XR
-
Select the XR wall
-
Set the "Output position"
OR from Editor
-
Select the XR wall
-
G to the "XR" section in the "Details" panel
-
Set the "Output Position"
Learn more about XR Walls and their settings
Enable XR rendering
From Director
-
Go to the "General" tab in PRODUCTION > Adjust > XR
-
Enable "Output XR"
OR from Editor
-
Go to the "Pixotope XR Compositing" section in the "World Settings"
-
Enable "Enable XR"
To output the XR wall texture(s) also in the viewport and the computer monitor when in live mode, change the "Visualization Mode" in World Settings > Pixotope World from "Normal" to "Off-axis texture".
When using virtual camera moves, make sure to enable "XR From Current Camera" in World Settings > Pixotope XR Compositing.
To increase image quality using NVIDIA's DLSS go to PRODUCTION > Adjust > Effects > Image up/down sampling.
For supported graphics cards and more details see Using NVIDIA DLSS
Adjust XR
Learn more about how to Adjust XR
Enable multi-machine syncing
In multi-machine setups with
-
more than 1 XR machine
-
a virtual set extension
enable multi-machine syncing.
Learn more about Configure multi-machine syncing